Increase the capacity of your ExtraHop recordstore cluster in VMware
The ExtraHop virtual recordstore for VMware is available in four configurations, each with maximum memory and datastore sizes. If your infrastructure outgrows your current recordstore cluster capacity, there are three ways to increase the capacity. You can add more nodes to an existing cluster, you can create a new cluster with all new higher-capacity nodes (data is not preserved), or you can replace your existing nodes with virtual appliances that have larger capacity than your existing virtual appliances and preserve your existing data.
- Deploy the new larger-capacity recordstores
- Disconnect the existing recordstore cluster from any connected ExtraHop packet sensors and consoles
- Add one newly-deployed recordstore to the existing recordstore cluster
- Wait for your data to be reallocated throughout the new recordstore cluster
- Remove the older, smaller-capacity recordstore node
- Repeat this process for additional new nodes
- Connect the new recordstore cluster to the sensors and consoles
If you simply want to add more nodes that have the same specifications as the existing nodes in your recordstore cluster, see our Deploy the ExtraHop recordstore with VMware guide.
| Important: | If you are creating a recordstore cluster with six to nine nodes, you must configure the cluster with at least three manager-only nodes. For more information, see Deploying manager-only nodes. |
To replace an existing cluster with larger-capacity nodes where you do not need to preserve the existing stored records, you similarly deploy new nodes and create a new cluster. You disconnect the existing cluster from any sensors or consoles, and then connect the new cluster to your sensors or consoles.
Before you begin
- Ensure that all appliances in the recordstore cluster have the same appliance specifications. Disparate node types are allowed only during a migration procedure.
- You must register every new recordstore with a product key before you can add the appliance to the recordstore cluster.
- Depending on the number of nodes and the amount of data stored in the recordstore cluster, it can take up to a week after you change the replication level or remove an recordstore node from the cluster for all indices to display a Green status.
Deploy the new recordstores in VMware
Disconnect all recordstore nodes
This procedure stops any new data from being sent and stored on the recordstore cluster that will be replaced.
Before you begin
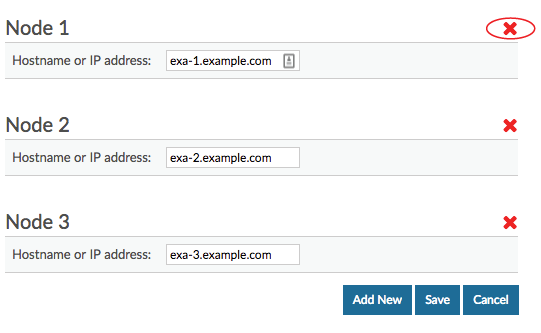
If the recordstore connections are managed from a console, you must perform this procedure from the console instead of from each sensor.-
Click the delete icon (X) next to each recordstore
node.
Change the replication level on the recordstore cluster
This procedure ensures that data is replicated across the new nodes correctly and quickly.
- Log in to the Administration settings on one of the nodes in the recordstore cluster.
- In the Recordstore Cluster Settings section, click Cluster Data Management.
- In the Replication section, from the Replication Level drop-down list, select 1, and then click Update Replication Level.
- If Shard Reallocation is OFF, click Enable Shard Reallocation.
- Return to the Status and Diagnostics section and click Cluster Status.
- Wait for all of the Status fields in the Indices table to display Green before continuing to the next procedure.
Join the new recordstore node to the existing cluster
In this procedure, you will join one of the new recordstore nodes to the existing cluster. Do not join multiple new nodes at this stage.
Remove the old recordstore node from the existing cluster
In this procedure, you will remove the recordstore node you are replacing. Do not remove multiple nodes at once.
Thank you for your feedback. Can we contact you to ask follow up questions?