Deploy the ExtraHop packetstore with VMware
This guide explains how to deploy the ExtraHop virtual packetstore (ETA 1150v and ETA 6150v) on the VMware ESXi/ESX platform.
Virtual machine requirements
Your environment must meet the following requirements to deploy a virtual packetstore:
- An existing installation of VMware ESX or ESXi server version 6.5 or later capable of
hosting the virtual packetstore. The virtual packetstores have the following resource
requirements:
ETA 1150v ETA 6150v 2 vCPUs 18 vCPUs 16 GB RAM 64 GB RAM 4 GB system disk 4 GB system disk 250 GB for a second system disk
1 TB for a packetstore disk You can reconfigure the disk size between 50 GB and 4 TB before deploying, if desired.
Packetstore disk You must manually add a third virtual disk between 1 TB and 25 TB at the time of deployment to store packet data. You can add up to 16 virtual disks to increase storage capacity and performance of the packetstore. The total capacity of all disks cannot exceed 25 TB.
The hypervisor CPU should provide Streaming SIMD Extensions 4.2 (SSE4.2) and POPCNT instruction support.
Follow these guidelines to ensure the virtual packetstore functions properly:
- If you want to deploy more than one virtual packetstore, create the new instance with the original deployment package or clone an existing instance that has never been started.
- Always choose thick provisioning. The ExtraHop packetstore requires low-level access to the complete drive and is not able to grow dynamically with thin provisioning.
- Do not change the default disk size after the packetstore is deployed. Size the virtual disk either smaller or larger than the default 1TB before deploying. We do not support changing the original disk size or adding additional disks after the virtual machine is deployed.
- Do not migrate the virtual machine from one host or storage location to another. Although it is possible to migrate when the datastore is on a remote SAN, ExtraHop does not recommend this configuration. If you must migrate the VM to a different host after deployment, shut down the virtual packetstore first and then migrate with a tool such as VMware VMotion. Live migration is not supported.
- For maximum performance and compatibility, deploy sensors and packetstores in the same datacenter.
Performance considerations
| Important: | The ETA 6150v is capable of capturing packets to disk at a throughput of 10 Gbps, but only with properly provisioned network and disk bandwidth. To achieve peak performance when capturing traffic from physical network interfaces, you must ensure that there is a 10 GbE physical NIC (or equivalent available bandwidth across multiple 10 GbE physical NICs) dedicated to the ETA 6150v. Similarly, you must ensure that 10 Gbps of disk bandwidth is allocated to the ETA 6150v. With HDDs, this disk bandwidth typically requires dedicating 12 or more disks to the virtual packetstore. Storage configurations with a small number of disks or with a large number of disks that are shared among multiple virtual packetstores are unlikely to sustain packet capture at 10 Gbps. |
Network requirements
| Packetstore | Intra-VM | External |
|---|---|---|
| ETA 1150v | One 1 Gbps Ethernet network port is required for management. A dedicated port is
not necessary. You can take advantage of the same physical NIC as other VMs in your
environment. The management port must be accessible on port 443. |
One 1 Gbps Ethernet network port for the physical port mirror. We recommend that you duplicate the feed of the traffic that is sent to the sensor to take advantage of the ExtraHop workflow. |
| ETA 6150v | A 1 Gbps Ethernet network port is required for management. A dedicated port is
not necessary. You can take advantage of the same physical NIC as other VMs in your
environment. The management port must be accessible on port 443. |
A 10 Gbps Ethernet network port for the physical port mirror. To achieve 10 Gbps
throughput, you must have 10 GbE or faster NIC ports in your ESXi server. We recommend that you duplicate the feed of the traffic that is sent to the sensor to take advantage of the ExtraHop workflow. |
Interface modes
| Interface | Interface mode |
|---|---|
| Interface 1 |
|
| Interface 2 |
|
| Interface 3 (ETA 6150v) |
|
| Interface 4 (ETA 6150v) |
|
- ERSPAN Type I
- ERSPAN Type II
- ERSPAN Type III
- Transparent Ethernet Bridging, which is an ERSPAN-like encapsulation commonly found in virtual switch implementations such as the VMware VDS and Open vSwitch.
Deploy the OVA file through the VMware vSphere web client
ExtraHop distributes the virtual packetstore package in the open virtual appliance (OVA) format.
Before you begin
If you have not already done so, download the OVA file for VMware from the ExtraHop Customer Portal.- Start the VMware vSphere web client and connect to your ESX server.
- Select the datacenter where you want to deploy the virtual packetstore.
- Select Deploy OVF Template… from the Actions menu.
-
Follow the wizard prompts to deploy the virtual machine. For most deployments,
the default settings are sufficient.
- Select Local file and then click Browse….
- Select the OVA file on your local machine and then click Open.
- Click Next.
- Review the virtual packetstore details and then click Next.
- Specify a name and location for the packetstore and then click Next.
- Select a resource location and then click Next.
- For disk format, select Thick Provision Lazy Zeroed and then click Next.
- Map the OVF-configured network interface labels with the correct ESX-configured interface labels and then click Next.
-
Verify the configuration and then complete the following steps:
- For the ETA 1150v
If you do not want to resize the packetstore disk, select the Power on after deployment checkbox and then click Finish to begin the deployment.
If you want to resize the packetstore disk:- Click Finish to begin the deployment. When the deployment is complete, select Edit Settings from the Actions menu.
- Type a new size in the Hard disk 2 field. The minimum disk size is 50 GB and the maximum is 4 TB.
- From the Actions menu, select .
- For the ETA 6150v
- From the Actions drop-down list, select Edit Settings... to configure the packetstore disk.
- From the New device drop-down list, select New Hard Disk, and then click Add.
- Type a size in the Hard disk 3 field. The minimum disk size is 1 TB and the maximum disk size is 25 TB.
- Specify a datastore for the packetstore disk. To help ensure that the Trace appliance can write packets at peak throughput without contention from other workloads, ExtraHop recommends that disk 3 be placed on a separate datastore than disks 1 and 2. The datastore must be backed by a high performance disk volume dedicated to the packetstore workload, and not shared with other virtual machines.
- In the Mode section, select Independent and then select Persistent.
- Repeat steps b through e to add additional packetstore disks.
- Click Finish to begin the deployment.
- Find the ETA 6150v virtual machine in the vSphere Web Client inventory.
- Right-click the virtual machine and click Edit Settings.
- Click VM Options and then click Advanced.
- Select Medium from the Latency Sensitivity drop-down menu.
- Click OK.
- From the Actions menu, select Power > Power on.
- For the ETA 1150v
- Select the virtual packetstore in the ESX Inventory and then select Open Console from the Actions menu.
- Click the console window and then press ENTER to display the IP address. DHCP is enabled by default on the virtual packetstore. To configure a static IP address, see the Configure a static IP address through the CLI section.
- Begin sending packets to your monitoring port or ports. Either connect a physical Ethernet port to the Monitoring Port through a virtual switch, or configure ERSPAN, RPCAP, or VXLAN sources to send traffic to the appropriate packetstore IP address.
Configure a static IP address through the CLI
The ExtraHop system is configured by default with DHCP enabled. If your network does not support DHCP, no IP address is acquired, and you must configure a static address manually.
| Important: | We strongly recommend configuring a unique hostname. If the system IP address changes, the ExtraHop console can re-establish connection easily to the system by hostname. |
- Access the CLI through an SSH connection, by connecting a USB keyboard and SVGA monitor to the physical ExtraHop appliance, or through an RS-232 serial (null modem) cable and a terminal emulator program. Set the terminal emulator to 115200 baud with 8 data bits, no parity, 1 stop bit (8N1), and hardware flow control disabled.
- At the login prompt, type shell and then press ENTER.
- At the password prompt, type default, and then press ENTER.
-
To configure the static IP address, run the following commands:
Configure the packetstore
Open a web browser and log in to the Administration settings on the packetstore through the configured IP address and complete the following procedures. The default login name is setup and the password is default.
- Register your ExtraHop system
- Connect sensors and console to the packetstore
- Review the ExtraHop Post-deployment Checklist and configure additional packetstore settings.
Connect sensors and console to the packetstore
Before you can query for packets, you must connect the console and all sensors to the packetstore.
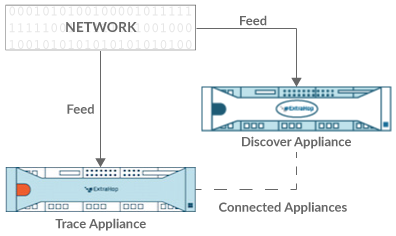
Connected to a sensor
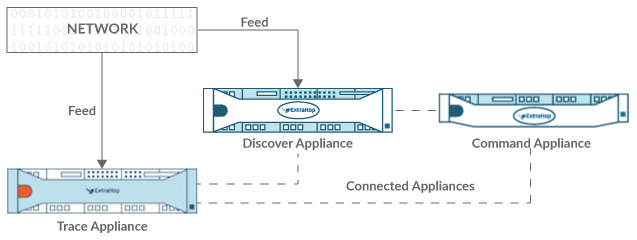
Connected to sensor and console
Verify the configuration
After you have deployed and configured the packetstore, verify that packets are being collected.
Before you begin
You must have a minimum user privilege of view and download packets to perform this procedure.-
Make sure that the Packets menu appears in the top
menu.

Thank you for your feedback. Can we contact you to ask follow up questions?