Deploy an ExtraHop recordstore in AWS

In this guide, you will learn how to launch the ExtraHop recordstore AMI in your Amazon Web Services (AWS) environment, and join multiple recordstores to create a cluster.

System requirements

Your environment must meet the following requirements to deploy a virtual recordstore in AWS:

  • An AWS account
  • Access to the Amazon Machine Image (AMI) of the ExtraHop recordstore.
  • An ExtraHop product key
  • An AWS instance type that most closely matches the sensor VM size, as follows:
    Recordstore Size Recommended Instance Type
    EXA 5100v Small m5.2xlarge (8 vCPU and 32 GB RAM)
    Medium m5.4xlarge (16 vCPU and 64 GB RAM)
    Large c5.9xlarge (36 vCPU and 72 GB RAM)
  • A datastore size between 200 GB and 2 TB, depending on the selected instance type.
    Instance Type Datastore size
    m5.2xlarge Between 200 GB and 500 GB
    m5.4xlarge Between 200 GB and 1 TB
    c5.9xlarge Between 200 GB and 2 TB

Create the recordstore in AWS

Before you begin

The Amazon Machine Images (AMIs) of ExtraHop recordstores are not publicly shared. Before you can start the deployment procedure, you must send your AWS account ID to your ExtraHop representative. Your account ID will be linked to the ExtraHop AMIs.
  1. Sign in to AWS with your user name and password.
  2. Click EC2.
  3. In the left navigation panel, under Images, click AMIs.
  4. Above the table of AMIs, change the Filter from Owned by Me to Private Images.
  5. In the filter box, type ExtraHop and then press ENTER.
  6. Select the checkbox next to the ExtraHop recordstore AMI and click Launch.
  7. On the Choose an Instance Type page, select the instance type sized for your deployment and then click Next: Configure Instance Details.
  8. In the Number of instances text box, type the number nodes in your recordstore cluster.
  9. Click the Network drop-down list and select the default setting or one of the VPCs for your organization.
  10. From the Shutdown behavior drop-down list, select Stop.
  11. Click the Protect against accidental termination checkbox.
  12. (Optional): Click the IAM role drop-down list and select an IAM role.
  13. (Optional): If you launched into a VPC and want to add more than one interface, scroll down to the Network Interfaces section and click Add Device to add additional interfaces to the instance.
    Note:If you add more than one interface, make sure that each interface is on a different subnet.
  14. Click Next: Add Storage.
    Note:Consult with your ExtraHop sales representative or Technical Support to determine the datastore disk size that is best for your needs.
  15. In the Size (GiB) field for the root volume, type the size of the storage volume. The minimum datastore size is 186 GiB (200 GB).
  16. From the Volume Type drop-down menu, select either Magnetic (standard) or General Purpose SSD (gp2). You must select General Purpose SSD (gp2) if you specify a size greater than 1024 GiB. GP2 provides better storage performance, although at a higher cost.
  17. Click Next: Add Tags.
  18. Click Add Tag.
  19. In the Key field, type a name for the tag.
  20. In the Value field, type a name for the instance.
  21. Click Next: Configure Security Group.
  22. On the Configure Security Group page, create a new security group or add ports to an existing group.
    If you already have a security group with the required ports for the ExtraHop system, you can skip this step.
    1. Select either Create a new security group or Select an existing security group. If you choose to edit an existing group, select the group you want to edit. If you choose to create a new group, type a name for the Security group and type a Description.
    2. Click the Type drop-down list, and select a protocol. Type the port number in the Port Range field.
    3. For each additional port needed, click the Add Rule button. Then click the Type drop-down list, select a protocol, and type the port number in the Port Range field.
      The following ports must be open for the recordstore AWS instance:
      • TCP port 443: Enables you to administer the recordstore from a web browser. Requests sent to port 80 are automatically redirected to HTTPS port 443.
      • TCP port 9443: Enables recordstore nodes to communicate within the same cluster.
  23. Click Review and Launch.
  24. Select Make General Purpose (SSD)...(recommended) and click Next.
    Note:If you select Make General Purpose (SSD)...(recommended), you will not see this step on subsequent instance launches.
  25. Scroll down to review the AMI details, instance type, and security group information, and then click Launch.
  26. In the pop-up window, click the first drop-down list and select Proceed without a key pair.
  27. Click the I acknowledge… checkbox and then click Launch Instance.
  28. Click View Instances to return to the AWS Management Console.

    From the AWS Management Console, you can view your instance on the Initializing screen.

    Under the table, on the Description tab, you can find an IP address or hostname for the recordstore that is accessible from your environment.

Configure the recordstore

After you obtain the IP address for the recordstore, log in to the Administration settings on the ExtraHop system through https://<extrahop-hostname-or-IP-address>/admin and complete the following recommended procedures.

Create a recordstore cluster

For the best performance, data redundancy, and stability, you must configure at least three ExtraHop recordstores in a cluster.

Important:If you are creating a recordstore cluster with six to nine nodes, you must configure the cluster with at least three manager-only nodes. For more information, see Deploying manager-only nodes.

In this example, the recordstores have the following IP addresses:

  • Node 1: 10.20.227.177
  • Node 2: 10.20.227.178
  • Node 3: 10.20.227.179

You will join nodes 2 and 3 to node 1 to create the recordstore cluster. All three nodes are data-only nodes. You cannot join a data-only node to a manager-only node or join a manager-only node to a data-only node to create a cluster.

Important:Each node that you join must have the same configuration (physical or virtual) and the same ExtraHop firmware version.

Before you begin

You must have already installed or provisioned the recordstores in your environment before proceeding.
  1. Log in to the Administration settings on all three recordstores with the setup user account in three separate browser windows or tabs.
  2. Select the browser window of node 1.
  3. In the Status and Diagnostics section, click Fingerprint and note the fingerprint value.
    You will later confirm that the fingerprint for node 1 matches when you join the remaining two nodes.
  4. Select the browser window of node 2.
  5. In the Explore Cluster Settings section, click Join Cluster.
  6. In the Host field, type the hostname or IP address of data node 1 and then click Continue.
    Note:For cloud-based deployments, be sure to type the IP address listed in the Interfaces table on the Connectivity page.
  7. Confirm that the fingerprint on this page matches the fingerprint you noted in step 3.
  8. In the Setup Password field, type the password for the node 1 setup user account and then click Join.
    When the join is complete, the Explore Cluster Settings section has two new entries: Cluster Members and Cluster Data Management.
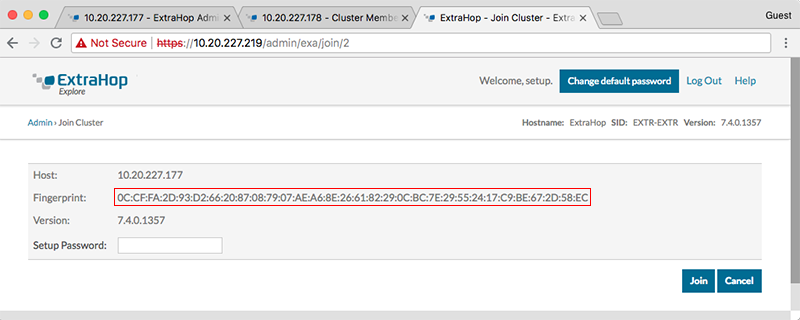
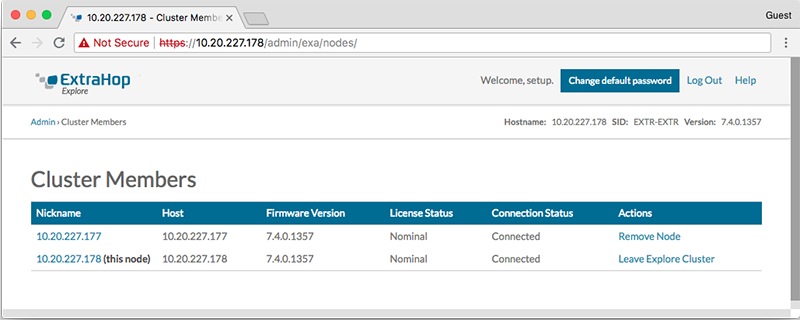
  9. Click Cluster Members.
    You should see node 1 and node 2 in the list.
  10. In the Status and Diagnostics section, click Explore Cluster Status.
    Wait for the Status field to change to Green before adding the next node.
  11. Repeat steps 5 through 10 to join each additional node to the new cluster.
    Note:To avoid creating multiple clusters, always join a new node to an existing cluster and not to another single appliance.
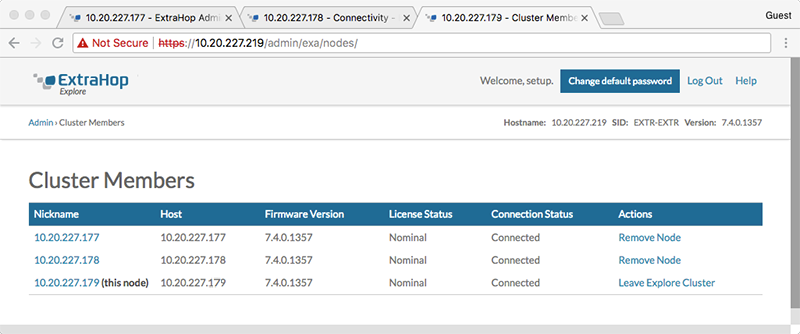
  12. When you have added all of your recordstores to the cluster, click Cluster Members in the Explore Cluster Settings section.
    You should see all of the joined nodes in the list, similar to the following figure.
  13. In the Explore Cluster Settings section, click Cluster Data Management and make sure that Replication Level is set to 1 and Shard Reallocation is ON.

Configure email notifications

You must configure an email server and sender before the recordstore can send notifications about system alerts by email.

You can receive the following alerts from the system:

  • A virtual disk is in a degraded state.
  • A physical disk is in a degraded state.
  • A physical disk has an increasing error count.
  • A registered recordstore node is missing from the cluster. The node might have failed, or is powered off.

Connect the recordstore to a console and all sensors

After you deploy the recordstore, you must establish a connection from the ExtraHop console and all sensors before you can query records.

Important:Connect the sensor to each recordstore node so that the sensor can distribute the workload across the entire recordstore cluster.
Note:If you manage all of your sensors from a console, you only need to perform this procedure from the console.
  1. Log in to the Administration settings on the ExtraHop system through https://<extrahop-hostname-or-IP-address>/admin.
  2. In the ExtraHop Recordstore Settings section, click Connect Recordstore.
  3. Click Add New.
  4. In the Node 1 section, type the hostname or IP address of any recordstore in the cluster.
  5. For each additional node in the cluster, click Add New and enter the individual hostname or IP address for the node.
  6. Click Save.
  7. Confirm that the fingerprint on this page matches the fingerprint of node 1 of the recordstore cluster.
  8. In the Explore Setup Password field, type the password for the node 1 setup user account and then click Connect.
  9. When the recordstore cluster settings are saved, click Done.

Send record data to the recordstore

After your recordstore is connected to your console and sensors, you must configure the type of records you want to store.

See Records for more information about configuration settings, how to generate and store records, and how to create record queries.
Last modified 2024-02-23