Configure ERSPAN with the Nexus 1000V

The Encapsulated Remote Switched Port Analyzer (ERSPAN) enables you to monitor traffic on multiple network interfaces or VLANs and then send the monitored traffic to one or more destinations. This guide explains how to configure ERSPAN on an ExtraHop Discover appliance with a Cisco Nexus 1000V switch that is running on a Windows machine.

This guide assumes that you are familiar with basic Cisco administration.

For more information, see the following documentation:

Configure the ExtraHop interface settings

Note:If you select Interface 1 for management and Interface 2 for ERSPAN, you cannot configure both interfaces on the same subnet.
  1. Log in to the Administration settings on the ExtraHop system through https://<extrahop-hostname-or-IP-address>/admin.
  2. In the Network Settings section, click Connectivity.
  3. In the Interfaces section, click Interface 1 or Interface 2.
  4. From the Interface Mode drop-down list, select Management + RPCAP/ERSPAN/VXLAN/GENEVE Target.
  5. To enable DHCP, select the checkbox.
  6. In the IP Address field, type the IP address that you want to assign to the ExtraHop port for ERSPAN traffic.
  7. In the Netmask field, type the netmask of the ExtraHop system.
  8. In the Gateway field, type the gateway IP address of the ExtraHop system.
  9. Click Save.
  10. (Optional): Disable the remaining interfaces, based on your configuration needs.
    Note:For more information about setting up network interfaces, see the Connectivity section of the ExtraHop Admin UI Guide.

Configure the Nexus 1000V settings

  1. Log in to your virtual supervisor module (VSM).
  2. Identify the virtual Ethernet hosts to monitor by running the following command:
    Switch# Show int virt
  3. Enter configuration mode by running the following command:
    Switch# config terminal
  4. Create a new monitor session (also know as a port mirroring session) by running the following command:
    switch(config)# monitor session 1 type erspan-source
  5. Configure the ExtraHop ERSPAN target IP address by running the following command:
    switch(config-erspan-src)# destination ip <ip-address>
    where <ip-address> is the destination IP address for your ERSPAN target.
  6. Set an ERSPAN ID by running the following command:
    switch(config-erspan-src)# erspan-id <integer>

    where <integer> is the ID number, such as 1.

  7. Set the MTU to 9000 by running the following command:
    switch(config-erspan-src)# mtu 9000
    Note:To minimize the chance of drops, be sure to change the default Nexus 1000V MTU from 1500 to 9000. In addition, consider turning off TCP segmentation offloading on the operating systems involved in forwarded communication.
  8. Add data sources by running the following command:
    switch(config-erspan-src)# source <sources>

    where <sources> are the sources for your data.

    1. In the following example, data is taken from a guest:
      switch(config-erspan-src)# source interface vethernet 3-5 both

      In this example, both means that the VM is sending and receiving data.

    2. In the following example, data is taken from all traffic received by the VLAN:
      switch(config-erspan-src)# source vlan 1010 rx
  9. Enable the monitoring session by running the following command:
    switch(config-erspan-src)# no shut
  10. Exit from the ERSPAN source and return to configuration mode by running the following command:
    switch(config-erspan-src)# exit
  11. Exit config mode and return to the enable prompt by running the following command:
    switch(config)# exit
  12. Save your changes by running the following command:
    switch# copy running-config startup-config
  13. Check the settings by running the following command:
    switch# show monitor session 1
    In the following example, a functioning monitoring session is displayed:
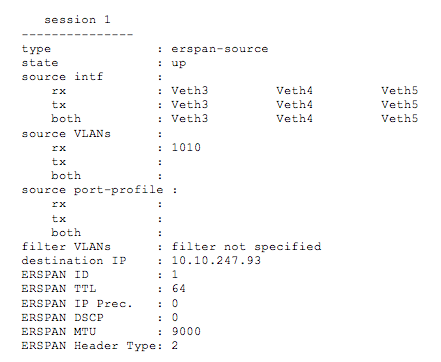
Next steps

Log in to the ExtraHop system through https://<extrahop-hostname-or-IP-address> and view the monitored traffic.
Last modified 2024-02-28