Collect traffic from NetFlow and sFlow devices

You must configure network interface and port settings on the ExtraHop system before you can collect NetFlow or sFlow data from remote flow networks (flow exporters). Flow networks cannot be configured on Reveal(x) Enterprise systems. The ExtraHop system supports the following flow technologies: Cisco NetFlow v5 and v9, AppFlow, IPFIX, and sFlow.

Note:For information on the EFC 1292v NetFlow sensor virtual appliance, see Deploy the ExtraHop EFC 1292v NetFlow Sensor.

You must log in as a user with System and Access Administration privileges to complete the following steps.

Configure the interface on your ExtraHop system

In addition to configuring the ExtraHop system, you must configure your network devices to send sFlow or NetFlow traffic. Refer to your vendor documentation or see the sample Cisco configurations at the end of this document. Note that Cisco ASA firewalls with NetFlow Secure Event Logging (NSEL) are not supported.
  1. Log in to the Administration settings on the ExtraHop system through https://<extrahop-hostname-or-IP-address>/admin.
  2. In the Network Settings section, click Connectivity.
  3. In the Interfaces section, click the name of the interface that should receive the flow data.
  4. From the Interface Mode drop-down list, select Management + Flow Target.
    Note:The EDA 1100v must be configured for either flow data or wire data because this sensor cannot process flow data and wire data simultaneously. If the sensor is configured for flow data, you must set the monitoring port to Disabled.
  5. If Enable DHCPv4 is selected, click Save.
    Otherwise, configure the remaining network settings and then click Save.

Configure the flow type and the UDP port

  1. Log in to the ExtraHop system through https://<extrahop-hostname-or-IP-address>.
  2. In the Network Settings section, click Flow Networks.
  3. In the Ports section, from the Port field, type the UDP port number.
    The default port for Net Flow is 2055, and the default port for sFlow is 6343. You can add additional ports as needed for your environment.
    Note:Port numbers must be 1024 or greater
  4. From the Flow Type drop-down menu, select NetFlow or sFlow.
    For AppFlow traffic, select NetFlow.
  5. Click the plus icon (+) to add the port.
  6. Save the running configuration file to preserve your changes by clicking View and Save Changes at the top of the Flow Networks page.
  7. Click Save.

Add the pending flow networks

You can now add pending flow networks.

Before you begin

You must log in as a user with System and Access Administration privileges to complete the following steps.
  1. Log in to the ExtraHop system through https://<extrahop-hostname-or-IP-address>.
  2. In the Network Settings section, click Flow Networks.
  3. In the Pending Flow Networks section, click Add Flow Network.
  4. Type a name to identify this flow network in the Flow Network ID field.
  5. Select the Automatic records checkbox to send records from this flow network to a connected recordstore.
  6. Select the Enable SNMP polling checkbox to enable SNMP polling.
  7. If you enable SNMP polling, select one of the following options from the SNMP credentials drop-down menu:
    • Inherit from CIDR. If you select this option, the SNMP credentials are applied based on the Shared SNMP Credentials settings.
    • Custom credentials. Select v1, v2, or v3 from the SNMP version drop-down list, and then configure the remaining settings for the specific polling type.
  8. Click Save.
The flow network appears in the Approved Flow Networks table. If you do not see the flow network, you can add it manually by clicking Add Flow Network in the Approved Flow Networks section and completing the information as described above.

View configured flow networks

After you configure your flow networks, log in to the ExtraHop system to view built-in charts and modify settings and configurations.

  1. Log in to the ExtraHop system through https://<extrahop-hostname-or-IP-address>.
  2. Click Assets, and then click Networks.
  3. Click the drop-down arrow next to the flow network name to see a list of flow interfaces and their attributes.
  4. Select the checkbox next to the flow network or interface name.
    From the top bar, you can create a chart, assign a trigger, assign an alert, rename the flow interface, and set the interface speed.
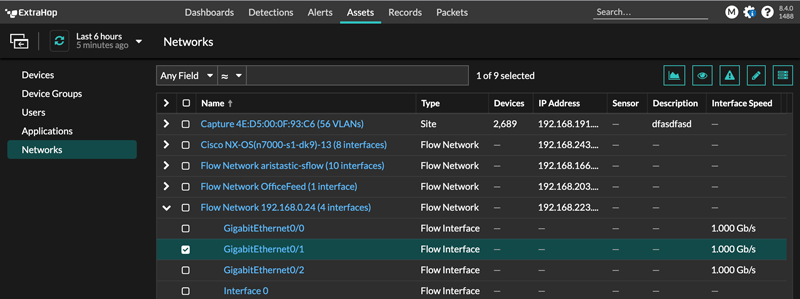
    Note:Each NetFlow record contains the interface index (ifIndex) of the reporting interface. The interface table (ifTable) is then polled by the ExtraHop system to obtain the interface speed (ifSpeed).
  5. Click the flow network name or flow interface name to view built-in charts on summary pages.
    From the summary pages, you can click the regions and charts and add them to a new or existing dashboard.

Configure Cisco NetFlow devices

The following examples of basic Cisco router configuration for NetFlow. NetFlow is configured on a per-interface basis. When NetFlow is configured on the interface, IP packet flow information is exported to the ExtraHop system.

Important:NetFlow takes advantage of the SNMP ifIndex value to represent ingress and egress interface information in flow records. To ensure consistency of interface reporting, enable SNMP ifIndex persistence on devices sending NetFlow to the ExtraHop system. For more information on how to enable SNMP ifIndex persistence on your network devices, refer to the configuration guide provided by the device manufacturer.

For more information on configuring NetFlow on Cisco switches, see your Cisco router documentation or the Cisco website at www.cisco.com.

Configure an exporter on the Cisco Nexus switch

Define a flow exporter by specifying the export format, protocol, and destination.

  1. Log in to the switch command-line interface and run the following commands.
  2. Enter global configuration mode.
    config t
  3. Create a flow exporter and enter flow exporter configuration mode.
    flow exporter <name>
    For example:
    flow exporter Netflow-Exporter-1
  4. (Optional) Enter a description.
    description <string>
    For example:
    description Production-Netflow-Exporter
  5. Set the destination IPv4 or IPv6 address for the exporter.
    destination <eda_mgmt_ip_address>
    For example:
    destination 192.168.11.2
  6. Specify the interface needed to reach the NetFlow collector at the configured destination.
    source <interface_type> <number>
    For example:
    source ethernet 2/2
  7. Specify the NetFlow export version.
    version 9

Configure Cisco switches through the Cisco IOS CLI

  1. Log in to the Cisco IOS command-line interface and run the following commands.
  2. Enter global configuration mode.
    config t
  3. Specify the interface, and then enter interface configuration mode.
    • Cisco 7500 series routers:
      interface <type> <slot>/<port-adapter>/<port>
      For example:
      interface fastethernet 0/1/0
    • Cisco 7200 series routers:
      interface <type> <slot>/<port>
      For example:
      interface fastethernet 0/1
  4. Enable NetFlow.
    ip route-cache flow
  5. Export NetFlow statistics, where <ip-address> is the Management + Flow Target interface on the ExtraHop system and <udp-port> is the configured collector UDP port number.
    ip flow-export <ip-address> <udp-port> version 5
Last modified 2024-01-22