Change a dashboard owner through the REST API

Dashboards are owned by the logged in user that created them. If a user is no longer with your company, you might need to change the owner of the dashboard to maintain that dashboard.

To transfer ownership of a dashboard, you need the dashboard ID and the username of the dashboard owner. You can only view the username of the owner of a dashboard through the REST API.

Before you begin

Retrieve the dashboard IDs

  1. In a browser, navigate to the REST API Explorer.
    The URL is the hostname or IP address of your sensor or console, followed by /api/v1/explore/. For example, if your hostname is seattle-eda, the URL is https://seattle-eda/api/v1/explore/.
  2. Enter your REST API credentials.
    • For sensors and ECA VMs, click Enter API Key and then paste or type your API key into the API Key field.
    • For RevealX 360, click Enter API Credentials and then paste or type the ID and secret of your API credentials into the ID and Secret fields.
  3. Click Authorize and then click Close.
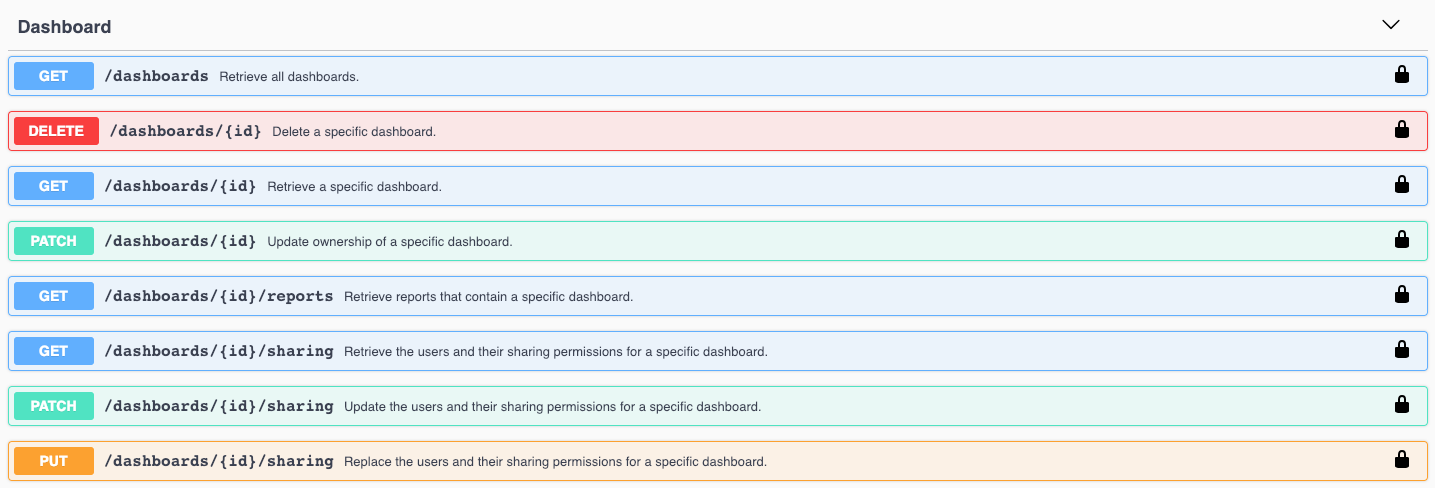
  4. Click Dashboard to display dashboard operations.
  5. Click GET /dashboards.
  6. Click Try it out and then click Send Request to send the request to your sensor or console.
  7. Search for the dashboards by the dashboard name or by the user account listed in the "owner" field. If your list of dashboards is long, you can press control-F and search the response body.
    For our example, we want to change the "LDAP Server Health" dashboard created by the user account for "marksmith":
    {
        "id": 1876,
        "comment": null,
        "mod_time": 1507576983922,
        "author": "Mark Smith",
        "name": "LDAP Server Health",
        "owner": "marksmith",
        "built-in": false,
        "short_code": "MpXgk",
        "rights": [
          "transfer",
          "view",
          "edit",
          "share",
          "delete"
        ]
    }
  8. Note the number in the "id" field for each dashboard you want to modify.

Change the dashboard owner

  1. Scroll down the page of Dashboard operations to the /dashboards/{id} section.
  2. Click PATCH /dashboards/{id}.
  3. Click Try it out.
    The JSON schema is automatically added to the body parameter text box.
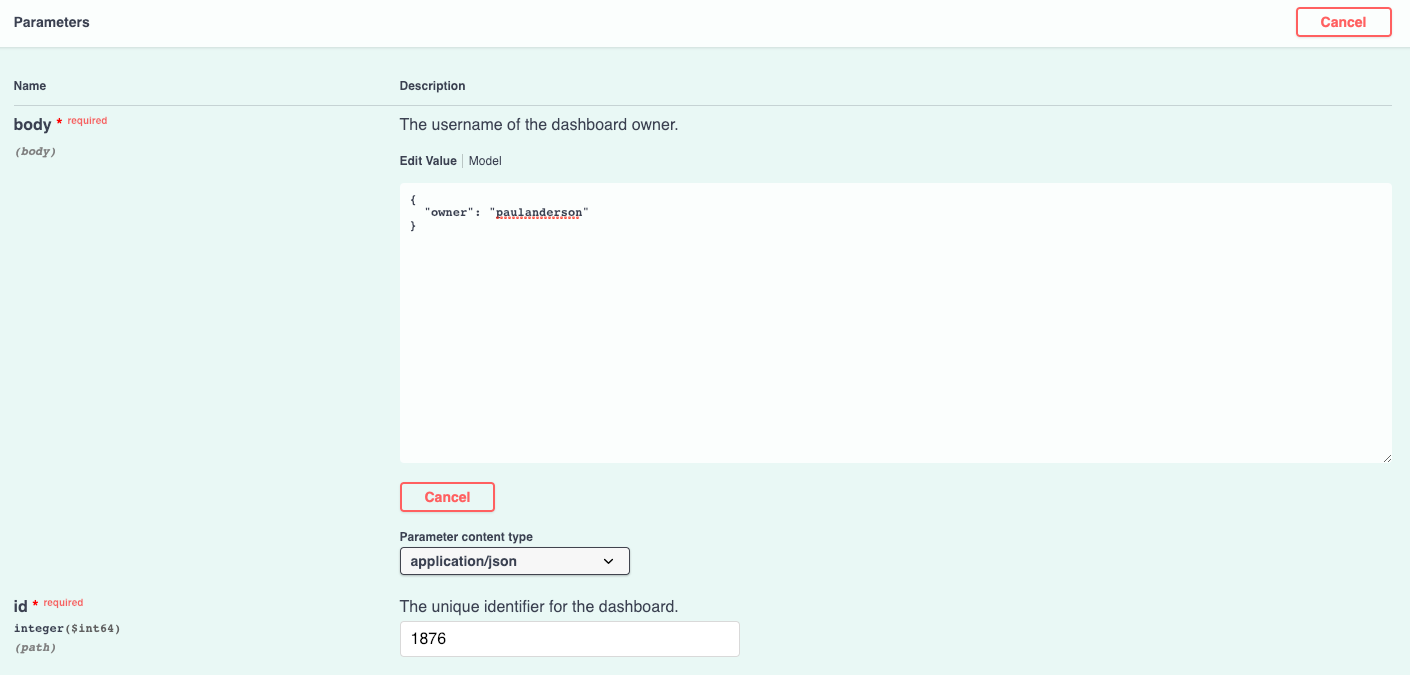
  4. In the body text box, in the "owner" field, replace string with the username of the new owner.
  5. In the id field, type the number you previously noted for the dashboard.
    For our example, this value is 1876. (You can only modify one dashboard at a time through the REST API Explorer.)
    In the following figure, we added the JSON "string" for the "owner" parameter to the body parameter text box, changed "string" to "paulanderson", and typed "1876" in the id field.
  6. Click Send Request to send the request to your sensor or console.
    Under Server response, the Code column displays 204 if the operation is successful. You can click GET /dashboards again to verify that the "owner" field has changed. Note that you can only change the dashboard owner. You cannot change the dashboard name or author fields through the REST API.

    The dashboard is now available under My Dashboards in the ExtraHop system for the new user. As the new owner, you can now log in to your ExtraHop system and change other dashboard properties, such as the dashboard name or author.

Tip:After you click Send Request, the REST API Explorer provides scripts for the operation in Curl, Python 2.7, or Ruby.

Python script example

The ExtraHop GitHub repository contains an example Python script that searches for all dashboards owned by a user account on a sensor or console and then changes the owner for all of those dashboards to another user account.

Important:The example python script authenticates to the sensor or console through an API key, which is not compatible with the RevealX 360 REST API. To run this script with RevealX 360, you must modify the script to authenticate with API tokens. See the py_rx360_auth.py script in the ExtraHop GitHub repository for an example of how to authenticate with API tokens.
  1. Go to the ExtraHop code-examples GitHub repository and download the change_dashboard_owner/change_dashboard_owner.py file to your local machine.
  2. In a text editor, open the change_dashboard_owner.py file and replace the following configuration variables with information from your environment:

    HOST: The IP address or hostname of the sensor or console.

    API_KEY: The API key.

    CURRENT: The username of the current dashboard owner.

    NEW: The username of the new dashboard owner.

  3. Run the following command:
    python3 change_dashboard_owner.py
    Note:If the script returns an error message that the TLS certificate verification failed, make sure that a trusted certificate has been added to your sensor or console. Alternatively, you can add the verify=False option to bypass certificate verification. However, this method is not secure and is not recommended. The following code sends an HTTP GET request without certificate verification:
    requests.get(url, headers=headers, verify=False)
Last modified 2024-09-04