Install the SSL Decryption Board

The following procedures explain how to install the SSL decryption card in an ExtraHop Discover appliance.

The SSL decryption board comes pre-installed in all new rack-mounted Discover appliance hardware.

Shut down the system

Before you open the Discover appliance, shut down the system and disconnect the appliance from the electrical outlet.

  1. Log in to the Administration settings on the ExtraHop system through https://<extrahop-hostname-or-IP-address>/admin.
  2. In the Appliance Settings section, click Shutdown or Restart.
  3. Click Shutdown.
  4. On the confirmation page, click Shut down.
  5. Disconnect the Discover appliance from the electrical outlet.

Remove the cover

The cover protects the components inside the Discover appliance and helps maintain internal air flow. Removing the cover actuates the intrusion switch, which helps maintain system security.
  1. Extend the Discover appliance from the data center rack.
  2. Rotate the latch release lock counter clockwise to the unlocked position.
  3. Lift the latch toward the back of the Discover appliance.
    The cover slides back and the tabs on the cover disengage from the slots on the chassis.
  4. Hold the cover on both sides, and lift the cover away from the Discover appliance.
    Warning:The internal drive installed in your Discover appliance might dislodge when you open the case. Make sure the drive is properly seated before reinstalling the cover.

Install the card

The SSL card must be installed in the correct slot to function correctly. The slots are labeled on the rear of the appliance.

  1. Unpack the SSL card.
  2. Determine the correct PCI slot for your Discover appliance model:
    Discover appliance Slot Number
    EDA 6200 2
    EDA 8200 2
    EDA 9200 8
    EDA 10200 8
    Note:There is no external port on the SSL card.
  3. Lift up the blue expansion card latch to remove the PCI slot cover.
  4. Holding the card by its edges, position the card so that the connector on the expansion card aligns with the expansion card connector on the riser.
  5. Insert the card-edge connector firmly into the expansion card connector until the card is fully seated.
  6. Close the expansion card latch.

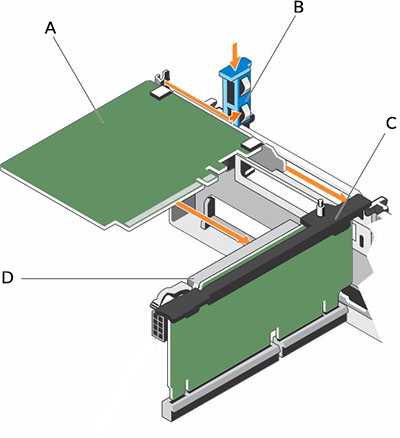
    Installing the SSL card into the expansion card riser in the EDA 9100

    Installing the SSL card into the expansion card riser in the EDA 9100
    A
    SSL decryption card
    B
    Expansion card latch
    C
    Expansion card riser
    D
    Expansion card connector

Install the cover

Important:Ensure that all internal cables are connected and placed out of the way and no tools or extra parts are left inside the Discover appliance.
  1. Align the slots on the cover with the tabs on the chassis.
  2. Push the cover latch down to move the system cover into the closed position.
    The cover slides forward and the tabs on the cover engage with the slots on the chassis. The cover latch locks into place when the cover engages with the slots on the chassis.
  3. Rotate the latch release lock clockwise to the locked position.
  4. Push the Discover appliance back into the rack.
  5. Plug the power cords into the electrical outlet and power the system on.
Last modified 2024-05-15