You can configure your ExtraHop system to enable users to log in to the system
through the Azure AD identity management service.
Before you begin
- You should be familiar with administering Azure AD.
- You should be familiar with administering ExtraHop systems.
These procedures require you to copy and paste information between the ExtraHop
system and Azure, so it is helpful to have each system open side-by-side.
In the following procedures, you will create an enterprise application, add users and
groups to the application, and configure single sign-on settings.
Create a new application
-
Log in to your Microsoft Azure portal.
-
In the Azure services section, click Enterprise
applications.
-
Click New application.
-
Click Create your own application.
-
Type a name for the sensor in the name field. This name appears for your
users on the Azure My Apps page.
-
Select Integrate any other application you don't find in the
gallery.
-
Click Create.
The application Overview page appears.
Add users and groups
You must assign users or groups to the new application before users can log in to
the ExtraHop system.
-
In the left pane, click Users and groups.
-
Click Add user/group.
-
Add your privileged users or groups and then click
Assign.
-
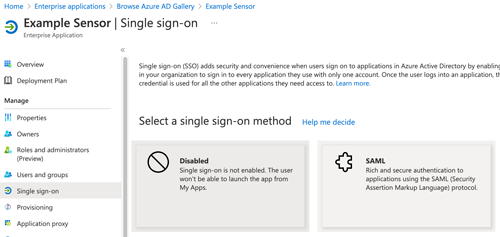
In the left pane, click Single sign-on.
-
Click SAML.
-
In the Basic SAML Configuration section, click
Edit.
-
Type or paste the Entity ID from the ExtraHop system into the Identifier
(Entity ID) field and select the Default checkbox.
You can delete the existing
http://adapplicationregistry.onmicrosoft.com/customappsso/primary
entry.
-
Type or paste the ACS URL from the ExtraHop system into the
Reply URL (Assertion Consumer Service URL) field.
-
Click Save.
-
In the Attributes & Claims section, click
Edit.
-
In the required claim section, click Unique User Identifier
(Name ID).
-
Click Choose name identifier format.
-
From the drop-down list, select Persistent.
-
Click Save.
-
In the additional claims section, delete the
user.mail claim from the list and replace the
default claim names with the following claim names:
| Claim name |
Value |
| urn:oid:2.5.4.4 |
user.surname |
| urn:oid:2.5.4.42 |
user.givenname |
| urn:oid:0.9.2342.19200300.100.1.3 |
user.userprincipalname |
-
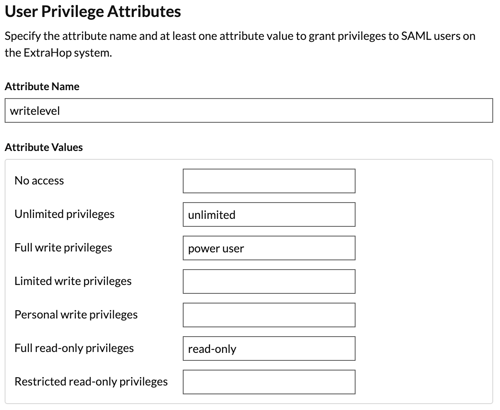
Click Add new claim.This claim enables users to
access the ExtraHop system with the assigned privileges. If a user is a
member of more than one group, the user is granted the most permissive
access privilege.
-
Type writelevel in the Name field. You can
type any name you want, but it must match the name you will
configure on the ExtraHop system.
-
Click Claim conditions.
-
From the User type drop-down list, select
Any.
-
Under Scoped Groups, click Select
groups, click the name of the group you want to add,
and then click Select.
-
Under Source, select
Attribute.
-
In the Value field, type
unlimited or a name of your choosing that
defines the privilege for this group. Repeat this step for each
group that you want to assign unique privileges to. In the example
below, we created a claim condition for two groups. One group is
assigned unlimited privileges and the other group is assigned
read-only privileges.
-
Click Save.
-
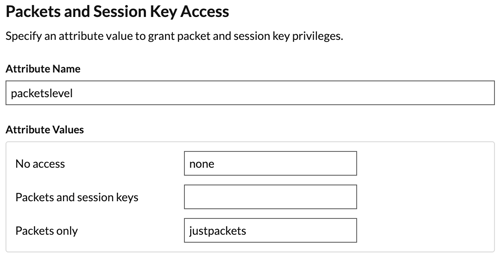
Return to the Attributes & Claims page and click Add new
claim. This claim assigns access to packets and session
keys.
-
Type packetslevel in the Name field. You
can type any name you want, but it must match the name you will
configure on the ExtraHop system.
-
Click Claim conditions.
-
From the User type drop-down list, select
Any.
-
Under Scoped Groups, click Select groups,
click the name of the group you want to add, and then click
Select.
-
Under Source, select Attribute.
-
In the Value field, type justpackets or a
name of your choosing that defines the privilege for this
group.


Thank you for your feedback. Can we contact you to ask follow up questions?