Add your own identity provider to RevealX 360
The RevealX 360 system includes a default identity provider (IdP) that enables you to manage your users who access the ExtraHop system. If your company already has an identity provider (IdP) that supports security assertion markup language (SAML) 2.0, you can configure the IdP to manage your users on the ExtraHop system.
To add your identity provider, you will map attributes for user identity and system access between your IdP and the ExtraHop system, and you will generate a metadata XML file that contains the IdP certificate and the attribute information.
| Tip: | These procedures require you to copy and paste information between the ExtraHop system and your IdP, so it is helpful to have each system open side-by-side. |
Prerequisites
Before adding your identity provider (IdP), review these considerations.
System and identity provider
Verify these system and IdP requirements:
- You must have an ExtraHop user account with System and Access Administration privileges to configure RevealX 360.
- Identity providers must meet the following criteria:
- SAML 2.0
- Support SP-initiated login flows. IdP-initiated login flows are not supported.
- Support signed SAML Responses
- Support HTTP-Redirect binding
- You must have a valid identity provider certificate. If the certificate expires,
single sign-on to the ExtraHop RevealX 360 console is disabled for all users
in your organization, and system configuration changes will fail.
Tip: The ExtraHop system automatically sends IdP certificate expiration notifications to all users with System and Access Administration privileges. Emails are sent 1 month, 2 weeks, and 1 week prior to the certificate expiration date. Obtain a new certificate from your identity provider and update your IdP configuration.
SAML responses
Ensure that all SAML responses meet these conditions:
- Responses by the SAML identity provider must contain an audience restriction.
For example:
<saml:AudienceRestriction>
  <saml:Audience>urn:amazon:cognito:sp:yourUserPoolID
</saml:AudienceRestriction>
- Responses must contain an InResponseTo element in the
Response object that matches the request ID in the
authentication request. For example:
<samlp:Response ... InResponseTo="originalSAMLrequestId">
- A SubjectConfirmationData attribute has
Recipient and InResponseTo values set. For
example:
<saml:SubjectConfirmation>
  <saml:SubjectConfirmationData … Recipient="https://yourUserPoolDomain/saml2/idpresponse" InResponseTo="originalSAMLrequestId">
</saml:SubjectConfirmation>
For more information on configuring single sign-on (SSO) authentication to the ExtraHop system through SAML identity providers, see Configure remote authentication through SAML.
Review RevealX 360 access types and privilege levels
There are four types of access, each with their own privilege levels, that you can grant to your users in RevealX 360: user privilege access, packets and session keys access, Network Detection and Response (NDR) module access, and Network Performance Management (NPM) module access.
Familiarize yourself with the following access types and their associated privilege levels. You will map attribute names between both systems in the procedures in this guide.
See User privileges to learn what users can do in each privilege level in RevealX 360.
- User privilege access
- Grants users read and write privileges throughout the system. There are 8 available privilege levels: system and access administration, system administration, full write, limited write, personal write, full read-only, restricted read-only, and none.
- Packets and session keys access
- Grants users the ability to view and download packet captures, with or without the ability to download session keys: No access, Packet slices only, Packet headers only, Packets only, or Packets and session keys.
- NDR module access
- Grants users the ability to view security detections and workflows: No access or Full access.
- NPM module access
- Grants users the ability to view network performance detections and workflows: No access or Full access.
If you only want to grant your users access to privilege levels for Full write and Full read-only, no packet access, and full detection access, create a worksheet similar to the following example:
| Access Type | Privilege Level Name in RevealX 360 | Attribute Value in your IdP |
|---|---|---|
| User privilege access | Full write | Full Write |
| User privilege access | Full read-only | Read-Only |
| Packets access | No access | None |
| NDR module access | Full access | Full NDR |
| NPM module access | Full access | Full NPM |
Add your IdP SAML application to RevealX 360
- Log into RevealX 360.
-
Click System Settings
 at the top right of the page and then click
All Administration.
at the top right of the page and then click
All Administration.
- Click User Access.
- Note the Assertion Consumer Service (ACS) URL and Entity ID, which you will paste into your IdP configuration.
- Paste the ACS URL from RevealX 360 into the ACS URL field on your IdP.
- Paste the SP Entity ID from RevealX 360 into the SP Entity ID field on your IdP.
Next steps
Leave the IdP settings open and configure attribute mappings next.Configure attributes that identify the user
You must configure attributes on your IdP that identify the user throughout the ExtraHop system by their first name, last name, and email address. Refer to your identity provider documentation for the correct property names when mapping these attributes or attribute statements.
- In the application attribute mapping section, add three attributes.
- In the first attribute, select email or similar. (For example, in Okta, this attribute is called user.email.)
- For the Service Provider, paste the following string: urn:oid:0.9.2342.19200300.100.1.3
- In the second attribute, select last name or similar. (For example, in Okta, this attribute is called user.lastName.)
- For the Service Provider, paste the following string: urn:oid:2.5.4.4
- In the third attribute, select first name or similar. (For example, in Okta, this attribute is called user.firstName.)
- For the Service Provider, paste the following string: urn:oid:2.5.4.42
| Service Provider Attribute Name (RevealX 360) | Identity Provider Attribute Name (Okta) |
|---|---|
| urn:oid:0.9.2342.19200300.100.1.3 | user.email |
| urn:oid:2.5.4.4 | user.lastName |
| urn:oid:2.5.4.42 | user.firstName |
Configure attributes for system access
You must configure attributes on your identity provider to grant users access to the ExtraHop system. You can type any name for these attributes, but they must match what you configure later in RevealX 360.
| Important: | Attribute values must be less than 2,000 characters. |
- In the application attribute mapping section, add four attributes.
- In the first attribute, select custom or similar and type a descriptive name for user privileges, such as writelevel.
- For the Service Provider, type a descriptive term to identify the attribute in RevealX 360, such as write.
- In the second attribute, select custom or similar and type a descriptive name for packet access, such as packetslevel.
- For the Service Provider, type a descriptive term to identify the attribute in RevealX 360, such as packets.
- In the third attribute, select custom or similar and type a descriptive name for NDR module access, such as ndrlevel.
- For the Service Provider, type a descriptive term to identify the attribute in RevealX 360, such as ndr.
- In the fourth attribute, select custom or similar and type a descriptive name for NPM module access, such as npmlevel.
- For the Service Provider, type a descriptive term to identify the attribute in RevealX 360, such as npm.
- Save the settings and then export the application metadata XML file.
| Service Provider Attribute Name (RevealX 360) | Identity Provider Attribute Name (IdP) |
|---|---|
| write | writelevel |
| packets | packetslevel |
| ndr | ndrlevel |
| npm | npmlevel |
Configure your identity provider information in RevealX 360
-
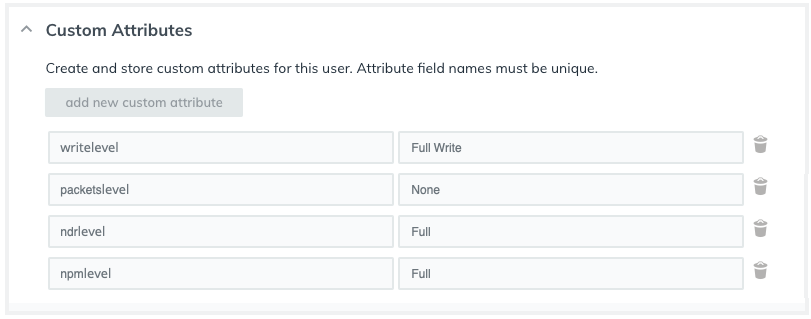
In our example above, we specified write. In the
Attribute Values fields, type the names of the
privilege levels you identified for your users. In the figure below, we
specified Full Write for the Full write
privileges value.
Important: You must specify the Attribute Name and configure at least one attribute value other than None to enable users to log in. 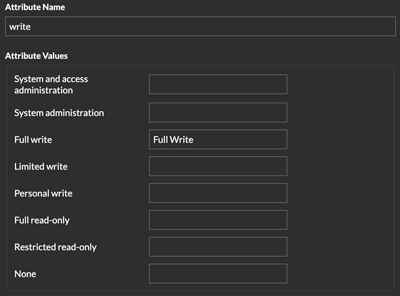
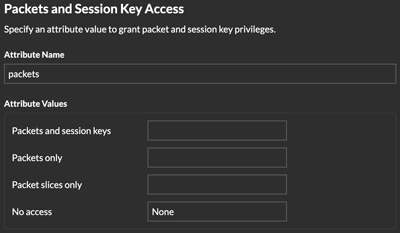
-
In the Attribute Values fields, type the names of the
privilege levels you created for your users. In the figure below, we specified
None.
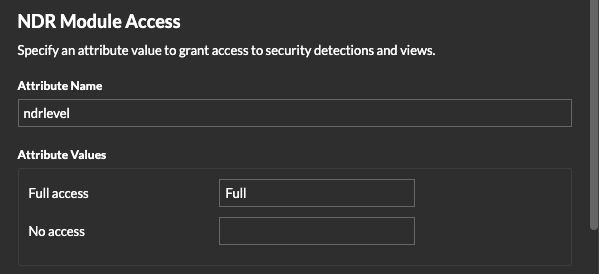
-
In the Attribute Values fields, type the names of the
privilege levels you created for your users. In the figure below, we specified
Full.
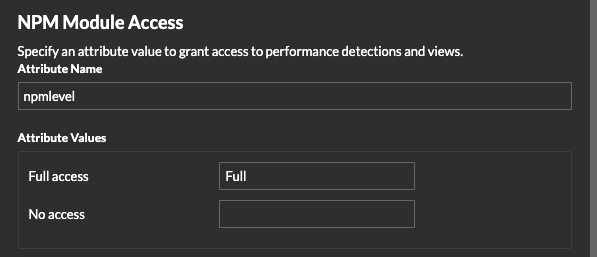
-
In the Attribute Values fields, type the names of the
privilege levels you created for your users. In the figure below, we specified
Full.
Assign privileges to users in your IdP
You can now add system access attributes and their associated privilege levels to your existing users. You can assign multiple privileges to a user, but the user is always granted the highest privilege when they log in to the system.
| Tip: | The ExtraHop system supports group attribute statements to easily map user privileges to all members of a specific group. When you configure the ExtraHop application on your identity provider, specify a group attribute name. This name is then entered in the Attribute Name field when you configure the identity provider on the ExtraHop system. |
- In your IdP, select the user you want to grant privileges to.
- Add an attribute for the type of access you previously defined, such as writelevel.
- In the same row, add the name you specified for the privilege level, such as Full Write.
View users in RevealX 360
Users appear on the Users page in RevealX 360 after they log in the first time. If a user does not appear in the table, they are not successfully being authenticated and authorized. Contact ExtraHop Support if you need assistance.
-
Click System Settings at the top right of the page and then click
All Administration.
Update identity provider settings
When you make changes to your identity provider configuration, for example, regenerating the IdP certificate, you must export the new metadata XML file and update the identity provider settings on RevealX 360.
Before you begin
Ensure that you remove unwanted data, such as an expired IdP certificate, from the metadata XML file.-
Click the System Settings icon and then click User
Access.
Thank you for your feedback. Can we contact you to ask follow up questions?