Deploy the ExtraHop Discover Appliance 1100
The following procedures explain how to deploy the EDA1100 ExtraHop Discover appliance.
System requirements
Your environment must meet the following requirements to deploy the EDA 1100:
Power supply: 100-240v power source
Network access: Two 10/100/1000 BASE-T network ports. One configured as the management port and the other configured as the monitoring port.
Front panel controls
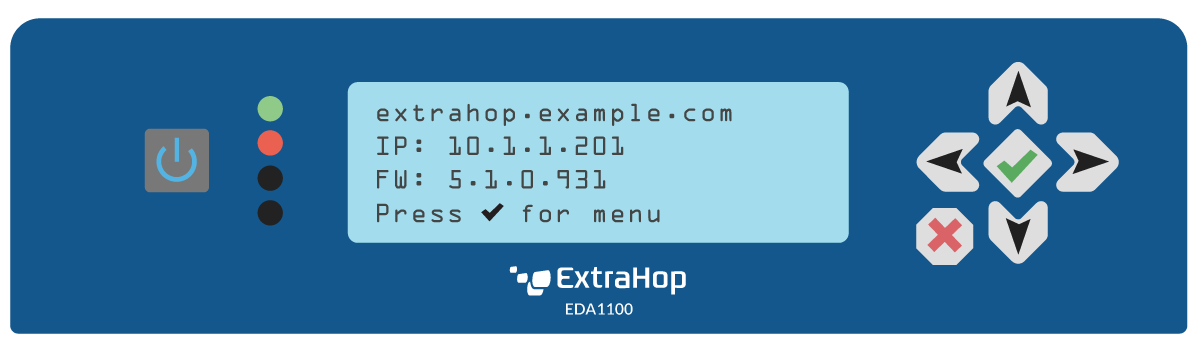
- Power button
- Press the power button once to power the appliance on or off.
- LED indicators
- Four LEDs are on the front panel. The top (first) LED indicates the status of
network port 1 and the second LED indicates the status of network port 2. The remaining
two LEDs are reserved for future use. The LED changes color to indicate the port status,
as follows:
- Off
- The appliance is turned off
- Amber
- The system is starting up
- Red
- No network link is available
- Green
- A network link is established
- LCD
- Through the LCD, you can view the current settings, manually configure the network
settings, run the ping network utility, and restart or shutdown the appliance.
Note: The LCD automatically dims after 60 minutes if no user input is received. Press any of the input buttons to illuminate the display again. - Input buttons
-
- Press the up, down, left, and right arrow buttons to navigate through the LCD menu.
- Press the green checkmark button to select a configuration setting and to save your changes.
- Press the red X button to cancel changes before saving and return to the home screen.
LCD menu layout
The table below represents the layout of the LCD menu controls.
| Home Screen | Main Menu |
|---|---|
|
|
|
|
|
Rear panel ports
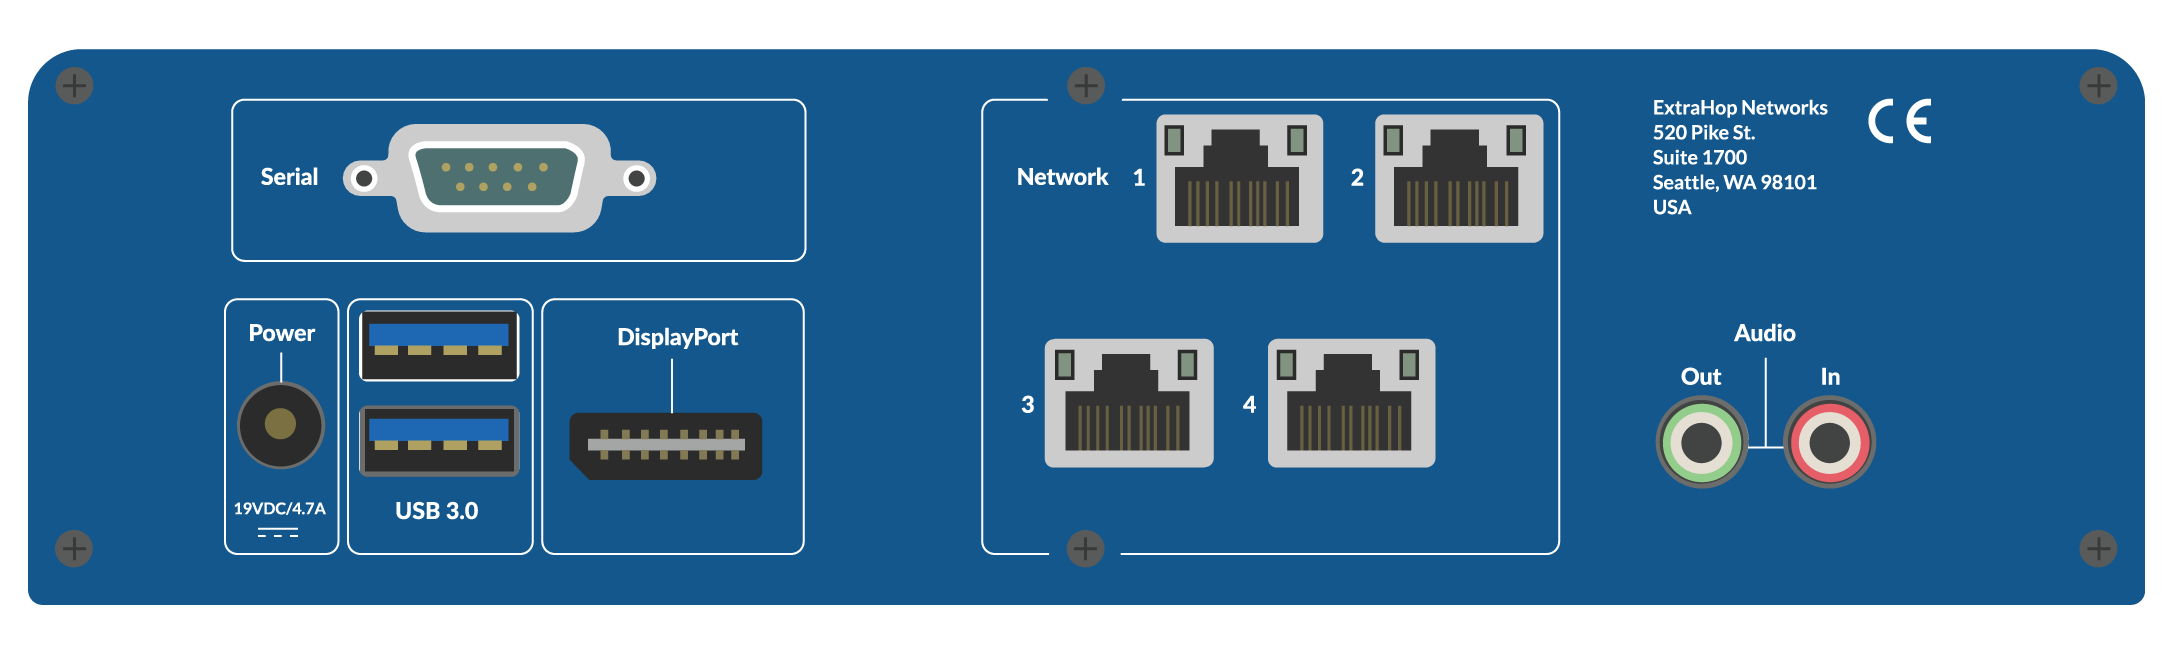
- One RS-232 serial port to connect a console device.
- One power port to connect the EDA 1100 to an AC power source.
- Two USB 3.0 ports to connect a keyboard.
- One DisplayPort to connect an external display.
- Four 10/100/1000 BASE-T network ports. Port 1 is the primary management port and port 2
is the primary monitor port.
Note: Ports 3 and 4 are reserved for future use and are disabled.
Configure the management IP address
DHCP is enabled by default on the EDA 1100. When you power on the appliance, interface 1 attempts to acquire an IP address through DHCP. The IP address appears on the home screen of the LCD.
If your network does not support DHCP, you can configure a static IP address through the LCD menu on the front panel or through the command-line interface (CLI). If an IP address has not been configured, the home screen displays IP:(None).
Complete the following steps to manually configure an IP address from the front panel.
- Press the checkmark button on the front of the EDA 1100.
- Press the down arrow button to select Network menu, and then press the checkmark button.
- Press the down arrow to select Set static IP, and then press the checkmark button.
- Press the left or right arrows to select the first digit to change, and then press the up or down arrows to change the digit to the desired number. Repeat this step for each digit you need to change. After you configure the desired IP address, press the checkmark button.
- On the Network mask screen, press the left or right arrows to select the first digit to change, and then press the up or down arrows to change the digit to the desired number. Repeat this step for each digit you need to change. After you configure the desired network mask, press the checkmark button.
- On the Default gateway screen, press the left or right arrows to select the first digit to change, and then press the up or down arrows to change the digit to the desired number. Repeat this step for each digit you need to change. After you configure the desired default gateway, press the checkmark button.
- Confirm your modified network settings on the Settings saved screen, and then press any button to return to the Network Menu.
- Press the down arrow and scroll to Set DNS servers, and then press the checkmark button.
- Press the left or right arrows on the DNS1 screen to select the first digit to change, and then press the up or down arrows to change the digit to the desired number. Repeat this step for each digit you need to change, and then press the checkmark button to continue to the DNS2 screen.
- (Optional): Repeat step 9 to configure a second DNS server.
- Confirm the DNS settings on the Settings saved screen and then press any button to return to the Network Menu.
(Optional) Configure a static IP address through the CLI
You can access the CLI by connecting a USB keyboard and SVGA monitor to the appliance or through an RS-232 serial cable and a terminal-emulator program. The terminal emulator must be set to 115200 bps with 8 data bits, no parity, 1 stop bit (8N1), and hardware flow control should be disabled.
Configure the Discover appliance
After you configure an IP address for the Discover appliance, open a web browser and navigate to the ExtraHop system through the configured IP address. Accept the license agreement and then log in with the setup user account. The password is the system serial number that appears in the Info section of the LCD display and on the label on the back of the appliance. Enter the product key to license the system.
After the system is licensed, and you have verified that traffic is detected, complete the recommended procedures in the post-deployment checklist.
Thank you for your feedback. Can we contact you to ask follow up questions?