Collect custom records
You can customize the type of record details you generate and store on a recordstore by writing a trigger. We recommend that you also create a record format to control how the records display in the ExtraHop system.
Before you begin
- These instructions assume some familiarity with ExtraHop Triggers.
- If you are connected to a Google BigQuery recordstore, there is a custom records field limit of 300.
In the following example, you will learn how to only store records for HTTP transactions that results in a 404 status code. First, we will write a trigger to collect information from the built-in HTTP record type. Then, we will assign the trigger to a web server. Finally, we will create a record format to display selected record fields in the table view for our record query results.
Write and assign a trigger
Note that the trigger must be created on each sensor that you want to collect these types of records from. You can create the trigger on a console to collect your custom records from all connected sensors.
-
Click the System Settings icon
 , and then click Triggers.
-
Click the Editor tab to write the trigger
specifications.
The following figure shows an example configuration that only collects records when a 404 status code is detected. We also set a name (web404) for these types of records to identify them in a record query and added identifying information for debugging.

In the next steps, assign the trigger to a device or device group for which you want to monitor 404 status codes. -
Click the Assign Triggers icon, select the trigger you created in the previous
steps, and then click Assign Triggers. In the following
figure, we have selected our web server, web2-sea.
 After assigning the trigger, return to the page and select the trigger you created. First, make sure your device has activity. Then, click the Debug Log tab to see if the trigger is committing your records. For the following example, we intentionally visited unavailable web pages to generate 404 errors.
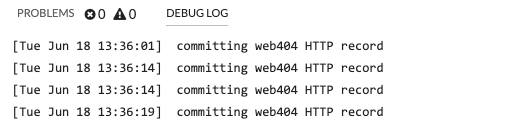
Create a custom record format to display your record results in a table
Record formats are the recommended way to display your records with only the fields you want to see. Without a custom record format, the fields for your custom record will not appear in any selectable lists, such as the Group By list.
-
Click the System Settings icon and then click Record
Formats.
-
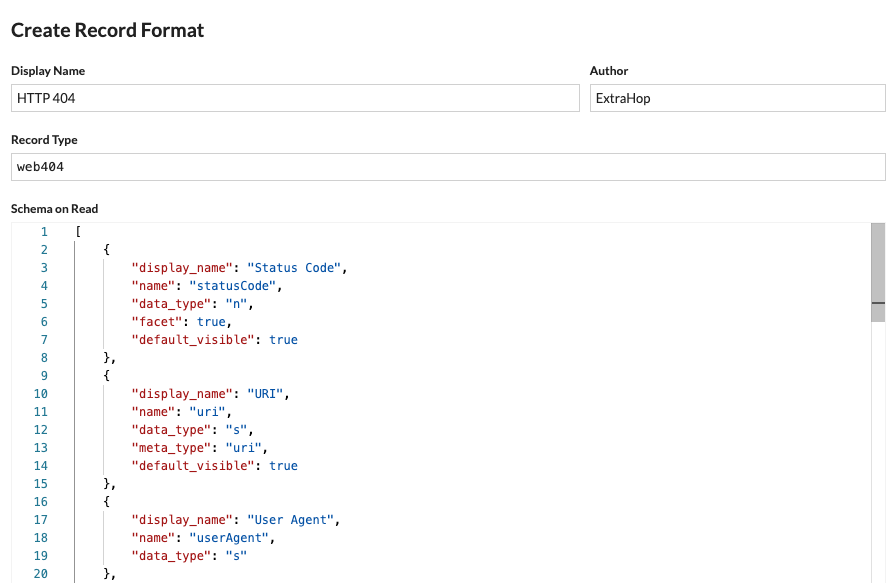
Complete the following fields:
Display Name: Type a unique name for your record format.
Author: Identify the author for the record format.
Record Type: Type the same record type ID you created in the trigger. In our example, this value is web404.
Schema on Read: Paste the copied contents from step 4 into the text box. Edit the box to delete any unwanted fields. For our example in the figure below, we only kept the following fields: Client, Server, Method, Status Code, URI, and Processing Time.
Record format settings
The Record Format Settings page displays a list of all built-in and custom record formats that are available on your ExtraHop sensors or console. If you need to create a custom record format, we recommend that you copy and paste the schema on read information from a built-in record format. Advanced users might want to create a custom record format with their own field-value pairs, and should apply the reference material provided in this section.
- Display Name
- The name displayed for the record format in the ExtraHop system. If there is no record format for the record, the record type is displayed.
- Author
- (Optional) The author of the record format. All built-in record formats display ExtraHop as the author.
- Record Type
- A unique alphanumeric name that identifies the type of information contained in the associated record format. The record type links the record format with the records that are sent to the recordstore. Built-in record formats have a record type that begins with a tilde (~). Custom record formats cannot have a record type that begins with a tilde (~) or an at symbol (@).
- Schema on Read
- A JSON-formatted array with at least one object, which consists of a field name and
value pair. Each object describes a field in the record and each object must have a
unique combination of name and data type for that record format. You can create the
following objects for a custom record format:
- name
- The name of the field.
- display_name
- The display name for the field. If the display_name field is empty, the name field is displayed.
- description
- (Optional) Descriptive information about the record format. This field is limited to the Record Format Settings page and is not displayed in any record query.
- default_visible
- (Optional) If set to true, this field displays in the ExtraHop system as a column heading by default in table view.
- facet
- (Optional) If set to true, facets for this field display in the ExtraHop system. Facets are a short list of the most common values for the field that can be clicked to add a filter.
- data_type
- The abbreviation that identifies the type of data stored in this field. The
following data types are supported:
Data Type Abbreviation Description application app ExtraHop application ID (string) boolean b Boolean value device dev ExtraHop device ID (string) flow interface fint Flow interface ID flow network fnet Flow network ID IPv4 addr4 An IPv4 address in dotted-quad format. Greater or less than filters are supported. IPv6 addr6 An IPv6 address. Only string-oriented filters are supported. number n Number (integer or floating point) string s Generic string - meta_type
- The sub-classification of the data type that further determines how the
information is displayed in the ExtraHop system. The following meta-types are supported for
each of the associated data types:
Data Type Meta Type String - domain
- uri
- user
Number - bytes
- count
- expiration
- milliseconds
- packets
- timestamp
Thank you for your feedback. Can we contact you to ask follow up questions?