Create a custom detection
Custom detections enable you to specify criteria that generates detections on the ExtraHop system. Machine-learning and rules-based detections capture unusual behaviors and common threats, however by creating a custom detection, you can hone in on the devices and behaviors that are critical for your network.
When creating a custom detection, you must create a trigger that identifies the system event and conditions that the system should watch for, and then you can assign the trigger to the specific devices or device groups you want to monitor. When the event occurs, a detection is generated.
In this guide, we provide the steps and an example script that generates a custom detection when suspicious connections are made to specified websites through Windows PowerShell.
Before you begin
- You must have some familiarity with ExtraHop Triggers. In particular, consider these best practices when writing your script and assigning triggers.
- You must have a user account with the privileges required to create triggers.
- If you have a console, create a trigger on the console and the trigger will run on all connected sensors.
Create a trigger to generate custom detections
Triggers generate custom detections by calling the commitDetection function in the trigger script.
In the following example, the trigger generates a custom detection when a PowerShell client reaches out to a website that is known as a staging site for exfiltrated data.
The trigger identifies PowerShell connections by looking for SSL client JA3 hashes that belong to known PowerShell clients.
If the SSL connection occurs from a PowerShell client to a suspicious host, the trigger generates a detection. The detection includes the version of PowerShell that initiated the connection, the server IP address, and the client IP address.
| Note: | For more information about the commitDetection function, see the Trigger API Reference. |
-
Click the System Settings icon
 and then click
Triggers.
and then click
Triggers.
-
Next, type the code that commits your custom detection. The
commitDetection function must be written in the following
format:
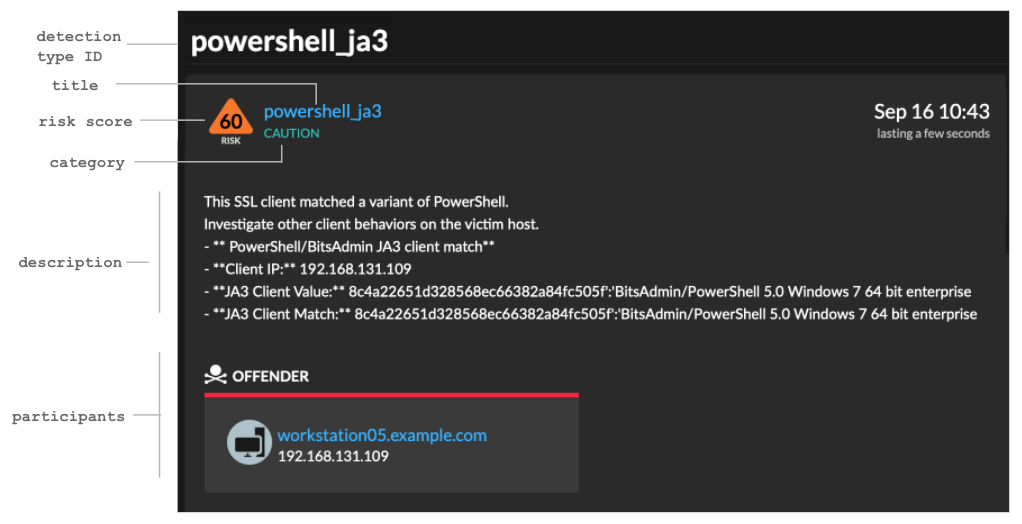
commitDetection('<detection type ID>', { title: '<title>', description: '<detection description>', categories: ['<category>'], riskScore: <risk score>, participants: [{ object:<offender participant>, role: 'offender' }, { object: <victim participant>, role: 'victim' }], identityKey: '<identity key>', identityTtl: '<time period>', });Enter values for each of the following parameters in your script.
Value Description detection type ID A unique string that identifies your custom detection. This string can only contain letters, numbers, and underscores. title Text that appears at the top of the detection card. Type a descriptive title that is easy to scan. This title appears in the Detection Catalog as the display name for your detection type, preceded by [custom].
detection description Text that appears below the title and category on a detection card. Type information about the event that generates the detection. This field supports markdown. We recommend that you include interpolation variables to display specific information about your detection.
For example, the variables $(Flow.client.ipaddr) and $(Flow.server.ipaddr) display the IP address of the client and server device in the flow and $(Flow.l7proto) displays the L7 protocol. Include \n at the end of each line of text to make sure the description displays correctly.risk score A number that measures the likelihood, complexity, and business impact of a security detection. The risk score icon appears at the top of the detection card and is color coded by severity as red (80-99), orange (31-79), or yellow (1-30). You can sort detections by risk. offender participant victim participant
An array of objects that identifies the participants in the detection. Define the role of the participant as either 'offender' or 'victim' and provide a reference to a device, IP address, or application object for that role.
For example, the following array identifies the server as the offender and the client as the victim in a flow:
participants: [ { role: 'offender', object: Flow.server.device}, { role: 'victim', object: Flow.client.device } ]For more information about device, IP address, and application objects, see the Trigger API Reference.
identity key A string that enables the identification of ongoing detections. If multiple detections with the same identity key and detection type are generated within the time period specified by the identityTtl parameter, the detections are consolidated into a single ongoing detection. Create a unique identity key string by combining characteristics of the detection.
For example, the following identity key is created by combining the server IP address and the client IP address:identityKey: [Flow.server.ipaddr, Flow.client.ipaddr].join('!!')time period The amount of time after a detection is generated that duplicate detections are consolidated into an ongoing detection. The time period is reset, and the detection does not end until the time period expires. The following time periods are valid:
- hour
- day
- week
The default time period is hour.
The following example shows the completed script section.
commitDetection('powershell_ja3', { title: 'PowerShell / BitsAdmin Suspicious Connection', description: "This SSL client matched a variant of PowerShell." + "\n"+ "Investigate other client behaviors on the victim host." + "\n"+ "- ** PowerShell/BitsAdmin JA3 client match**" + "\n"+ "- **Client IP:** " + Flow.client.ipaddr + "\n"+ "- **JA3 Client Value:** " + ja3 + "\n"+ "- **JA3 Client Match:** " + suspect_ja3_hashes[ja3], riskScore: 60, participants: [{ object:Flow.client.device, role: 'offender' }], identityKey: [ Flow.server.ipaddr, Flow.client.ipaddr, hash ].join('!!'), identityTtl: 'hour', });These values appear in the detection card similar to the following figure:
Create a custom detection type
After you create a trigger to generate your custom detection, you can create a custom detection type in the Detection Catalog to add more information to your detection.
-
Click the System Settings icon and then click Detection
Catalog.
View custom detections
You can view custom detections on the Detections page with other built-in detections.
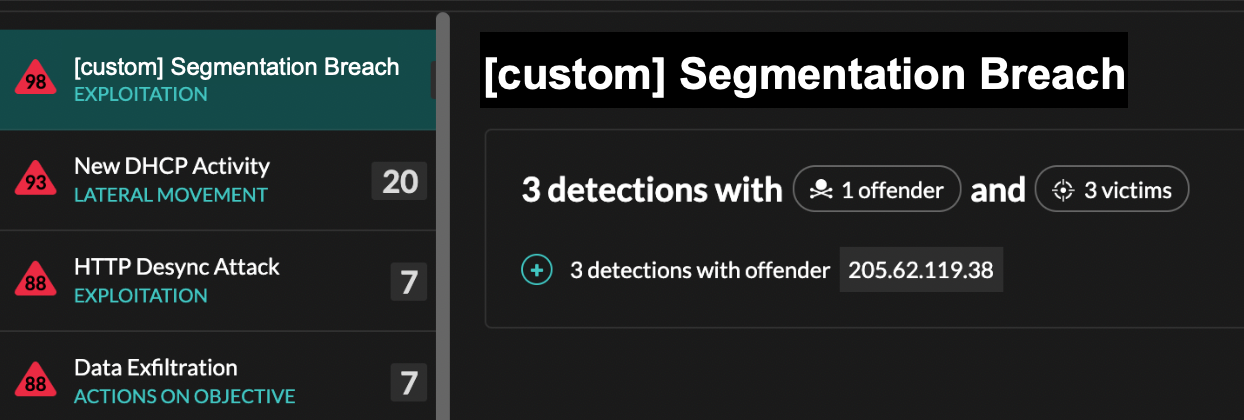
Group the detections page by Type. All detections in the detection list are grouped by detection type.
For example, if your detection display name is [custom]Segmentation Breach, the entry would appear in the detection list similar to the following figure:
From the top left of the page, select MITRE Map. The MITRE techniques that were linked to the custom detection are highlighted in the matrix.
Next steps
Create a detection notification rule. For example, you can configure the ExtraHop system to email you when your custom detection occurs.
Example Custom Detection Trigger
The following script is the complete PowerShell/JA3 example referred to throughout these instructions.
// If the server is internal, exit
if ( ! Flow.server.ipaddr.isExternal ) {
    return;
}
// If the SSL host name is not set, exit
if(SSL.host === null) { return; }

// Continue only if the SSL hostname belongs to one of the suspicious sites
if(SSL.host.match(/pastebin/i) || SSL.host.match(/raw.githubusercontent.com/i) || SSL.host.match(/githack/i)) {

    // List of common PowerShell JA3 hashes
    let suspect_ja3_hashes = cache('suspect_ja3_hashes', () => ({
        '13cc575f247730d3eeb8ff01e76b245f':'PowerShell/BitsAdmin/PowerShell 4.0 Windows Server 2012RT',
        '5e12c14bda47ac941fc4e8e80d0e536f':'PowerShell/BitsAdmin/PowerShell 4.0 Windows Server 2012RT',
        '2c14bfb3f8a2067fbc88d8345e9f97f3':'PowerShell/BitsAdmin Windows Server 2012RT',
        '613e01474d42ebe48ef52dff6a20f079':'PowerShell/BitsAdmin Windows Server 2012RT',
        '05af1f5ca1b87cc9cc9b25185115607d':'BitsAdmin/PowerShell 5.0 Windows 7 64 bit enterprise',
        '8c4a22651d328568ec66382a84fc505f':'BitsAdmin/PowerShell 5.0 Windows 7 64 bit enterprise',
        '235a856727c14dba889ddee0a38dd2f2':'BitsAdmin/PowerShell 5.1 Server 2016',
        '17b69de9188f4c205a00fe5ae9c1151f':'BitsAdmin/PowerShell 5.1 Server 2016',
        'd0ec4b50a944b182fc10ff51f883ccf7':'PowerShell/BitsAdmin (Microsoft BITS/7.8) Server 2016',
        '294b2f1dc22c6e6c3231d2fe311d504b':'PowerShell/BitsAdmin (Microsoft BITS/7.8) Server 2016',
        '54328bd36c14bd82ddaa0c04b25ed9ad':'BitsAdmin/PowerShell 5.1 Windows 10',
        'fc54e0d16d9764783542f0146a98b300':'BitsAdmin/PowerShell 5.1 Windows 10',
        '2863b3a96f1b530bc4f5e52f66c79285':'BitsAdmin/PowerShell 6.0 Windows Server 2012RT',
        '40177d2da2d0f3a9014e7c83bdeee15a':'BitsAdmin/PowerShell 6.0 Windows Server 2012RT',
        '36f7277af969a6947a61ae0b815907a1':'PowerShell/BitsAdmin Windows 7 32 bit enterprise',
    }));
    // Store the client JA3 hash in a variable
    const hash = SSL.ja3Hash;

    // Iterate through each PowerShell JA3 hash
    for ( let ja3 in suspect_ja3_hashes ) {

        // If the client JA3 hash is from PowerShell,
        // commit the detection
        if ( hash.includes(ja3) ) {

            commitDetection('PowerShell_JA3', {
                categories: ['sec.caution'],
                title: "PowerShell / BitsAdmin Suspicious Connection",
                // Specify the offender as the device object of the client
                participants: [
                    { role: 'offender', object: Flow.client.device }
                ],
                description:
                    "This SSL client matched a variant of PowerShell." + "\n"+
                    "Investigate other client behaviors on the victim host." + "\n"+
                    "- ** PowerShell/BitsAdmin JA3 client match**" + "\n"+
                    "- **Client IP:** " + Flow.client.ipaddr + "\n"+
                    "- **Server IP:** " + Flow.server.ipaddr + "\n"+
                    "- **JA3 Client Value:** " + ja3 + "\n"+
                    "- **JA3 Client Match:** " + suspect_ja3_hashes[ja3],
                // Create the identity key by combining the server IP address, client IP address, and PowerShell JA3 hash
                identityKey: [
                    Flow.server.ipaddr,
                    Flow.client.ipaddr,
                    hash
                ].join('!!'),
                riskScore: 60,
                identityTtl: 'hour'
            });
        }
    }
}
Thank you for your feedback. Can we contact you to ask follow up questions?