Configure SAML single sign-on with Google
You can configure your ExtraHop system to enable users to log in to the system through the Google identity management service.
Before you begin
- You should be familiar with administering Google Admin.
- You should be familiar with administering ExtraHop systems.
These procedures require you to copy and paste information between the ExtraHop system and Google Admin console, so it is helpful to have each system open side-by-side.
Enable SAML on the ExtraHop system
- Log in to the Administration settings on the ExtraHop system through https://<extrahop-hostname-or-IP-address>/admin.
- In the Access Settings section, click Remote Authentication.
- From the Remote authentication method drop-down list, select SAML.
- Click Continue.
- Click View SP Metadata.
- Copy the ACS URL and Entity ID to a text file. You will paste this information into the Google configuration in a later procedure.
Add user custom attributes
- Log in to the Google Admin console.
- Click Users.
-
Click the Manage custom attributes icon
 .
.
- Click Add Custom Attribute.
- In the Category field, type ExtraHop.
- (Optional): Type a description in the Description field.
-
In the Custom fields section, enter the following
information.
- In the Name field, type writelevel.
- From the Info Type drop-down list, select Text.
- From the Visibility drop-down list, select Visible to domain.
- From the No. of values drop-down list, select Single Value.
-
Enable NDR module access
- In the Name field, type ndrlevel.
- From the Info Type drop-down list, select Text.
- From the Visibility drop-down list, select Visible to domain.
- From the No. of values drop-down list, select Single Value.
-
Enable NPM module access
- In the Name field, type npmlevel.
- From the Info Type drop-down list, select Text.
- From the Visibility drop-down list, select Visible to domain.
- From the No. of values drop-down list, select Single Value.
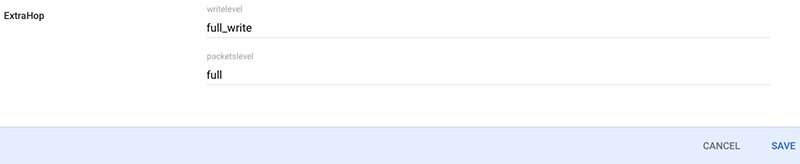
- (Optional):
If you have connected packetstores, enable packet access by configuring a
custom field with the following information.
- In the Name field, type packetslevel.
- From the Info Type drop-down list, select Text.
- From the Visibility drop-down list, select Visible to domain.
- From the No. of values drop-down list, select Single Value.
- Click Add.
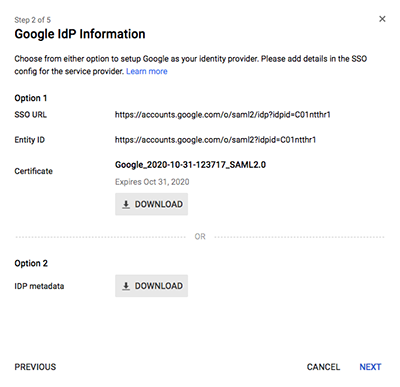
Add identity provider information from Google to the ExtraHop system
-
In the Google Admin console, click the Main menu icon
 and select .
-
Click the Enable SSO for a SAML application icon
 .
.
Add ExtraHop service provider information to Google
-
Return to the Google Admin console and click Next on the
Google Idp Information page to continue to step 3 of
5.
Thank you for your feedback. Can we contact you to ask follow up questions?