ExtraHop Trace Admin UI Guide
Introduction to the ExtraHop Trace Admin UI
The ExtraHop Trace Admin UI Guide provides detailed information about the administrator features and functionality of the ExtraHop Trace appliance.
In addition, this guide provides an overview of the global navigation and information about the controls, fields, and options available throughout the Trace Administration settings.
After you have deployed your Trace appliance, see the Trace Post-deployment Checklist.
We value your feedback. Please let us know how we can improve this document. Send your comments or suggestions to documentation@extrahop.com.
Supported browsers
The following browsers are compatible with all ExtraHop systems. Apply the accessibility and compatibility features provided by your browser to access content through assistive technology tools.
- Firefox
- Google Chrome
- Microsoft Edge
- Safari
| Important: | Internet Explorer 11 is no longer supported. We recommend that you install the latest version of any supported browser. |
Status and Diagnostics
The Status and Diagnostics section includes metrics and logging data about the current state of the ExtraHop packetstore and enables system administrators to view the overall system health.
- Health
- Provides metrics about the operating efficiency of the ExtraHop packetstore.
- Audit Log
- Enables you to view event logging data and to change syslog settings.
- Fingerprint
- Provides the unique hardware fingerprint for the ExtraHop packetstore.
- Support Scripts
- Enables you to upload and run support scripts.
- Exception Files
- Enable or disable the ExtraHop packetstore exception files.
Health
The Health page provides a collection of metrics that enable you check the operation of the Trace appliance.
The metrics on this page can help you troubleshoot problems and determine why the ExtraHop appliance is not performing as expected.
- System
- Reports the following information about the system CPU usage and disk drives.
-
- CPU User
- Displays the percentage of CPU usage associated with the Trace appliance user.
- CPU System
- Displays the percentage of CPU usage associated with the Trace appliance.
- CPU Idle
- Displays the CPU idle percentage associated with the Trace appliance.
- CPU IO
- Displays the percentage of CPU usage associated with the Trace appliance IO functions.
- Service Status
- Reports the status of ExtraHop packetstore system services.
-
- exadmin
- Displays the time the ExtraHop packetstore web portal service started.
- exconfig
- Displays the time the ExtraHop packetstore config service started.
- excap
- Displays the time the ExtraHop packetstore capture service started.
- Interfaces
- Reports the status of ExtraHop packetstore network interfaces.
-
- RX packets
- Displays the number of packets received by the ExtraHop packetstore on the specified interface.
- RX Errors
- Displays the number of received packet errors on the specified interface.
- RX Drops
- Displays the number of received packets dropped on the specified interface.
- TX Packets
- Displays the number of packets transmitted by the ExtraHop packetstore on the specified interface.
- TX Errors
- Displays the number of transmitted packet errors on the specified interface.
- TX Drops
- Displays the number of transmitted packets dropped on the specified interface.
- RX Bytes
- Displays the number of bytes received by the ExtraHop packetstore on the specified interface.
- TX Bytes
- Displays the number of bytes transmitted by the ExtraHop packetstore on the specified interface.
- Partitions
- Reports the status and usage of ExtraHop packetstore components. The configuration settings for these components are stored on disk and retained even when the power to the packetstore is turned off.
-
- Name
- Displays the ExtraHop packetstore settings that are stored on disk.
- Options
- Displays the read-write options for the settings stored on disk.
- Size
- Displays the size in gigabytes for the identified component.
- Utilization
- Displays the amount of memory usage for each of the components as a quantity and as percentage of total disk space.
Audit Log
The audit log provides data about the operations of your ExtraHop system, broken down by component. The audit log lists all known events by timestamp, in reverse chronological order.
Fingerprint
Fingerprints help secure appliances from machine-in-the-middle attacks by providing a unique identifier that can be verified when connecting ExtraHop appliances.
When connecting an ExtraHop recordstore or packetstore with a packet sensor or console, make sure that the fingerprint displayed is exactly the same as the fingerprint shown on the join or pairing page.
If the fingerprints do not match, communications between the devices might have been intercepted and altered.
Support Scripts
ExtraHop Support might provide a support script that can apply a special setting, make a small adjustment to the ExtraHop system, or provide help with remote support or enhanced settings. The Administration settings enable you to upload and run support scripts.
Exception Files
Exception files are a core file of the data stored in memory. When you enable the Exception File setting, the core file is written to the disk if the system unexpectedly stops or restarts. This file can help ExtraHop Support diagnose the issue.
Click Enable Exception Files or Disable Exception Files to enable or disable the saving of exception files.
Network Settings
The Network Settings section provides the following configurable network connectivity settings.
- Connectivity
- Configure network connections.
- SSL Certificate
- Generate and upload a self-signed certificate.
- Notifications
- Set up alert notifications through email and SNMP traps.
The Trace appliance has two 10/100/1000baseT network ports and four 10 GbE SFP+ network ports. By default, the Gb3 port is configured as the management port and requires an IP address. Port 5 is the default monitor (or capture) interface.
Before you begin configuring the network settings, verify that a network patch cable connects the Gb3 port on the Trace appliance to the management network. For more information about installing a Trace appliance, see the ExtraHop Trace appliance deployment guide or contact ExtraHop Support for assistance.
For specifications, installation guides, and more information about your appliance, see the complete ExtraHop documentation set at docs.extrahop.com.
Connect to ExtraHop Cloud Services
ExtraHop Cloud Services provides access to ExtraHop cloud-based services through an encrypted connection.
After the connection is established, information about the available services appear on the ExtraHop Cloud Services page.
- By sharing data with ExtraHop Machine Learning Service, you can enable features that
enhance the ExtraHop system and your user experience.
- Enable AI Search Assistant to find devices with natural language user prompts, which
are shared with ExtraHop Cloud Services for product improvement. See the AI Search Assistant FAQ for more
information. AI Search Assistant cannot currently be enabled for the following
regions:
- Asia Pacific (Singapore, Sydney, Tokyo)
- Europe (Frankfurt, Paris)
- Opt in to Expanded Threat Intelligence to enable the Machine Learning Service to review data such as IP addresses and hostnames against threat intelligence provided by CrowdStrike, benign endpoints, and other network traffic information. See the Expanded Threat Intelligence FAQ for more information.
- Contribute data such as file hashes and external IP addresses to Collective Threat Analysis to improve the accuracy of detections. See the Collective Threat Analysis FAQ for more information.
- Enable AI Search Assistant to find devices with natural language user prompts, which
are shared with ExtraHop Cloud Services for product improvement. See the AI Search Assistant FAQ for more
information. AI Search Assistant cannot currently be enabled for the following
regions:
- ExtraHop Update Service enables automatic updates of resources to the ExtraHop system, such as ransomware packages.
- ExtraHop Remote Access enables you to allow ExtraHop account team members and ExtraHop Support to connect to your ExtraHop system for configuration help. See the Remote Access FAQ for more information about remote access users.
| Video: | See the related training: Connect to ExtraHop Cloud Services |
Before you begin
- RevealX 360 systems are automatically connected to ExtraHop Cloud Services, however, you might need to allow access through network firewalls.
- You must apply the relevant license on the ExtraHop system before you can connect to ExtraHop Cloud Services. See the License FAQ for more information.
- You must have setup or system and access administration privileges to access Administration settings.
Configure your firewall rules
If your ExtraHop system is deployed in an environment with a firewall, you must open access to ExtraHop Cloud Services. For RevealX 360 systems that are connected to self-managed sensors, you must also open access to the cloud-based recordstore included with RevealX Standard Investigation
Open access to Cloud Services
For access to ExtraHop Cloud Services, your sensors must be able to resolve DNS queries for *.extrahop.com and access TCP 443 (HTTPS) from the IP address that corresponds to your sensor license:
- 35.161.154.247 (Portland, U.S.A.)
- 54.66.242.25 (Sydney, Australia)
- 52.59.110.168 (Frankfurt, Germany)
Open access for the ExtraHop recordstore
For access to the cloud-based recordstore included with RevealX Standard Investigation, your sensors must be able to access outbound TCP 443 (HTTPS) to these fully-qualified domain names:
- bigquery.googleapis.com
- bigquerystorage.googleapis.com
- oauth2.googleapis.com
- www.googleapis.com
- www.mtls.googleapis.com
- iamcredentials.googleapis.com
You can also review the public guidance from Google about computing possible IP address ranges for googleapis.com.
In addition to configuring access to these domains, you must also configure the global proxy server settings.
Connect to ExtraHop Cloud Services through a proxy
If you do not have a direct internet connection, you can try connecting to ExtraHop Cloud Services through an explicit proxy.
Before you begin
Verify whether your proxy vendor is configured to perform machine-in-the-middle (MITM) when tunneling SSH over HTTP CONNECT to localhost:22. ExtraHop Cloud Services deploys an encrypted inner SSH tunnel, so traffic will not be visible to MITM inspection. We recommend that you create a security exception and disable MITM inspection for this traffic.| Important: | If you are unable to disable MITM on your proxy, you must disable certificate validation in the ExtraHop system running configuration file. For more information, see Bypass certificate validation. |
- Log in to the Administration settings on the ExtraHop system through https://<extrahop-hostname-or-IP-address>/admin.
- In the Network Settings section, click Connectivity.
- Click Enable ExtraHop Cloud Proxy.
- In the Hostname field, type the hostname for your proxy server, such as proxyhost.
- In the Port field, type the port for your proxy server, such as 8080.
- (Optional): If required, in the Username and Password fields, type a user name and password for your proxy server.
- Click Save.
Bypass certificate validation
Some environments are configured so that encrypted traffic cannot leave the network without inspection by a third-party device. This device can act as an SSL/TLS endpoint that decrypts and re-encrypts the traffic before sending the packets to ExtraHop Cloud Services.
| Note: | The following procedure requires familiarity with modifying the ExtraHop running configuration file. |
Disconnect from ExtraHop Cloud Services
You can disconnect an ExtraHop system from ExtraHop Cloud Services.
- Log in to the Administration settings on the ExtraHop system through https://<extrahop-hostname-or-IP-address>/admin.
- In the Network Settings section, click ExtraHop Cloud Services.
- In the Cloud Services Connection section, click Disconnect.
Manage ExtraHop Cloud Services enrollment
If you want to move an existing license from one ExtraHop system to another, you can manage system enrollment from the ExtraHop Cloud Services page. Unenrolling a system deletes all data and historical analysis for the Machine Learning Service from the system and will no longer be available.
- Log in to the Administration settings on the ExtraHop system through https://<extrahop-hostname-or-IP-address>/admin.
- In the Network Settings section, click ExtraHop Cloud Services.
- In the Cloud Services Connection section, click Unenroll.
Connectivity
The Connectivity page contains controls for your appliance connections and network settings.
- Interface Status
- On physical appliances, a diagram of interface connections appears, which updates
dynamically based on the port status.
- The blue Ethernet port is for management
- A black Ethernet port indicates a licensed and enabled port that is currently down
- A green Ethernet port indicates an active, connected port
- A gray Ethernet port indicates a disabled or unlicensed port
- Network Settings
-
- Click Change Settings to add a hostname for your ExtraHop appliance or to add DNS servers.
- Proxy Settings
-
- Enable a global proxy to connect to an ExtraHop console
- Enable a cloud proxy to connect to ExtraHop Cloud Services
- Bond Interface Settings
-
- Create a bond interface to bond multiple interfaces together into one logical interface with a single IP address.
- Interfaces
- View and configure your management and monitoring interfaces. Click any interface to display setting options.
- Netskope Settings
-
- Enable Netskope packet ingest on your sensor to discover and monitor devices through a Netskope integration.
Configure an interface
Interface throughput
ExtraHop sensor models EDA 6100, EDA 8100, and EDA 9100 are optimized to capture traffic exclusively on 10GbE ports.
Enabling the 1GbE interfaces for monitoring traffic can impact performance, depending on the ExtraHop sensor. While you can optimize these sensors to capture traffic simultaneously on both the 10GbE ports and the three non-management 1GbE ports, we recommend that you contact ExtraHop Support for assistance to avoid reduced throughput.
| Note: | EDA 6200, EDA 8200, EDA 9200, and EDA 10200 sensors are not susceptible to reduced throughput if you enable 1GbE interfaces for monitoring traffic. |
| ExtraHop Sensor | Throughput | Details |
|---|---|---|
| EDA 9100 | Standard 40Gbps throughput | If the non-management 1GbE interfaces are disabled, you can use up to four of the 10GbE interfaces for a combined throughput of up to 40Gbps. |
| EDA 8100 | Standard 20Gbps throughput | If the non-management 1GbE interfaces are disabled, you can use either one or both of the 10GbE interfaces for a combined throughput of up to 20Gbps. |
| EDA 6100 | Standard 10Gbps throughput | If the non-management 1GbE interfaces are disabled, the maximum total combined throughput is 10Gbps. |
| EDA 3100 | Standard 3Gbps throughput | No 10GbE interface |
| EDA 1100 | Standard 1Gbps throughput | No 10GbE interface |
Set a static route
Before you begin
You must disable DHCPv4 before you can add a static route.- Log in to the Administration settings on the ExtraHop system through https://<extrahop-hostname-or-IP-address>/admin.
- In the Network Settings section, click Connectivity.
- In the Interfaces section, click the name of the interface you want to configure.
- On the Network Settings for Interface <interface number> page, ensure that the IPv4 Address and Netmask fields are complete and saved, and click Edit Routes.
- In the Add Route section, type a network address range in CIDR notation in the Network field and IPv4 address in the Via IP field and then click Add.
- Repeat the previous step for each route you want to add.
- Click Save.
Global proxy server
If your network topology requires a proxy server to enable your ExtraHop system to communicate either with a console or with other devices outside of the local network, you can enable your ExtraHop system to connect to a proxy server you already have on your network. Internet connectivity is not required for the global proxy server.
ExtraHop Cloud proxy
If your ExtraHop system does not have a direct internet connection, you can connect to the internet through a proxy server specifically designated for ExtraHop Cloud services connectivity. Only one proxy can be configured per system.
Complete the following fields and click Save to enable a cloud proxy.
Hostname: The hostname or IP address for your cloud proxy server.
Port: The port number for your cloud proxy server.
Username: The name of a user that has for access to your cloud proxy server.
Password: The password for the user specified above.
Bond interfaces
You can bond multiple interfaces on your ExtraHop system together into a single logical interface that has one IP address for the combined bandwidth of the member interfaces. Bonding interfaces enable a larger throughput with a single IP address. This configuration is also known as link aggregation, port channeling, link bundling, Ethernet/network/NIC bonding, or NIC teaming. Bond interfaces cannot be set to monitoring mode.
| Note: | When you modify bond interface settings, you lose connectivity to your ExtraHop system. You must make changes to your network switch configuration to restore connectivity. The changes required are dependent on your switch. Contact ExtraHop Support for assistance before you create a bond interface. |
- Bonding is only configurable on Management or Management + interfaces.
- Port channeling on traffic monitoring ports is supported on the ExtraHop sensors.
Interfaces chosen as members of a bond interface are no longer independently configurable and are shown as Disabled (bond member) in the Interfaces section of the Connectivity page. After a bond interface is created, you cannot add more members or delete existing members. The bond interface must be destroyed and recreated.
Create a bond interface
You can create a bond interface with at least one interface member and up to the number of members that are available for bonding.
Modify bond interface settings
After a bond interface is created, you can modify most settings as if the bond interface is a single interface.
Destroy a bond interface
When a bond interface is destroyed, the separate interface members of the bond interface return to independent interface functionality. One member interface is selected to retain the interface settings for the bond interface and all other member interfaces are disabled. If no member interface is selected to retain the settings, the settings are lost and all member interfaces are disabled.
Notifications
The ExtraHop system can send notifications about configured alerts through email, SNMP traps, and syslog exports to remote servers. If an email notification group is specified, then emails are sent to the groups assigned to the alert.
Configure email settings for notifications
You must configure an email server and sender before the ExtraHop system can send alert notifications or scheduled reports.
Next steps
After you confirm that your new settings are working as expected, preserve your configuration changes through system restart and shutdown events by saving the running configuration file.Add a new notification email address on an Explore or Trace appliance
You can send system storage alerts to individual recipients. Alerts are sent under the following conditions:
- A physical disk is in a degraded state.
- A physical disk has an increasing error count.
- (Explore appliance only) A virtual disk is in a degraded state.
- (Explore appliance only) A registered Explore node is missing from the cluster. The node might have failed, or it is powered off.
- Log in to the Administration settings on the ExtraHop system through https://<extrahop-hostname-or-IP-address>/admin.
- In the Network Settings section, click Notifications.
- Under Notifications, click Email Addresses.
- In the Email address text box, type the recipient email address.
- Click Save.
Configure settings to send notifications to an SNMP manager
The state of the network can be monitored through the Simple Network Management Protocol (SNMP). SNMP collects information by polling devices on the network. SNMP enabled devices can also send alerts to SNMP management stations. SNMP communities define the group where devices and management stations running SNMP belong, which specifies where information is sent. The community name identifies the group.
| Note: | Most organizations have an established system for collecting and displaying SNMP traps in a central location that can be monitored by their operations teams. For example, SNMP traps are sent to an SNMP manager, and the SNMP management console displays them. |
Download the ExtraHop SNMP MIB
SNMP does not provide a database of information that an SNMP-monitored network reports. SNMP information is defined by third-party management information bases (MIBs) that describe the structure of the collected data.
Send system notifications to a remote syslog server
The syslog export option enables you to send alerts from an ExtraHop system to any remote system that receives syslog input for long-term archiving and correlation with other sources.
Next steps
After you confirm that your new settings are working as expected, preserve your configuration changes through system restart and shutdown events by saving the running configuration file.SSL Certificate
SSL certificates provide secure authentication to the ExtraHop system.
You can designate a self-signed certificate for authentication instead of a certificate signed by a Certificate Authority. However, be aware that a self-signed certificate generates an error in the client browser, which reports that the signing certificate authority is unknown. The browser provides a set of confirmation pages to trust the certificate, even though the certificate is self-signed. Self-signed certificates can also degrade performance by preventing caching in some browsers. We recommend that you create a certificate-signing request from your ExtraHop system and upload the signed certificate instead.
| Important: | When replacing an SSL certificate, the web server service is restarted. Tunneled connections from ExtraHop sensors to ExtraHop consoles are lost but then re-established automatically. |
Upload an SSL certificate
You must upload a .pem file that includes both a private key and either a self-signed certificate or a certificate-authority certificate.
| Note: | The .pem file must not be password protected. |
| Note: | You can also automate this task through the REST API. |
- Log in to the Administration settings on the ExtraHop system through https://<extrahop-hostname-or-IP-address>/admin.
- In the Network Settings section, click SSL Certificate.
- Click Manage certificates to expand the section.
- Click Choose File and navigate to the certificate that you want to upload.
- Click Open.
- Click Upload.
Create a certificate signing request from your ExtraHop system
A certificate signing request (CSR) is a block of encoded text that is given to your Certificate Authority (CA) when you apply for an SSL certificate. The CSR is generated on the ExtraHop system where the SSL certificate will be installed and contains information that will be included in the certificate such as the common name (domain name), organization, locality, and country. The CSR also contains the public key that will be included in the certificate. The CSR is created with the private key from the ExtraHop system, making a key pair.
Next steps
Send the CSR file to your certificate authority (CA) to have the CSR signed. When you receive the SSL certificate from the CA, return to the SSL Certificate page in the Administration settings and upload the certificate to the ExtraHop system.| Tip: | If your organization requires that the CSR contains a new public key, generate a self-signed certificate to create new key pairs before creating the CSR. |
Trusted Certificates
Trusted certificates enable you to validate SMTP, LDAP, HTTPS ODS and MongoDB ODS targets, as well as Splunk recordstore connections from your ExtraHop system.
Add a trusted certificate to your ExtraHop system
Your ExtraHop system only trusts peers who present a Transport Layer Security (TLS) certificate that is signed by one of the built-in system certificates and any certificates that you upload. SMTP, LDAP, HTTPS ODS and MongoDB ODS targets, as well as Splunk recordstore connections can be validated through these certificates.
Before you begin
You must log in as a user with setup or system and access administration privileges to add or remove trusted certificates.| Important: | To trust the built-in system certificates and any uploaded certificates, you must also enable SSL/TLS or STARTTLS encryption and certificate validation when configuring the settings for the external server. |
- Log in to the Administration settings on the ExtraHop system through https://<extrahop-hostname-or-IP-address>/admin.
- In the Network Settings section, click Trusted Certificates.
- (Optional): If you want to trust the built-in certificates included in the ExtraHop system, select Trust System Certificates, and then click Save.
- To add your own certificate, click Add Certificate and then in the Certificate field, paste the contents of the PEM-encoded certificate chain.
- In the Name field, type a name.
- Click Add.
Access Settings
In the Access Settings section, you can change user passwords, enable the support account, manage local users and user groups, configure remote authentication, and manage API access.
Passwords
Users with privileges to the Administration page can change the password for local user accounts.
- Select any user and change their password
- You can only change passwords for local users. You cannot change passwords for users authenticated through LDAP or other remote authentication servers.
For more information about privileges for specific Administration page users and groups, see the Users section.
Change the default password for the setup user
It is recommended that you change the default password for the setup user on the ExtraHop system after you log in for the first time. To remind administrators to make this change, there is a blue Change Password button at the top of the page while the setup user is accessing the Administration settings. After the setup user password is changed, the button at the top of the page no longer appears.
| Note: | The password must be a minimum of 5 characters. |
Support Access
Support accounts provide access for the ExtraHop Support team to help customers troubleshoot issues with the ExtraHop system.
These settings should be enabled only if the ExtraHop system administrator requests hands-on assistance from the ExtraHop Support team.
Generate SSH key
- In the Access Settings section, click Support Access.
- Click Generate SSH Key.
- Copy the encrypted key from the text box and email the key to your ExtraHop representative.
- Click Done.
Regenerate or revoke the SSH key
To prevent SSH access to the ExtraHop system with an existing SSH key, you can revoke the current SSH key. A new SSH key can also be regenerated if needed.
- In the Access Settings section, click Support Access.
- Click Generate SSH Key.
-
Choose one of the following options:
- Click Regenerate SSH Key and then click
Regenerate.
Copy the encrypted key from the text box and email the key to your ExtraHop representative and then click Done.
- Click Revoke SSH Key to prevent SSH access to the system with the current key.
- Click Regenerate SSH Key and then click
Regenerate.
Users
The Users page enables you to control local access to the ExtraHop appliance.
Add a local user account
By adding a local user account, you can provide users with direct access to your ExtraHop system and restrict their privileges as needed by their role in your organization.
| Tip: |
|
Users and user groups
Users can access the ExtraHop system in three ways: through a set of pre-configured user accounts, through local user accounts configured on the appliance, or through remote user accounts configured on existing authentication servers, such as LDAP, SAML, Radius, and TACACS+.
| Video: | See the related trainings: |
Local users
This topic is about default and local accounts. See Remote Authentication to learn how to configure remote accounts.
- setup
- This account provides full system read and write privileges to the browser-based user interface and to the ExtraHop command-line interface (CLI). On physical sensors, the default password for this account is the service tag number on the front of the appliance. On virtual sensors, the default password is default.
- shell
- The shell account, by default, has access to non-administrative shell commands in the ExtraHop CLI. On physical sensors, the default password for this account is the service tag number on the front of the appliance. On virtual sensors, the default password is default.
| Note: | The default ExtraHop password for either account when deployed in Amazon Web Services (AWS) and Google Cloud Platform (GCP) is the instance ID of the virtual machine. |
Next steps
Remote Authentication
The ExtraHop system supports remote authentication for user access. Remote authentication enables organizations that have authentication systems such as LDAP (OpenLDAP or Active Directory, for example) to enable all or a subset of their users to log in to the system with their existing credentials.
Centralized authentication provides the following benefits:
- User password synchronization.
- Automatic creation of ExtraHop accounts for users without administrator intervention.
- Management of ExtraHop privileges based on user groups.
- Administrators can grant access to all known users or restrict access by applying LDAP filters.
Remote users
If your ExtraHop system is configured for SAML or LDAP remote authentication, you can create an account for those remote users. Preconfiguring accounts on the ExtraHop system for remote users enables you to share system customizations with those users before they log in.
If you choose to auto-provision users when you configure SAML authentication, then the user is automatically added to the list of local users when they log in for the first time. However, you can create a remote SAML user account on the ExtraHop system when you want to provision a remote user before that user has logged in to the system. Privileges are assigned to the user by the provider. After the user is created, you can add them to local user groups.
Next steps
User groups
User groups enable you to manage access to shared content by group instead of by individual user. Customized objects such as activity maps can be shared with a user group, and any user who is added to the group automatically has access. You can create a local user group—which can include remote and local users. Alternatively, if your ExtraHop system is configured for remote authentication through LDAP, you can configure settings to import your LDAP user groups.
- Click Create User Group to create a local group. The user group appears in the list. Then, select the checkbox next to the user group name and select users from the Filter users... drop-down list. Click Add Users to Group.
- (LDAP only) Click Refresh All User Groups or select multiple LDAP user groups and click Refresh Users in Groups.
- Click Reset User Group to remove all shared content from a selected user group. If the group no longer exists on the remote LDAP server, the group is removed from the user group list.
- Click Enable User Group or Disable User Group to control whether any group member can access shared content for the selected user group.
- Click Delete User Group to remove the selected user group from the system.
- View the following properties for listed user groups:
- Group Name
- Displays the name of the group. To view the members in the group, click the group name.
- Type
- Displays Local or Remote as the type of user group.
- Members
- Displays the number of users in the group.
- Shared Content
- Displays the number of user-created objects that are shared with the group.
- Status
- Displays whether the group is enabled or disabled on the system. When the status is Disabled, the user group is considered empty when performing membership checks; however, the user group can still be specified when sharing content.
- Members Refreshed (LDAP only)
- Displays the amount of time elapsed since the group membership was refreshed. User
groups are refreshed under the following conditions:
- Once per hour, by default. The refresh interval setting can be modified on the page.
- An administrator refreshes a group by clicking Refresh All User Groups or Refresh Users in Group, or programmatically through the REST API. You can refresh a group from the User Group page or from within the Member List page.
- A remote user logs in to the ExtraHop system for the first time.
- A user attempts to load a shared dashboard that they do not have access to.
User privileges
Administrators determine the module access level for users in the ExtraHop system.
For information about user privileges for the REST API, see the REST API Guide.
For information about remote user privileges, see the configuration guides for LDAP, RADIUS, SAML, and TACACS+.
Privilege Levels
Set the privilege level for your user to determine which areas of the ExtraHop system they can access.
- NDR Module Access
- Allows the user to access security features such as attack detections, investigations, and threat briefings.
- NPM Module Access
- Allows the user to access performance features such as operations detections and the ability to create custom dashboards.
- Packet and Session Key Access
- Allows the user to view and download packets and session keys, packets only, or packet slices only. Also allows the user to extract files associated with packets.
These privileges determine the level of functionality users have within the modules where they have been granted access.
For RevealX Enterprise, users with system access and administration privileges can access all features, packets, and session keys for their licensed modules.
For RevealX 360, system access and administration privileges, access to licensed modules, packets, and session keys must be assigned separately. RevealX 360 also offers an additional System Administration account that grants full system privileges except for the ability to manage users and API access.
The following table contains ExtraHop features and their required privileges. If no module requirement is noted, the feature is available in both the NDR and NDM modules.
| System and Access Administration | System Administration (RevealX 360 only) | Full Write | Limited Write | Personal Write | Full Read-Only | Restricted Read-Only | |
|---|---|---|---|---|---|---|---|
| Activity Maps | |||||||
| Create, view, and load shared activity maps | Y | Y | Y | Y | Y | Y | N |
| Save activity maps | Y | Y | Y | Y | Y | N | N |
| Share activity maps | Y | Y | Y | Y | N | N | N |
| Alerts | NPM module license and access required. | ||||||
| View alerts | Y | Y | Y | Y | Y | Y | Y |
| Create and modify alerts | Y | Y | Y | N | N | N | N |
| Analysis Priorities | |||||||
| View Analysis Priorities page | Y | Y | Y | Y | Y | Y | N |
| Add and modify analysis levels for groups | Y | Y | Y | N | N | N | N |
| Add devices to a watchlist | Y | Y | Y | N | N | N | N |
| Transfer priorities management | Y | Y | Y | N | N | N | N |
| Bundles | |||||||
| Create a bundle | Y | Y | Y | N | N | N | N |
| Upload and apply a bundle | Y | Y | Y | N | N | N | N |
| Download a bundle | Y | Y | Y | Y | Y | N | N |
| View list of bundles | Y | Y | Y | Y | Y | Y | N |
| Dashboards | NPM module license and access required to create and modify dashboards. | ||||||
| View and organize dashboards | Y | Y | Y | Y | Y | Y | Y |
| Create and modify dashboards | Y | Y | Y | Y | Y | N | N |
| Share dashboards | Y | Y | Y | Y | N | N | N |
| Detections | NDR module license and access required
to view and tune security detections and create
investigations. NPM module license and access required to view and tune performance detections. |
||||||
| View detections | Y | Y | Y | Y | Y | Y | Y |
| Acknowledge Detections | Y | Y | Y | Y | Y | N | N |
| Modify detection status and notes | Y | Y | Y | Y | N | N | N |
| Create and modify investigations | Y | Y | Y | Y | N | N | N |
| Create and modify tuning rules | Y | Y | Y | N | N | N | N |
| Device Groups | Administrators can configure the Device Group Edit Control global policy to specify whether users with limited write privileges can create and edit device groups. | ||||||
| Create and modify device groups | Y | Y | Y | Y (If the global privilege policy is enabled) | N | N | N |
| Metrics | |||||||
| View metrics | Y | Y | Y | Y | Y | Y | N |
| Notification Rules | NDR module license and access required
to create and modify notifications for security detections and
threat briefings. NPM module license and access required to create and modify notifications for performance detections. |
||||||
| Create and modify detection notification rules | Y | Y | Y | N | N | N | N |
| Create and modify threat briefing notification rules | Y | Y | Y | N | N | N | N |
| Create and modify system notification rules (RevealX only) | Y | Y | N | N | N | N | N |
| Records | Recordstore required. | ||||||
| View record queries | Y | Y | Y | Y | Y | Y | N |
| View record formats | Y | Y | Y | Y | Y | Y | N |
| Create, modify, and save record queries | Y | Y | Y | N | N | N | N |
| Create, modify, and save record formats | Y | Y | Y | N | N | N | N |
| Scheduled Reports | Console required. | ||||||
| Create, view, and manage scheduled reports | Y | Y | Y | Y | N | N | N |
| Threat Intelligence | NDR module license and access required. | ||||||
| Configure file hashing filters | Y | Y | N | N | N | N | N |
| Manage threat collections | Y | Y | N | N | N | N | N |
| Manage TAXII feeds | Y | Y | N | N | N | N | N |
| View threat intelligence information | Y | Y | Y | Y | Y | Y | N |
| Triggers | |||||||
| Create and modify triggers | Y | Y | Y | N | N | N | N |
| Administrative Privileges | |||||||
| Access the ExtraHop Administration settings | Y | Y | N | N | N | N | N |
| Connect to other appliances | Y | Y | N | N | N | N | N |
| Manage other appliances (Console) | Y | Y | N | N | N | N | N |
| Manage users and API access | Y | N | N | N | N | N | N |
Sessions
The ExtraHop system provides controls to view and delete user connections to the web interface. The Sessions list is sorted by expiration date, which corresponds to the date the sessions were established. If a session expires or is deleted, the user must log in again to access the web interface.
Remote Authentication
The ExtraHop system supports remote authentication for user access. Remote authentication enables organizations that have authentication systems such as LDAP (OpenLDAP or Active Directory, for example) to enable all or a subset of their users to log in to the system with their existing credentials.
Centralized authentication provides the following benefits:
- User password synchronization.
- Automatic creation of ExtraHop accounts for users without administrator intervention.
- Management of ExtraHop privileges based on user groups.
- Administrators can grant access to all known users or restrict access by applying LDAP filters.
Next steps
Configure remote authentication through LDAP
The ExtraHop system supports the Lightweight Directory Access Protocol (LDAP) for authentication and authorization. Instead of storing user credentials locally, you can configure your ExtraHop system to authenticate users remotely with an existing LDAP server. Note that ExtraHop LDAP authentication only queries for user accounts; it does not query for any other entities that might be in the LDAP directory.
Before you begin
- This procedure requires familiarity with configuring LDAP.
- Ensure that each user is in a permission-specific group on the LDAP server before beginning this procedure.
- If you want to configure nested LDAP groups, you must modify the Running Configuration file. Contact ExtraHop Support for help.
When a user attempts to log onto an ExtraHop system, the ExtraHop system tries to authenticate the user in the following ways:
- Attempts to authenticate the user locally.
- Attempts to authenticate the user through the LDAP server if the user does not exist locally and if the ExtraHop system is configured for remote authentication with LDAP.
- Logs the user onto the ExtraHop system if the user exists and the password is validated either locally or through LDAP. The LDAP password is not stored locally on the ExtraHop system. Note that you must enter the username and password in the format that your LDAP server is configured for. The ExtraHop system only forwards the information to the LDAP server.
- If the user does not exist or an incorrect password is entered, an error message appears on the login page.
| Important: | If you change LDAP authentication at a later time to a different remote authentication method, the users, user groups, and associated customizations that were created through remote authentication are removed. Local users are unaffected. |
Configure user privileges for remote authentication
You can assign user privileges to individual users on your ExtraHop system or configure and manage privileges through your LDAP server.
The ExtraHop system supports both Active Directory and POSIX group memberships. For Active Directory, memberOf is supported. For POSIX, memberuid, posixGroups, groupofNames, and groupofuniqueNames are supported.
-
Choose one of the following options from the Privilege assignment
options drop-down list:
- Obtain privileges level from remote server
This option assigns privileges through your remote authentication server. You must complete at least one of the following distinguished name (DN) fields.
System and Access Administration DN: Create and modify all objects and settings on the ExtraHop system, including Administration settings.
Full Write DN: Create and modify objects on the ExtraHop system, not including Administration settings.
Limited Write DN: Create, modify, and share dashboards.
Personal Write DN: Create personal dashboards and modify dashboards shared with the logged-in user.
Full read-only DN: View objects in the ExtraHop system.
Restricted Read-only DN: View dashboards shared with the logged-in user.
Packet Slices Access DN: View and download the first 64 bytes of packets captured through the ExtraHop Trace appliance.
Packet Access DN: View and download packets captured through the ExtraHop Trace appliance.
Packet and Session Keys Access DN: View and download packets and any associated SSL session keys captured through the ExtraHop Trace appliance.
NDR Module Access DN: View, acknowledge, and hide security detections that appear in the ExtraHop system.
NPM Module Access DN: View, acknowledge, and hide performance detections that appear in the ExtraHop system.
- Remote users have full write access
This option grants remote users full write access to the ExtraHop system. In addition, you can grant additional access for packet downloads, SSL session keys, NDR module access, and NPM module access.
- Remote users have full read-only access
This option grants remote users read-only access to the ExtraHop system. In addition, you can grant additional access for packet downloads, SSL session keys, NDR module access, and NPM module access.
- Obtain privileges level from remote server
- (Optional):
Configure packet and session key access. Select one of the following options to
allow remote users to download packet captures and SSL session keys.
- No access
- Packet slices only
- Packets only
- Packets and session keys
- (Optional):
Configure NDR and NPM module access.
- No access
- Full access
- Click Save and Finish.
- Click Done.
Configure remote authentication through RADIUS
The ExtraHop system supports Remote Authentication Dial In User Service (RADIUS) for remote authentication and local authorization only. For remote authentication, the ExtraHop system supports unencrypted RADIUS and plaintext formats.
Configure remote authentication through TACACS+
The ExtraHop system supports Terminal Access Controller Access-Control System Plus (TACACS+) for remote authentication and authorization.
Configure the TACACS+ server
In addition to configuring remote authentication on your ExtraHop system, you must configure your TACACS+ server with two attributes, one for the ExtraHop service and one for the permission level. If you have an ExtraHop packetstore, you can optionally add a third attribute for packet capture and session key logging.
-
For the second value, add 1.
For example, the following figure shows the extrahop attribute and a privilege level of readwrite.
 Here is a table of available permission attributes, values, and descriptions:
Attribute Value Description setup 1 Create and modify all objects and settings on the ExtraHop system and manage user access readwrite 1 Create and modify all objects and settings on the ExtraHop system, not including Administration settings limited 1 Create, modify, and share dashboards readonly 1 View objects in the ExtraHop system personal 1 Create personal dashboards for themselves and modify any dashboards that have been shared with them limited_metrics 1 View shared dashboards ndrfull 1 View, acknowledge, and hide security detections npmfull 1 View, acknowledge, and hide performance detections packetsfull 1 View and download packets stored on a connected packetstore. packetslicesonly 1 View and download packet slices on a connected packetstore. packetsfullwithkeys 1 View and download packets and associated session keys stored on a connected packetstore.
API Access
The API Access page enables you to generate, view, and manage access for the API keys that are required to perform operations through the ExtraHop REST API.
Manage API key access
Users with system and access administration privileges can configure whether users can generate API keys for the ExtraHop system. You can allow only local users to generate keys, or you can also disable API key generation entirely.
- Log in to the Administration settings on the ExtraHop system through https://<extrahop-hostname-or-IP-address>/admin.
- In the Access Settings section, click API Access.
-
In the Manage API Access section, select one of the
following options:
- Allow all users to generate an API key: Local and remote users can generate API keys.
- Only local users can generate an API key: Remote users cannot generate API keys.
- No users can generate an API key: No API keys can be generated by any user.
- Click Save Settings.
Configure cross-origin resource sharing (CORS)
Cross-origin resource sharing (CORS) allows you to access the ExtraHop REST API across domain-boundaries and from specified web pages without requiring the request to travel through a proxy server.
- Log in to the Administration settings on the ExtraHop system through https://<extrahop-hostname-or-IP-address>/admin.
- In the Access Settings section, click API Access.
-
In the CORS Settings section, specify one of the following
access configurations.
- To add a specific URL, type an origin URL in the text box, and then
click the plus (+) icon or press ENTER.
The URL must include a scheme, such as HTTP or HTTPS, and the exact domain name. You cannot append a path; however, you can provide a port number.
- To allow access from any URL, select the Allow API requests
from any Origin checkbox.
Note: Allowing REST API access from any origin is less secure than providing a list of explicit origins.
- To add a specific URL, type an origin URL in the text box, and then
click the plus (+) icon or press ENTER.
- Click Save Settings and then click Done.
Generate an API key
You must generate an API key before you can perform operations through the ExtraHop REST API. Keys can be viewed only by the user who generated the key or by users with system and access administration privileges. After you generate an API key, add the key to your request headers or the ExtraHop REST API Explorer.
Before you begin
Make sure the ExtraHop system is configured to allow API key generation.- In the Access Settings section, click API Access.
- In the Generate an API Key section, type a description for the new key, and then click Generate.
- Scroll down to the API Keys section and copy the API key that matches your description.
Privilege levels
User privilege levels determine which ExtraHop system and administration tasks the user can perform through the ExtraHop REST API.
You can view the privilege levels for users through the granted_roles and effective_roles properties. The granted_roles property shows you which privilege levels are explicitly granted to the user. The effective_roles property shows you all privilege levels for a user, including those received outside of the granted role, such as through a user group.
The granted_roles and effective_roles properties are returned by the following operations:
- GET /users
- GET /users/{username}
The granted_roles and effective_roles properties support the following privilege levels. Note that the type of tasks for each ExtraHop system vary by the available resources listed in the REST API Explorer and depend on the modules enabled on the system and user module access privileges.
| Privilege level | Actions allowed |
|---|---|
| "system": "full" |
|
| "write": "full" |
|
| "write": "limited" |
|
| "write": "personal" |
|
| "metrics": "full" |
|
| "metrics": "restricted" |
|
| "ndr": "full" |
This is a module access privilege that can be granted to a user in addition to one of the following system access privilege levels:
|
| "ndr": "none" |
This is a module access privilege that can be granted to a user in addition to one of the following system access privilege levels:
|
| "npm": "full" |
This is a module access privilege that can be granted to a user in addition to one of the following system access privilege levels:
|
| "npm": "none" |
This is a module access privilege that can be granted to a user in addition to one of the following system access privilege levels:
|
| "packets": "full" |
This is an add-on privilege that can be granted to a user with one of the following privilege levels:
|
| "packets": "full_with_keys" |
This is an add-on privilege that can be granted to a user with one of the following privilege levels:
|
| "packets": "slices_only" |
This is an add-on privilege that can be granted to a user with one of the following privilege levels:
|
Appliance Settings
You can configure the following components of the ExtraHop appliance in the Appliance Settings section.
All appliances have the following components:
- Running Config
- Download and modify the running configuration file.
- Services
- Enable or disable the Web Shell, management GUI, SNMP service, SSH access, and SSL session key receiver. The SSL Session Key Receiver option appears only on packet sensors.
- Firmware
- Upgrade the ExtraHop system firmware.
- System Time
- Configure the system time.
- Shutdown or Restart
- Halt and restart system services.
- License
- Update the license to enable add-on modules.
- Disks
- Provides information about the disks in the appliance.
The following components only appear on the specified appliances:
- Console Nickname
- Assign a nickname to an ExtraHop console. This setting is available only on the console.
- Reset Packetstore
- Delete all packets stored on ExtraHop packetstores. The Reset Packetstore page appears only on packetstores.
Running Config
The running configuration file specifies the default system configuration. When you modify system settings, you must save the running configuration file to preserve those modifications after a system restart.
| Note: | Making configuration changes to the code from the Edit page is not recommended. You can make most system modifications through other pages in the Administration settings. |
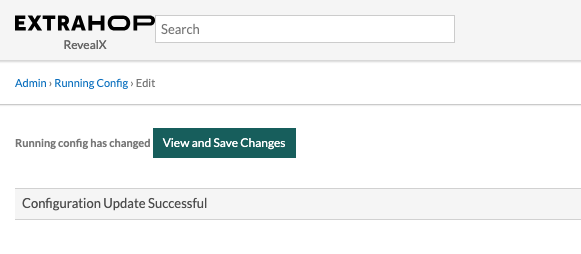
Save system settings to the running configuration file
When you modify any of the system configuration settings on an ExtraHop system, you must confirm the updates by saving the running configuration file. If you do not save the settings, the changes are lost when your ExtraHop system restarts.
-
Click View and Save Changes.
Edit the running configuration file
The ExtraHop Administration settings provide an interface to view and modify the code that specifies the default system configuration. In addition to making changes to the running configuration file through the Administration settings, you can also make changes on the Running Config page.
| Important: | Making configuration changes to the code from the Edit page is not recommended. You can make most system modifications through other Administration settings. |
Download the running configuration as a text file
You can download the running configuration file to your workstation. You can open this text file and make changes to it locally, before copying those changes into the Running Config window.
- Log in to the Administration settings on the ExtraHop system through https://<extrahop-hostname-or-IP-address>/admin.
- In the Appliance Settings section, click Running Config.
- Click Download config as a file.
Disable ICMPv6 Destination Unreachable messages
You can prevent the ExtraHop system from generating ICMPv6 Destination Unreachable messages. You might want to disable ICMPv6 Destination Unreachable messages for security reasons per RFC 4443.
To disable ICMPv6 Destination Unreachable messages, you must edit the Running Configuration. However, we recommend that you do not manually edit the Running Configuration file without direction from ExtraHop Support. Manually editing the running configuration file incorrectly might cause the system to become unavailable or stop collecting data. You can contact ExtraHop Support.
Disable specific ICMPv6 Echo Reply messages
You can prevent the ExtraHop system from generating Echo Reply messages in response to ICMPv6 Echo Request messages that are sent to an IPv6 multicast or anycast address. You might want to disable these messages to reduce unnecessary network traffic.
To disable specific ICMPv6 Echo Reply messages, you must edit the running configuration file. However, we recommend that you do not manually edit the running configuration file without direction from ExtraHop Support. Manually editing this file incorrectly might cause the system to become unavailable or stop collecting data. You can contact ExtraHop Support.
Services
These services run in the background and perform functions that do not require user input. These services can be started and stopped through the Administration settings.
- Enable or disable the Management GUI
- The Management GUI provides browser-based access to the ExtraHop system. By default, this
service is enabled so that ExtraHop users can access the ExtraHop system through a web
browser. If this service is disabled, the Apache Web Server session is terminated and all
browser-based access is disabled.
Warning: Do not disable this service unless you are an experienced ExtraHop administrator and you are familiar with the ExtraHop CLI. - Enable or disable the SNMP Service
- Enable the SNMP service on the ExtraHop system when you want your network device monitoring
software to collect information about the ExtraHop system. This service is disabled by
default.
- Enable the SNMP service from the Services page by selecting the Disabled checkbox and then clicking Save. After the page refreshes, the Enabled checkbox appears.
- Configure the SNMP service and download the ExtraHop MIB file
- Enable or disable SSH Access
- SSH access is enabled by default to enable users to securely log in to the ExtraHop
command-line interface (CLI).
Note: The SSH Service and the Management GUI Service cannot be disabled at the same time. At least one of these services must be enabled to provide access to the system. - Enable or disable the SSL Session Key Receiver (Sensor only)
- You must enable the session key receiver service through the Administration settings before
the ExtraHop system can receive and decrypt session keys from the session key forwarder. By
default, this service is disabled.
Note: If you do not see this checkbox and have purchased the SSL Decryption license, contact ExtraHop Support to update your license.
SNMP Service
Configure the SNMP service on your ExtraHop system so that you can configure your network device monitoring software to collect information about your ExtraHop system through the Simple Network Management Protocol (SNMP).
For example, you can configure your monitoring software to determine how much free space is available on an ExtraHop system and send an alert if the system is over 95% full. Import the ExtraHop SNMP MIB file into your monitoring software to monitor all ExtraHop-specific SNMP objects. You can configure settings for SNMPv1/SNMPv2 and SNMPv3.
Firmware
The Administration settings provide an interface to upload and delete the firmware on ExtraHop appliances. The firmware file must be accessible from the computer where you will perform the upgrade.
Before you begin
Be sure to read the release notes for the firmware version that you want to install. Release notes contain upgrade guidance as well as known issues that might affect critical workflows in your organization.Upgrade the firmware on your ExtraHop system
The following procedure shows you how to upgrade your ExtraHop system to the latest firmware release. While the firmware upgrade process is similar across all ExtraHop appliances, some appliances have additional considerations or steps that you must address before you install the firmware in your environment. If you need assistance with your upgrade, contact ExtraHop Support.
| Video: | See the related training: Update Firmware |
| Important: | When settings migration fails during firmware upgrade, the previously installed firmware version and ExtraHop system settings are restored. |
Pre-upgrade checklist
Here are some important considerations and requirements about upgrading ExtraHop appliances.
- A system notice appears on consoles and sensors connected to ExtraHop Cloud Services when a new firmware version is available.
- Verify that your RevealX 360 system has been upgraded to version 9.7 before upgrading your self-managed sensors.
- If you are upgrading from firmware version 8.7 or earlier, contact ExtraHop Support for additional upgrade guidance.
- If you have multiple types of ExtraHop appliances, you must upgrade them in the
following order:
- Console
- Sensors (EDA and Ultra)
- Recordstores
- Packetstores
| Note: | Your browser might time out after 5 minutes of inactivity. Refresh the browser page if
the update appears incomplete. If the browser session times out before the ExtraHop system is able to complete the update process, you can try the following connectivity tests to confirm the status up the upgrade process:
|
Console upgrades
- For large console deployments (managing 50,000 devices or more), reserve a minimum of one hour to perform the upgrade.
- The console firmware version must be greater than or equal to the firmware version of all connected appliances. To ensure feature compatibility, all connected appliances should be running firmware version 8.7 or later.
Recordstore upgrades
- Do not upgrade recordstores to a firmware version that is newer than the version installed on connected consoles and sensors.
- After upgrading the console and sensors, disable record ingest on the recordstore before upgrading the recordstore.
- You must upgrade all recordstore nodes in a recordstore cluster. The cluster will not
function correctly if nodes are on dissimilar firmware versions.
Important: The messages Could not determine ingest status on some nodes and Error appear on the Cluster Data Management page in the Administration settings of the upgraded nodes until all nodes in the cluster are upgraded. These errors are expected and can be ignored. - You must enable record ingest and shard reallocation from the Cluster Data Management page after all nodes in the recordstore cluster are upgraded.
Upgrade the firmware on a console and sensor
Upgrade the firmware on recordstores
Next steps
After all nodes in the recordstore cluster are upgraded, re-enable record ingest and shard reallocation on the cluster. You only need to perform these steps on one recordstore node.- In the Recordstore Cluster Settings section, click Cluster Data Management.
- Click Enable Record Ingest.
- Click Enable Shard Reallocation.
Upgrade connected sensors in RevealX 360
Administrators can upgrade sensors that are connected to RevealX 360.
Before you begin
- Your user account must have privileges on RevealX 360 for System and Access Administration or System Administration.
- Sensors must be connected to ExtraHop Cloud Services
- Notifications appear when a new firmware version is available
- You can upgrade multiple sensors at the same time
-
From the Overview page, click System Settings
 and then click
Sensors.
Sensors that are eligible for upgrade display an up arrow in the Sensor Version field.
and then click
Sensors.
Sensors that are eligible for upgrade display an up arrow in the Sensor Version field.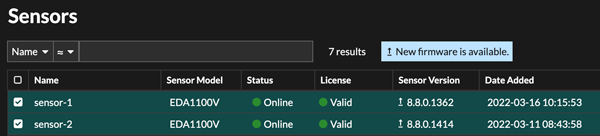
System Time
The System Time page displays the current time settings configured for your ExtraHop system. View the current system time settings, the default display time for users, and details for configured NTP servers.
System time is the time and date tracked by services running on the ExtraHop system to ensure accurate time calculations. By default, the system time on the sensor or console is configured locally. For better accuracy, we recommend that you configure the system time through an NTP time server.
When capturing data, the system time must match the time on connected sensors to ensure that time stamps are correct and complete in scheduled reports, exported dashboards and chart metrics. If time sync issues occur, check that the configured system time, external time servers, or NTP servers are accurate. Reset the system time or sync NTP servers if needed
The table below contains details about the current system time configuration. Click Configure Time to configure system time settings.
| Detail | Description |
|---|---|
| Time Zone | Displays the currently selected time zone. |
| System Time | Displays the current system time. |
| Time Servers | Displays a comma-separated list of configured time servers. |
Default display time for users
The Default Display Time for Users section shows the time displayed to all users in the ExtraHop system unless a user manually changes their displayed time zone.
To modify the default display time, select one of the following options and then click Save Changes:
- Browser time
- System time
- UTC
NTP Status
The NTP Status table displays the current configuration and status of all NTP servers that keep the system clock in sync. The table below contains details about each configured NTP server. Click Sync Now to sync the current system time to a remote server.
| remote | The host name or IP address of the remote NTP server you have configured to synchronize with. |
| st | The stratum level, 0 through 16. |
| t | The type of connection. This value can be u for unicast or manycast, b for broadcast or multicast, l for local reference clock, s for symmetric peer, A for a manycast server, B for a broadcast server, or M for a multicast server. |
| when | The last time when the server was queried for the time. The default value is seconds, or m is displayed for minutes, h for hours, and d for days. |
| poll | How often the server is queried for the time, with a minimum of 16 seconds to a maximum of 36 hours. |
| reach | Value that shows the success and failure rate of communicating with the remote server. Success means the bit is set, failure means the bit is not set. 377 is the highest value. |
| delay | The round trip time (RTT) of the ExtraHop appliance communicating with the remote server, in milliseconds. |
| offset | Indicates how far off the ExtraHop appliance clock is from the time reported by the server. The value can be positive or negative, displayed in milliseconds. |
| jitter | Indicates the difference, in milliseconds, between two samples. |
Configure the system time
By default, the ExtraHop system synchronizes the system time through the *.extrahop.pool.ntp.org network time protocol (NTP) servers. If your network environment prevents the ExtraHop system from communicating with these time servers, you must configure an alternate time server source.
Before you begin
| Important: | Always configure more than one NTP server to increase the accuracy and reliability of time kept on the system. |
The NTP Status table displays a list of NTP servers that keep the system clock in sync. To sync the current system time a remote server, click the Sync Now button.
Shutdown or restart
You can shut down or restart the Trace appliance in the Administration settings.
- In the Appliance Settings section, click Shutdown or Restart.
-
In the Actions column, select one of the following options:
- Click Restart and then on the confirmation page, click Restart to restart the appliance.
- Click Shutdown, and then on the confirmation page, click Shut down to shut down the system and power off the appliance.
License
The Administration settings provide an interface to add and update licenses for add-in modules and other features available in the ExtraHop system. The License Administration page includes the following licensing information and settings:
- Manage license
- Provides an interface to add and update the ExtraHop system
- System Information
- Displays the identification and expiration information about the ExtraHop system.
- Features
- Displays the list of licensed features and whether the licensed features are enabled or disabled.
Register your ExtraHop system
This guide provides instructions on how to apply a new product key and activate all of your purchased modules. You must have privileges on the ExtraHop system to access the Administration settings.
Register the appliance
Before you begin
| Note: | If you are registering a sensor or a console, you can optionally enter the product key after you accept the EULA and log in to the ExtraHop system (https://<extrahop_ip_address>/). |
Next steps
Have more questions about ExtraHop licensing works? See the License FAQ.Troubleshoot license server connectivity
For ExtraHop systems licensed and configured to connect to ExtraHop Cloud Services, registration and verification is performed through an HTTPS request to ExtraHop Cloud Services.
If your ExtraHop system is not licensed for ExtraHop Cloud Services or is not yet licensed, the system attempts to register the system through a DNS TXT request for regions.hopcloud.extrahop.com and an HTTPS request to all ExtraHop Cloud Services regions. If this request fails, the system tries to connect to the ExtraHop licensing server through DNS server port 53. The following procedure is useful to verify that the ExtraHop system can communicate with the licensing server through DNS.
nslookup -type=NS d.extrahop.com
Non-authoritative answer:
d.extrahop.com  nameserver = ns0.use.d.extrahop.com.
d.extrahop.com  nameserver = ns0.usw.d.extrahop.com.
If the name resolution is not successful, make sure that your DNS server is properly configured to lookup the
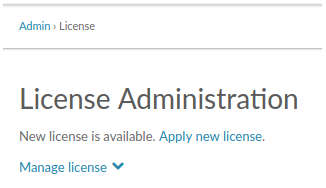
Apply an updated license
When you purchase a new protocol module, service, or feature, the updated license is automatically available on the ExtraHop system. However you must apply the updated license to the system through the Administration settings for the new changes to take effect.
-
In the Appliance Settings section, click
License.
A message appears about the availability of your new license.
Update a license
If ExtraHop Support provides you with a license file, you can install this file on your appliance to update the license.
| Note: | If you want to update the product key for your appliance, you must register your ExtraHop system. |
Disks
The Disks page provides information about the configuration and status of the disks in your Trace appliance as well the disks in any attached storage units.
| Note: | We recommend that you configure the settings to receive email notifications about your system health. If a disk is beginning to experience problems, you will be alerted. |
The following information displays on the page:
- Drive Map
- Provides a visual representation of the front of the Trace appliance. The drive map does not appear in the Administration settings on the virtual Trace appliance.
- RAID Disk Details
- Provides access to detailed information about all the disks in the node.
- Packetstore
- Displays information about disks reserved for packet storage and the option to encrypt the packetstore disk. For more information, see the Encrypt the packetstore disk section.
- Direct Connected Disks
- Displays information about the SD memory cards. The memory cards have the following roles:
-
- Firmware
- Displays information about disks reserved for the firmware.
- Utility
- Displays information about disks reserved for system files.
- Extended Storage Units
- Displays information about ExtraHop extended storage units.
Encrypt the packetstore disk
You can encrypt the disk, including attached extended storage units that packet captures are stored on for increased security. The packetstore disk is secured with 256-bit AES encryption.
| Warning: | You cannot decrypt a packetstore disk after it is encrypted. You can reformat an encrypted disk; however, all data stored on the disk will be lost. To perform a secure delete (secure wipe) of all system data, see the ExtraHop Rescue Media Guide. |
| Important: | The packetstore is locked when the ETA appliance is restarted. Before packets can written to disk, you must unlock the disk from the Packetstore Encryption Settings page. |
- In the Appliance Settings section, click Disks.
-
Navigate to the Packetstore Encryption Settings
page.
Option Description For virtual appliances In the Direct Connected Disks table, click Settings. For physical appliances In the Packetstore section, next to Packetstore Encryption, click Settings. - Click Encrypt Packetstore.
-
Specify a disk encryption key by choosing one of the following options.
- To encrypt the disk with a passphrase, type a passphrase of at least 8 characters into the Passphrase and Confirm fields. The passphrase must contain a combination of uppercase letters, lowercase letters, numbers, and special characters.
- To encrypt the disk with a key file, click Choose File, and then browse to an encryption key file.
- Click Encrypt.
Change the packet capture disk encryption key
- In the Status section, click Disks.
- In the Datastore section, click Packetstore Encryption Settings.
- Click Change Packetstore Encryption Key.
-
Specify the existing encryption key.
Option Description If you entered an encryption passphrase Type a passphrase into the Passphrase field. If you selected an encryption key file Click Choose File, and then browse to an encryption key file. -
Specify a new disk encryption key.
Option Description To enter an encryption passphrase Type a passphrase into the Passphrase and Confirm fields. To select an encryption key file Click Choose File, and then browse to an encryption key file. - Click Change Key.
Add storage capacity to an ExtraHop packetstore
Adding additional storage capacity to your ExtraHop packetstore enables you to store more packets and extend the amount of lookback available when running packet queries. You can safely add ExtraHop Extended Storage Units (ESUs) to a packetstore and retain all packets currently stored on the packetstore.
Managing extended storage units with a foreign packetstore status
When an extended storage unit with an existing RAID configuration is connected to a RAID controller on the Trace appliance, the extended storage unit is designated as "foreign". This status can occur when an extended storage unit was previously connected and then disconnected from the RAID controller on the Trace appliance and when the extended storage unit was configured on a RAID controller other than the Trace appliance it was originally connected to.
Reset Packetstore
In certain circumstances, you might want to reset the packetstore. For example, if you accidentally collected packets with sensitive data or from the wrong data feed, you can reset the datastore so the packets do not appear in any packet queries.
| Warning: |
If you reset the packetstore, all existing packets will be inaccessible to packet queries. |
- In the Appliance Settings section, click Reset Packetstore.
- Type YES in the confirmation field and then click Reset Packetstore.
Trace Cluster Settings
The Trace Cluster Settings section includes the following sections:
- Connect to RevealX 360
- This option only appears when the packetstore is licensed for RevealX 360.
- Manager
- Enable a console to remotely run support scripts and upgrade firmware on the packetstore.
- View the hostname of the console that is configured to manage the packetstore as well as a list of all sensors and consoles connected to the packetstore.
- Packet Query Status
- View a list of all packet queries generated from a connected console and connected sensors.
Manager
The Manager page contains the following information and controls:
- Manager
- Displays the hostname of the console that is configured to manage the packetstore. To
connect a console through a tunneled connection, click Manage with a Command
Appliance. A tunneled connection might be required if a direct connection cannot
be established through the Command appliance.Click Remove Manager to remove the console as the manager.
Note: The packetstore can be managed by only one console. - Connected Appliances
- Displays a table of all sensors and consoles connected to the packetstore. The table includes the hostname, product key and IP address of the connected ExtraHop system.
Packet Query Status
The Packet Query Status page provides a collection of metrics about the packetstore.
The metrics on this page can help you troubleshoot problems and determine why the packetstore is not performing as expected.
- Packet Query Status
- Displays statistics about packet queries run from the Packets page.
If the number of simultaneous packet queries exceeds the maximum allotted system memory, errors might occur and you must delete in-progress or completed queries by clicking the Remove or Remove All button before you can create new queries. Queries are cached until you navigate away from the Packets page.
- Packetstore Disks
- Displays statistics about packet storage disks.
- SSL Session Key Storage
- Displays statistics about session keys stored on the packetstore. For information about session key storage, see Store SSL session keys on connected packetstores.
Remove packet queries
You can remove one or more packet queries to clear query memory and disk cache.
- In the Trace Cluster Settings section, click Packet Query Status.
-
Do one of the following:
- To remove a single query, click Remove in the Actions column of the query you want to remove.
- To remove all listed queries, click Remove All.
Manage with a console
Connect the packetstore to a console to remotely run support scripts and upgrade firmware on the packetstore from the console.
The packetstore connects to the console through a tunneled connection. Tunneled connections are required in network environments where a direct connection from the console is not possible because of firewalls or other network restrictions.
Before you begin
| Note: | This procedure only enables you to perform management functions from a connected console or RevealX 360. To search and download packets from the ExtraHop system, follow the instructions in Connect sensors and console to the packetstore. |
Thank you for your feedback. Can we contact you to ask follow up questions?