Deploy an ExtraHop recordstore in AWS
In this guide, you will learn how to launch the ExtraHop recordstore AMI in your Amazon Web Services (AWS) environment, and join multiple recordstores to create a cluster.
System requirements
Your environment must meet the following requirements to deploy a virtual recordstore in AWS:
- An AWS account
- Access to the Amazon Machine Image (AMI) of the ExtraHop recordstore.
- An ExtraHop product key
- An AWS instance type that most closely matches the sensor VM size, as follows:
Recordstore Size Recommended Instance Type EXA 5100v Small m5.2xlarge (8 vCPU and 32 GB RAM) Medium m5.4xlarge (16 vCPU and 64 GB RAM) Large c5.9xlarge (36 vCPU and 72 GB RAM) - A datastore size between 200 GB and 2 TB, depending on the selected instance type.
Instance Type Datastore size m5.2xlarge Between 200 GB and 500 GB m5.4xlarge Between 200 GB and 1 TB c5.9xlarge Between 200 GB and 2 TB
Create the recordstore in AWS
Before you begin
The Amazon Machine Images (AMIs) of ExtraHop recordstores are not publicly shared. Before you can start the deployment procedure, you must send your AWS account ID to your ExtraHop representative. Your account ID will be linked to the ExtraHop AMIs.Configure the recordstore
After you obtain the IP address for the recordstore, log in to the Administration settings on the ExtraHop system through https://<extrahop-hostname-or-IP-address>/admin and complete the following recommended procedures.
Create a recordstore cluster
For the best performance, data redundancy, and stability, you must configure at least three ExtraHop recordstores in a cluster.
| Important: | If you are creating a recordstore cluster with six to nine nodes, you must configure the cluster with at least three manager-only nodes. For more information, see Deploying manager-only nodes. |
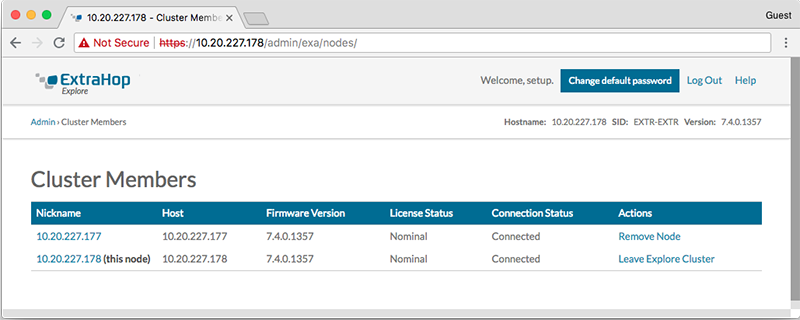
In the following example, the recordstores have the following IP addresses:
- Node 1: 10.20.227.177
- Node 2: 10.20.227.178
- Node 3: 10.20.227.179
You will join nodes 2 and 3 to node 1 to create the recordstore cluster. All three nodes are data nodes. You cannot join a data node to a manager node or join a manager node to a data node to create a cluster.
| Important: | Each node that you join must have the same configuration (physical or virtual) and the same ExtraHop firmware version. |
Before you begin
You must have already installed or provisioned the recordstores in your environment before proceeding.Next steps
Connect the EXA 5200 to the ExtraHop system.Configure email notifications
You must configure an email server and sender before the recordstore can send notifications about system alerts by email.
You can receive the following alerts from the system:
- A virtual disk is in a degraded state.
- A physical disk is in a degraded state.
- A physical disk has an increasing error count.
- A registered recordstore node is missing from the cluster. The node might have failed, or is powered off.
Connect the recordstore to a console and all sensors
After you deploy the recordstore, you must establish a connection from the ExtraHop console and all sensors before you can query records.
| Important: | Connect the sensor to each recordstore node so that the sensor can distribute the workload across the entire recordstore cluster. |
| Note: | If you manage all of your sensors from a console, you only need to perform this procedure from the console. |
- Log in to the Administration settings on the ExtraHop system through https://<extrahop-hostname-or-IP-address>/admin.
- In the ExtraHop Recordstore Settings section, click Connect Recordstore.
- Click Add New.
- In the Node 1 section, type the hostname or IP address of any recordstore in the cluster.
- For each additional node in the cluster, click Add New and enter the individual hostname or IP address for the node.
- Click Save.
- Confirm that the fingerprint on this page matches the fingerprint of node 1 of the recordstore cluster.
- In the Explore Setup Password field, type the password for the node 1 setup user account and then click Connect.
- When the recordstore cluster settings are saved, click Done.
Send record data to the recordstore
After your recordstore is connected to your console and sensors, you must configure the type of records you want to store.


Thank you for your feedback. Can we contact you to ask follow up questions?