Configure SAML single sign-on with Google

You can configure your ExtraHop system to enable users to log in to the system through the Google identity management service.

Before you begin

  • You should be familiar with administering Google Admin.
  • You should be familiar with administering ExtraHop systems.

These procedures require you to copy and paste information between the ExtraHop system and Google Admin console, so it is helpful to have each system open side-by-side.

Enable SAML on the ExtraHop system

  1. Log in to the Administration settings on the ExtraHop system through https://<extrahop-hostname-or-IP-address>/admin.
  2. In the Access Settings section, click Remote Authentication.
  3. From the Remote authentication method drop-down list, select SAML.
  4. Click Continue.
  5. Click View SP Metadata.
  6. Copy the ACS URL and Entity ID to a text file.
    You will paste this information into the Google configuration in a later procedure.

Add user custom attributes

  1. Log in to the Google Admin console.
  2. Click Users.
  3. Click the Manage custom attributes icon .
  4. Click Add Custom Attribute.
  5. In the Category field, type ExtraHop.
  6. (Optional): In the Description field, type a description.
  7. In the Custom fields section, enter the following information:
    1. In the Name field, type writelevel.
    2. From the Info Type drop-down list, select Text.
    3. From the Visibility drop-down list, select Visible to domain.
    4. From the No. of values drop-down list, select Single Value.
  8. Enable NDR module access:
    1. In the Name field, type ndrlevel.
    2. From the Info Type drop-down list, select Text.
    3. From the Visibility drop-down list, select Visible to domain.
    4. From the No. of values drop-down list, select Single Value.
  9. Enable NPM module access:
    1. In the Name field, type npmlevel.
    2. From the Info Type drop-down list, select Text.
    3. From the Visibility drop-down list, select Visible to domain.
    4. From the No. of values drop-down list, select Single Value.
  10. (Optional): If you have connected packetstores, enable packet access by configuring a custom field:
    1. In the Name field, type packetslevel.
    2. From the Info Type drop-down list, select Text.
    3. From the Visibility drop-down list, select Visible to domain.
    4. From the No. of values drop-down list, select Single Value.
  11. Click Add.

Add identity provider information from Google to the ExtraHop system

  1. In the Google Admin console, click the Main menu icon and select Apps > SAML apps.
  2. Click the Enable SSO for a SAML application icon .
  3. Click SETUP MY OWN CUSTOM APP.
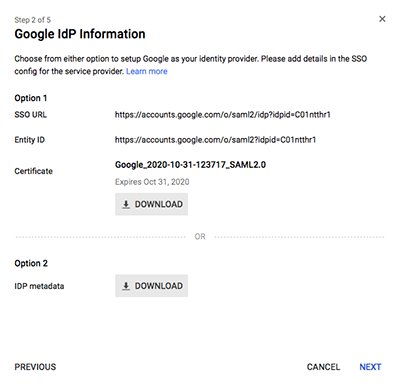
  4. On the Google IdP Information screen, click the Download button to download the certificate (GoogleIDPCertificate.pem).
  5. Return to the Administration settings on the ExtraHop system.
  6. Click Add Identity Provider.
  7. In the Provider Name field, type a unique name.
    This name appears on the ExtraHop system login page.
  8. From the Google IdP Information screen, copy the SSO URL and paste it into the SSO URL field on the ExtraHop appliance.
  9. From the Google IdP Information screen, copy the Entity ID and paste into the Entity ID field on the ExtraHop system.
  10. Open the GoogleIDPCertificate in a text editor, copy the contents and paste into the Public Certificate field on the ExtraHop system.
  11. Choose how you would like to provision users from one of the following options.
    • Select Auto-provision users to create a new remote SAML user account on the ExtraHop system when the user first logs in.
    • Clear the Auto-provision users checkbox and manually configure new remote users through the ExtraHop Administration settings or REST API. Access and privilege levels are determined by the user configuration in Google.
  12. The Enable this identity provider option is selected by default and allows users to log in to the ExtraHop system. To prevent users from logging in, clear the checkbox.
  13. Configure user privilege attributes.
    You must configure the following set of user attributes before users can log in to the ExtraHop system through an identity provider. Values are user-definable; however, they must match the attribute names that are included in the SAML response from your identity provider. Values are not case sensitive and can include spaces. For more information about privilege levels, see Users and user groups..
    Important:You must specify the attribute name and configure at least one attribute value other than No access to enable users to log in.
    In the example below, the Attribute Name field is the application attribute and the Attribute Value is the user field name configured when creating the ExtraHop application on the identity provider.
    Field Name Example Attribute Value
    Attribute Name urn:extrahop:saml:2.0:writelevel
    System and access administration unlimited
    Full write privileges full_write
    Limited write privileges limited_write
    Personal write privileges personal_write
    Full read-only privileges full_readonly
    Restricted read-only privileges restricted_readonly
    No access none
  14. Configure NDR module access.
    Field Example Attribute Value
    Attribute Name urn:extrahop:saml:2.0:ndrlevel
    Full access full
    No access none
  15. Configure NPM module access.
    Field Example Attribute Value
    Attribute Name urn:extrahop:saml:2.0:npmlevel
    Full access full
    No access none
  16. (Optional): Configure packets and session key access.
    Configuring packets and session key attributes is optional and only required when you have a connected packetstore.
    Field Name Example Attribute Value
    Attribute Name urn:extrahop:saml:2.0:packetslevel
    Packets and session keys full_with_keys
    Packets only full
    Packets slices only slices
    No access none
  17. Click Save.
  18. Save the Running Config.

Add ExtraHop service provider information to Google

  1. Return to the Google Admin console and click Next on the Google Idp Information page to continue to step 3 of 5.
  2. In the Application Name field, type a unique name to identify the ExtraHop system.
    Each ExtraHop system that you create a SAML application for needs a unique name.
  3. (Optional): Type a description for this application or upload a custom logo.
  4. Click Next.
  5. Copy the Assertion Consumer Service (ACS) URL from the ExtraHop system and paste into the ACS URL field in Google Admin.
    Note:You might need to manually edit the ACS URL if the URL contains an unreachable hostname, such as the default system hostname extrahop. We recommend that you specify the fully qualified domain name for the ExtraHop system in the URL.
  6. Copy the SP Entity ID from the ExtraHop system and paste into the Entity ID field in Google Admin.
  7. Select the Signed Response checkbox.
  8. In the Name ID section, leave the default Basic Information and Primary Email settings unchanged.
  9. From the Name ID Format drop-down list, select PERSISTENT.
  10. Click Next.
  11. On the Attribute Mapping screen, click ADD NEW MAPPING.
  12. Add the following attributes exactly as shown.
    The first four attributes are required. The packetslevel attribute is optional and is only required if you have a connected packetstore. If you have a packetstore and you do not configure the packetslevel attribute, users will be unable to view or download packet captures in the ExtraHop system.
    Application Attribute Category User Field
    urn:oid:0.9.2342.19200300.100.1.3 Basic Information Primary Email
    urn:oid:2.5.4.4 Basic Information Last Name
    urn:oid:2.5.4.42 Basic Information First Name
    urn:extrahop:saml:2.0:writelevel ExtraHop writelevel
    urn:extrahop:saml:2.0:ndrlevel ExtraHop ndrlevel
    urn:extrahop:saml:2.0:npmlevel ExtraHop npmlevel
    urn:extrahop:saml:2.0:packetslevel ExtraHop packetslevel
  13. Click Finish and then click OK.
  14. Click Edit Service.
  15. Select On for everyone.
  16. Click Save.

Assign user privileges

  1. Click Users to return to the table of all users in your organizational units.
  2. Click the name of the user you want to allow to log in to the ExtraHop system.
  3. In the User information section, click User details.
  4. In the ExtraHop section, click writelevel and type one of the following privilege levels.
    • unlimited
    • full_write
    • limited_write
    • personal_write
    • full_readonly
    • restricted_readonly
    • none
    For information about user privileges, see Users and user groups.
  5. (Optional): If you added the packetslevel attribute above, click packetslevel and type one of the following privileges.
    • full
    • full_with_write
    • none
  6. (Optional): If you added the detectionslevel attribute above, click detectionslevel and type one of the following privileges.
    • full
    • none
  7. Click Save.

Log in to the ExtraHop system

  1. Log in to the ExtraHop system through https://<extrahop-hostname-or-IP-address>.
  2. Click Log in with <provider name>.
  3. Sign in to your provider with your email address and password. You are automatically directed to the ExtraHop Overview page.
Last modified 2024-09-04