Deploy ERSPAN with an ExtraHop sensor and Brocade 5600 vRouter in AWS

This guide explains how to install and configure an example environment within Amazon Web Services (AWS) through built‐in ERSPAN capabilities on the ExtraHop sensor and the Brocade 5600 vRouter.

Encapsulated Remote Switched Port Analyzer (ERSPAN) enables you to monitor traffic on multiple network interfaces or VLANs and send the monitored traffic to one or more destinations, including ExtraHop sensors. Configuring ERSPAN on the Brocade 5600 vRouter with the ExtraHop sensor enables additional mission-critical traffic analytics, monitoring, and visibility across AWS and other cloud platforms.

Additional references

The document assumes a certain level of familiarity with networking. Completing the steps in this guide requires an AWS account. If you are new to ExtraHop, Brocade, or Amazon Web Services, see the following links for additional information:

Configure an AWS Virtual Private Cloud network

In this section, you will configure a new virtual private cloud (VPC), an Internet gateway, subnets, and routing services.

Create a VPC

  1. Sign into the AWS console.
  2. In the Networking section, click VPC.
  3. In the Virtual Private Cloud section, click Your VPCs and then click Create VPC.
  4. In the Name tag field, type a name for the VPC.
  5. In the CIDR block field, type a block of IP addresses for the network, such as 10.4.0.0/16.
  6. In the Tenancy field, leave the option set to Default.
  7. Click Yes, Create.
    Note:Make note of the VPC ID (vpc-nnnnnnnn), which is needed for the next procedure.

Create an Internet Gateway

  1. In the navigation pane, click Internet Gateways, and then click Create Internet Gateway.
  2. In the Name tag field, type a name to identify the Internet gateway.
    This setting allows public traffic in and out of your virtual private cloud.
  3. Click Yes, Create.
    Make note of the gateway ID (igw-nnnnnnnn).
  4. Click Attach to VPC.
  5. From the drop-down list, select the VPC you created and then click Yes, Attach.

Set routes

Before traffic is allowed in or out of the new VPC, routing and traffic security rules must be configured. By default, all outbound traffic is allowed, but inbound traffic is more restrictive.

  1. In the navigation pane, click Route Tables.
  2. From the table, select the checkbox next to the route that is associated with the VPC you created.
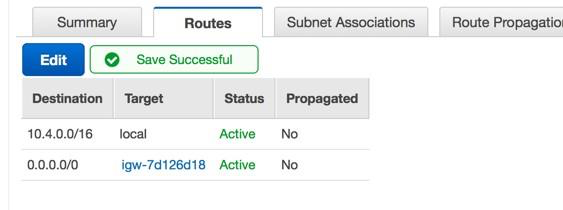
  3. Click the Routes tab, and then click Edit.
  4. Click Add another route.
  5. In the Destination field, type 0.0.0.0/0.
  6. In the Target field, type the name tag you entered for the Internet gateway.
  7. Click Save.

Create a subnet

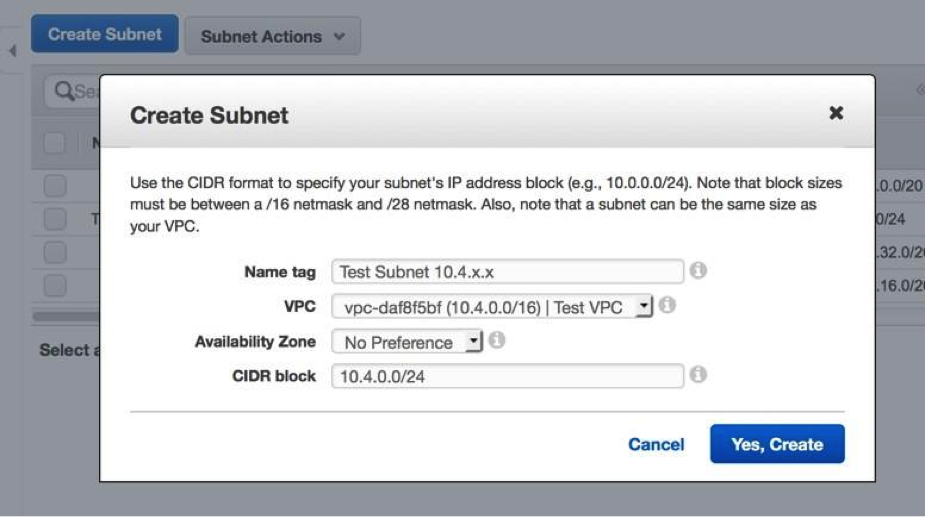
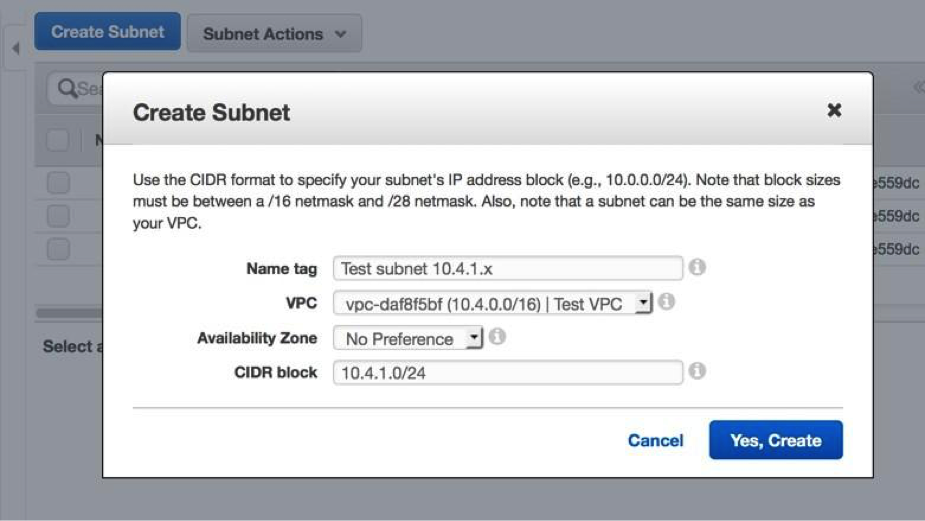
This example network has a public and private subnet within the CIDR block you configured earlier. You will configure 10.4.0.0/24 as the public subnet and 10.4.1.0/24 as the private subnet.

  1. In the navigation pane, click Subnets, and then click Create Subnet.
  2. In the Name tag field, type a name for the subnet.
  3. From the VPC drop-down list, select the VPC created earlier.
  4. (Optional): From the Availability Zone drop-down list, select the Amazon availability zone where the subnet will reside.
  5. In the CIDR block field, type the public CIDR block of 10.4.0.0/24.
  6. Click Yes, Create.
  7. Repeat steps 1-6 to create a private subnet with the 10.4.1.0/24 CIDR block.

Associate the route table with the subnet

  1. In the navigation pane, click Route Tables.
  2. Verify that the route table selected is the table with the Internet gateway you created earlier.
  3. Click the Subnet Associations tab.
  4. Click Edit and select the public subnet of 10.4.0.0/24, and then click Save.
  5. Click Create Route Table to create a new route table for the private subnet 10.4.1.0/24.
  6. In the Name tag field, type a name for the route table and select the VPC you created earlier, and then click Yes, Create.
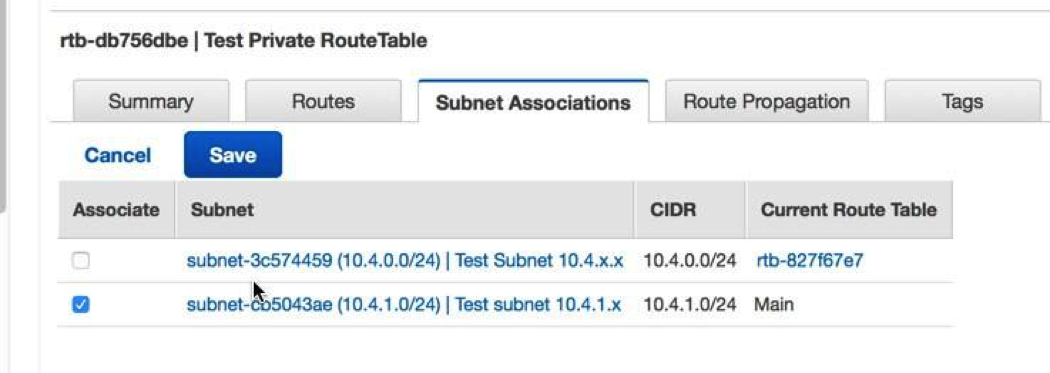
  7. Select the route table created for the private subnet 10.4.1.0/24.
  8. Select the Subnet Associations tab.
  9. Click Edit and select the private subnet 10.4.1.0/24 and then click Save.
    Make note of this route table, in a subsequent step an association is made to the private interface of the Brocade vRouter with a route.

Add inbound rules to the security group

  1. In the navigation pane, select your new VPC from the Filter by VPC pulldown.
  2. In the navigation pane, click Security Groups.
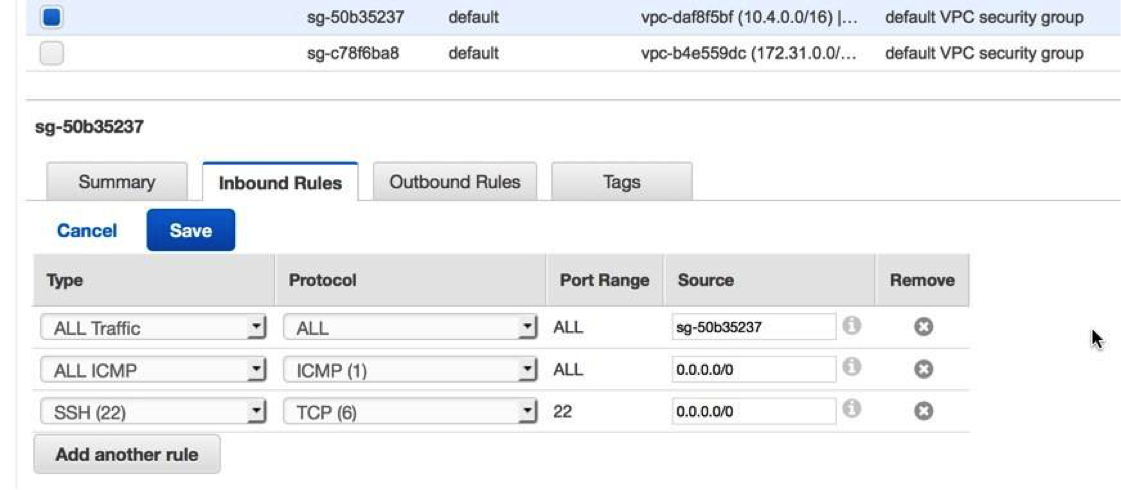
    The security group has rules allowing traffic into the VPC. The initial setup allows all traffic from itself, all ICMP (so you can test ping of interface) and SSH on port 22.
  3. Select the default security group for your new VPC.
  4. Click the Inbound Rules tab and then click Edit.
  5. Click Add another rule.
  6. Select All ICMP from the dropdown list and type 0.0.0.0/0 in the Source field.
  7. Click Add another rule.
  8. Select SSH (22) from the dropdown list and type 0.0.0.0/0 in the Source field.
  9. Click Save.
    Note:This is a non-production configuration; you would not typically allow all IP addresses to access your instance.

Summary

In this section you created a virtual public cloud, a private subnet for the 10.4.1.0/24 network and a public subnet for the 10.4.0.0/24 network. In addition, you created routing tables for routing traffic within the VPC subnets and externally through an Internet Gateway. Security groups allow traffic in or out of the VPC and you configured inbound rules to allow ICMP and SSH traffic.

Configure the Brocade 5600v router

In this section you will configure a new Brocade 5600v router within the public subnet created previously, and assign an Elastic IP to configure and test the setup through SSH.

  1. Click the Console Home icon in the upper left corner to return to the AWS Management Console page.
  2. In the Compute section, click EC2.
  3. In the navigation pane, click Instances.
  4. Click Launch Instance to start the Amazon Machine Image (AMI) wizard.
  5. Click AWS Marketplace and type 5600 or Brocade vRouter in the Search AWS Marketplace Products field and then press ENTER.
  6. Click the Select button next to Brocade 5600 Virtual Router/Firewall/VPN.
  7. For this example, select the m4.large instance type and then click Next: Configure Instance Details.
  8. On the Configure Instance Details page, complete the following steps:
    1. Type 1 in the Number of instances field.
    2. From the Network dropdown list, select the VPC you created in the first section of this guide.
    3. From the Subnet dropdown list, select the public subnet, 10.4.0.0/24.
    4. In the Network interfaces section at the bottom of the page, type 10.4.0.187 in the Primary IP field.
  9. Click Next: Add Storage. Keep the default storage settings and then click Next: Tag Instance.
  10. Type any name in the Value field for the Name key to identify the instance. Add any additional tags to identify this instance in the environment and then click Next: Configure Security Group.
  11. Choose Select an existing security group and the select the default Security Group ID for your VPC.
    Ensure the rules created earlier have been applied. For example, SSH and ICMP are still listed and their source addresses are 0.0.0.0/0. Optionally, a new security group could be created specifically for this instance.
  12. Click Review and Launch to launch and install the Brocade vRouter.
  13. Review the selections and entries, especially the subnet and IP addresses. If costs are a concern, ensure the instance has stayed within the confines of the free trial. Click Launch to launch the instance and register the Brocade vRouter.
  14. In the key pair dialog box, select Create a new key pair from the dropdown menu, type a friendly name and click the Download Key Pair button to download the key pair. Ensure you make note of the download location.
  15. Click Launch Instances to finish the install process.
  16. Click View Instances at the bottom of the Launch Status screen or select Instances from navigation pane. The instance, depending on the selections, might take a several minutes to be fully online.
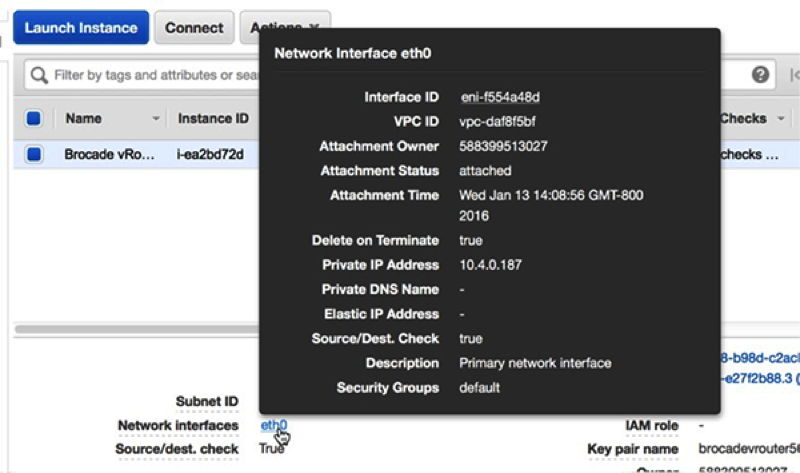
  17. After the instance has fully launched and the Status Checks are complete, click the Description tab at the bottom of the page. In the Network interfaces section, click eth0. Verify that the IP address is 10.4.0.187 (or the IP address configured earlier).
  18. Click the link associated with the Interface ID. In this example, the ID is eni-f554a48d.
  19. With the private interface of the Brocade vRouter selected, click on the Actions dropdown menu and select Change Source/Dest. Check.
  20. Select the Disabled radio button and then click Save.
  21. Create the private subnet interface for the Brocade vRouter by clicking Create Network Interface.
  22. In the Create Network Interface dialog box, complete the following fields:
    Description
    Type a name to identify the private interface.
    Subnet
    From the dropdown list, select the subnet for 10.4.1.0/24.
    Private IP
    Type 10.4.1.10.
    Security groups
    Select the default VPS security group.
  23. Click Yes, Create to create the new interface.
  24. Select the private interface and then click on the Actions dropdown menu and select Change Source/Dest. Check.
  25. Select the Disabled radio button and then click Save.
    Record or make note of the 10.4.1.10 network interface ID.
  26. With the private interface still selected, click Attach.
  27. Select your instance from the Instance ID dropdown list and then click Attach.
  28. Return to the VPC Dashboard.
  29. In the navigation pane, select Route Tables.
  30. Select the route table associated with the private subnet 10.4.1.0/24.
  31. Click the Routes tab and then click Edit.
  32. Click Add another route. In the Destination field, type 0.0.0.0/0 and in the target field, type the interface ID noted in step 23 and then click Save. This route table should be associated with the private Interface ID of the Brocade vRouter and associated with the private subnet 10.4.1.0/24.
  33. Allocate an Amazon Elastic IP, a dynamically allocated publicly routed IP, by selecting Elastic IPs from the navigation pane. Click Allocate New Address, and then click Yes, Allocate.
  34. From the Actions drop-down menu, select Associate Address and set the following fields:
    Associate with
    Network Interface
    Network Interface
    Select the public interface ID of the Brocade vRouter. In this example, the ID is eni-f554a48d.
    Private IP address
    Select the public subnet assigned IP address. In this example, it is 10.4.0.187.
  35. Click Yes, Associate.

Connect to your Brocade vRouter instance through SSH

Note:The following procedures were performed in a macOS terminal application. Your commands might vary based on your choice of client.
  1. Open a terminal client and run the following commands:
    1. Change to the directory where you downloaded your private key file. For example:
      remote$ cd ~/Downloads
    2. Change the permissions of the key file so that it is not publically viewable:
      remote$ chmod 400 *.pem
    3. Establish the connection:
      remote$ ssh -i <vrouter_private_key.pm> vyatta@<elastic_IP>

      For example:

      ssh -i brocadevrouter5600.pem vyatta@52.35.186.255

      If the SSH connection is successful, output similar to the following appears:

      Welcome to Brocade vRouter
      Welcome to Brocade Vyatta Network OS
      Version:	4.1R2B
      Description:	Brocade Vyatta Network OS 4.1 R2
      Built on:	Fri Dec 18 07:10:38 UTC 2015
      Note:If the connection fails, add -vvv to the ssh command to collect debug output, check the security group rules to ensure SSH is allowed, verify the elastic IP is associated with the public interface, and verify ping to the public elastic IP returns a response.
  2. Display a list of configured interfaces by running the following command:
    show interfaces

    Output similar to the following appears:

    Codes: S - State, L - Link, u - Up, D - Down, A – Admin Down
    		Interface        IP Address                        S/L  Description
    		---------        ----------                        ---  -----------
    		dp0s0            10.4.0.187/24                     u/u  
    		dp0s1            10.4.1.10/24                     -A/D
    Note:If only one interface appears, reboot the Brocade vRouter by running the reboot command.
  3. Two interfaces should be visible. One interface is not configured and an IP address does not appear. To configure the interface run the following commands:
    1. Enter configure mode:
      configure
    2. Configure the private interface with the previously assigned private IP. In this example, 10.4.1.0.24 was assigned in the instance in AWS on the private interface.
      set interfaces dataplane dp0s1 address 10.4.1.10/24
    3. Set the number of gratuitous Address Resolution Protocol (ARP) requests to send:
      set interfaces dataplane dp0s1 ip gratuitous-arp-count 1
    4. Enable reverse-path filter with no source validation:
      set interfaces dataplane dp0s1 ip rpf-check disable
    5. Set the number of NS packets to transmit:
      set interfaces dataplane dp0s1 ipv6 dup-addr-detect-transmits 1
    6. Sets the size of the MTU for the data plane interface:
      set interfaces dataplane dp0s1 mtu 1500
    7. Set the EtherType for VLAN frames:
      set interfaces dataplane dp0s1 vlan-protocol 0x8100
  4. Run the show interfaces command to view the configured interfaces. Output similar to the following appears:
    interfaces {
            dataplane dp0s0 {
                    address dhcp
                    ip {
                            gratuitous-arp-count 1
                            rpf-check disable
                    }
                    ipv6 {
                            dup-addr-detect-transmits 1
                    }
                    mtu 1500
                    vlan-protocol 0x8100
            }
    +       dataplane dp0s1 {
    +                address 10.4.1.10/24
    +                ip {
    +                        gratuitous-arp-count 1
    +                        rpf-check disable
    +                }
    +                ipv6 {
    +                        dup-addr-detect-transmits 1
    +                }
    +                mtu 1500
    +                vlan-protocol 0x8100
    +        }
    +        loopback lo
    + }
    Note:The plus (+) sign indicates unsaved changes.
  5. Type commit and then press ENTER.
  6. Type save and then press ENTER to save the changes.
  7. (Optional): Set the SSH service port to 22 to ensure ports are assigned properly on the Brocade vRouter in the configuration file:
    set service ssh port 22
  8. Type commit and then press ENTER.
  9. Type save and then press ENTER to save the changes.
  10. Type exit to leave configure mode.
  11. Run the show interfaces command. Both interfaces should be up and administratively up, similar to the following output:
    Codes: S - State, L - Link, u - Up, D - Down, A – Admin Down
    		Interface        IP Address                        S/L  Description
    		---------        ----------                        ---  -----------
    		dp0s0            10.4.0.187/24                     u/u  
    		dp0s1            10.4.1.10/24                      u/u  
    Note:Leave the vRouter shell open to run additional commands later in this procedure.

Summary

In this section, you configured the Brocade vRouter to be accessible and configurable from a remote machine. You also added the appropriate interfaces for creation of additional subnets.

(Optional) Configure Linux client for traffic generation

In this section and the next, you will configure a new Linux AMI in order to verify the Brocade vRouter and ExtraHop Discover configuration. If other sources of traffic are available, then these sections can be skipped.

Note:A Linux client is selected in the following example.
  1. Click the Console Home icon in the upper left corner to return to the AWS Management Console page.
  2. In the Compute section, click EC2.
  3. In the navigation pane, click Instances.
  4. Click Launch Instance to start the Amazon Machine Image (AMI) wizard.
  5. Locate an Ubuntu Server image in the list and then click Select.
  6. Select the t2.micro instance type and then click Next: Configure Instance Details.
  7. On the Configure Instance Details page, complete the following steps:
    1. Type 1 in the Number of instances field.
    2. From the Network dropdown list, select the VPC you created in the first section of this guide.
    3. From the Subnet dropdown list, select the 10.4.1.0/24 subnet.
      A static IP is not necessary for this step, but make note of the IP address assigned to the instance. In this example, the IP is 10.4.1.50.
    4. The remaining settings can be left at their default values.
  8. Click Next: Add Storage. No changes are necessary.
  9. Click Next: Tag Instance. No changes are necessary.
  10. Click Next: Configure Security Group.
  11. On the Configure Security Group page, complete the following steps:
    1. Select Create a new security group.
    2. In the Security group name field, type a descriptive name. For example, Ubuntu Linux.
    3. In the Description field, type a description for this security group.
    4. Click Add Rule.
    5. Select All ICMP from the dropdown list.
    6. In the Source column, select Anywhere from the dropdown list and type 0.0.0.0/0 in the field.
    7. If SSH is not listed, click Add Rule.
    8. In the Source column, select Anywhere from the dropdown list and type 0.0.0.0/0 in the field.
    9. Click Review and Launch.
    10. Acknowledge that your security group is open to the world, and then click Launch.
      Note:This is a non-production configuration. Typically, traffic should not be configured open to the world.
    11. In the key pair dialog box, select Create a new key pair from the dropdown list. Type a name in the Key pair name field and click Download Key Pair. Make note of the download location and then click Launch Instances to finish the install process.

(Optional) Configure NAT on the vRouter for the Linux client

To reach the Linux client on the internal private subnet, both inbound and outbound for traffic generation, NAT must be configured on the vRouter.

  1. Return to the previously opened vRouter shell prompt.
  2. Open a port and masquerade outbound traffic by running the following commands.
    1. Enter configure mode:
      configure
    2. Set the destination port. This is an arbitrary port and 445 is specified in this example.
      set service nat destination rule 10 destination port 445
    3. Set the inbound interface:
      set service nat destination rule 10 inbound-interface dp0s0
    4. Set the protocol:
      set service nat destination rule 10 protocol tcp
    5. Set the translation address, where <client_instance_ip> is the IP address of the Linux client:
      set service nat destination rule 10 translation address <client_ip_address>

      For example:

      set service nat destination rule 10 translation address 10.4.1.50
    6. Set the translation port:
      set service nat destination rule 10 translation port 22
    7. Type commit and then press ENTER.
    8. Type save and then press ENTER to save the changes.
    9. Configure outbound traffic on the vRouter to mask the internal addresses:
      set service nat source rule 100 outbound-interface dp0s0
      
      set service nat source rule 100 translation address masquerade
    10. Type commit and then press ENTER
    11. Type save and then press ENTER to save the changes.
      Note:The rule numbers are arbitrary; however, allow enough space between ranges in case you need to add related rules in the future.
  3. Verify that the configuration is updated with the rules just created by running the following command:
    show service 

    Output similar to the following appears. Make note of the destination port, the translation port and address to the Linux instance created. Additionally, make sure the interface on both rules are the external interface of the vRouter.

    nat {
    	destination {
    		rule 10 {
    			destination {
    				port 445
    			}
    			inbound-interface dp0s0 
    			protocol tcp 
    			translation {
    				address 10.4.1.50
    				port 22
    			}
    		}
    	}
    	source {
    		rule 100 {
    			outbound-interface dp0s0
    			translation {
    				address masquerade
    			}
    		}
    	}
    }
    ssh {
    	authentication-retries 3
    	disable-password-authentication
    	port 22
    	timeout 120
    }
  4. Return to the AWS console to create an inbound rule on the default security group to test NAT rules.
    1. In the navigation pane, click Instances.
    2. Select the vRouter in the list of instances.
    3. In the Description tab area, next to Security groups, click default.
    4. On the security group page, click the Inbound tab.
    5. Click Edit.
    6. Click Add Rule.
    7. In the Type drop-down list, select Custom TCP Rule.
    8. In the Port Range field, type 445.
    9. In the Source field, type 0.0.0.0/0.

(Optional) Test the Linux client configuration

  1. On your client computer, open a new terminal window.
  2. Connect to the AWS Linux or Windows client with the appropriate keypair and username.
    ssh –i <client.pem> <username>@<elastic_ip> -p 445

    For example:

    ssh -i ubuntulinux.pem ubuntu@52.35.186.255 -p 445
    Note:In the AWS console, with the instance selected, click Connect to learn how to connect to your particular instance. Usernames and connectivity are unique to the AMI selected.
  3. After you have successfully connected to the client, ping the public and private IP addresses that you configured earlier and make sure you can reach the specified IPs. For example:
    ubuntu@ip-10-4-1-50:~$ ping 10.4.0.187
    ubuntu@ip-10-4-1-50:~$ ping 10.4.1.10
  4. Open a new terminal window and connect to the Brocade vRouter with the appropriate username and keypair.
  5. Ping the Linux client IP address. For example:
    ping 10.4.1.50
  6. Display the route map by running the following command:
    show ip route

    Output similar to the following appears:

    Codes: K - kernel, C - connected, S - static, R - RIP, B - BGP 
           O - OSPF, IA - OSPF inter area
           N1 - OSPF NSSA external type 1, N2 - OSPF NSSA external type 2
           E1 - OSPF external type 1, E2 - OSPF external type 2
           i - IS-IS, L1 - IS-IS level-1, L2 - IS-IS level-2, ia - IS-IS
    inter area
    > - selected route, * - FIB route, p - stale info
    
    IP Route Table for VRF "default"
    Gateway of last resort is 10.4.0.1 to network 0.0.0.0
    
    K    *> 0.0.0.0/0 via 10.4.0.1, dp0s0
    C    *> 10.4.0.0/24 is directly connected, dp0s0
    C    *> 10.4.1.0/24 is directly connected, dp0s1
    C    *> 127.0.0.0/8 is directly connected, lo
  7. Display the ARP table by running the following command:
    show arp

    Output similar to the following appears:

    IP Address     HW address              Dataplane   Controller  Device
    10.4.0.2       02:22:ef:75:6b:79       VALID       VALID       dp0s0
    10.4.0.1       02:22:ef:75:6b:79       VALID       VALID       dp0s0
    10.4.1.1       02:1f:68:6c:5c:81       VALID                   dp0s1
    10.4.1.50      02:f2:d9:aa:fe:c5       VALID       VALID       dp0s1
  8. Display the interfaces by running the following command:
    show interface

    Output similar to the following appears:

    Codes: S - State, L - Link, u - Up, D - Down, A - Admin Down
    Interface       IP Address       S/L       Description
    ---------       ----------       ---	-----------
    dp0s0	    10.4.0.187/24    u/u
    dp0s1	    10.4.1.10/24     u/u

Summary

In this section, you installed and configured a Linux instance for generating test packet traffic.

Configure an ExtraHop EDA 1000v

In this section, you will configure a new ExtraHop EDA 1000v sensor.

  1. Click the Console Home icon in the upper left corner to return to the AWS Management Console page.
  2. In the Compute section, click EC2.
  3. In the navigation pane, click Instances.
  4. Click Launch Instance to start the Amazon Machine Image (AMI) wizard.
  5. Click Community AMIs.
  6. Type ExtraHop in the Search community AMIs field and locate the ExtraHop Discover appliance 1000v 5.x.x.x AMI and click Select.
  7. Select the t2.medium instance type and then click Next: Configure Instance Details.
  8. In the Configure Instance Details page, complete the following steps:
    1. Type 1 in the Number of instances field.
    2. In the Network drop-down list, select the VPC created in the first portion of this guide.
    3. In the Subnet drop-down list, select the private subnet 10.4.1.0/24.
    4. In the Network interfaces section type 10.4.1.15 in the Primary IP field and then click Next: Add Storage.
  9. Leave the default storage size at the default setting. Click Next: Tag Instance.
  10. Tag the instance with a name to identify the instance. Add any additional tags for identifying this instance in the environment and then click Next: Configure Security Group.
  11. On the Configure Security Group page, complete the following steps:
    1. Select Create a new security group.
    2. In the Security group name field, type a descriptive name. For example, EDA 1000v.
    3. In the Description field, type a description for this security group.
    4. Click Add Rule 6 times and configure each protocol type as follows:
    Type Protocol Port Range Source
    SSH TCP 22 Anywhere 0.0.0.0/0
    HTTP TCP 80 Anywhere 0.0.0.0/0
    HTTPS TCP 443 Anywhere 0.0.0.0/0
    Custom TCP Rule TCP 2003 Anywhere 0.0.0.0/0
    Custom UDP Rule UDP 2003 Anywhere 0.0.0.0/0
    All Traffic ALL 0-65535 Custom IP 10.4.0.0/16
    All ICMP ICMP 0-65535 Anywhere 0.0.0.0/0
  12. Click Review and Launch.
    Note:If a Boot from General Purpose (SSD) dialog appears, select the first option and then click Next.
  13. Review the instance selection and then click Launch.
  14. In the Select an existing key pair page dialog box, select Proceed without a key pair from the drop-down list. Most of the configuration is completed through the Administration settings on the sensor, so a key pair is not necessary. Select the I acknowledge checkbox and then click Launch Instances.
  15. Go to your Instances list in AWS. Confirm that the status checks have passed and note the instance IP.

Configure NAT on the vRouter to access the ExtraHop system

To access the ExtraHop system, NAT must be configured on the vRouter.

  1. Return to the previously opened vRouter shell prompt.
  2. Open a port and masquerade outbound traffic by running the following commands.
    1. Enter configure mode:
      configure
    2. Set the destination port. This is an arbitrary port and 8443 is specified in this example.
      set service nat destination rule 20 destination port 8443
    3. Set the inbound interface:
      set service nat destination rule 20 inbound-interface dp0s0
    4. Set the protocol:
      set service nat destination rule 20 protocol tcp
    5. Set the translation address, where <extrahop_instance_ip> is the IP address of the Linux client:
      set service nat destination rule 20 translation address
          <extrahop_ip_address>

      For example:

      set service nat destination rule 20 translation address 10.4.1.15
    6. Set the translation port:
      set service nat destination rule 20 translation port 443
    7. Configure outbound traffic on the vRouter to mask the internal addresses (if not done already):
      set service nat source rule 100 outbound-interface dp0s0
      
      set service nat source rule 100 translation address masquerade
    8. Type commit and then press ENTER.
    9. Type save and then press ENTER to save the changes.
      Note:The rule numbers are arbitrary; however, allow enough space between ranges in case you need to add related rules in the future.
  3. Verify that the configuration is updated with the rules just created by running the following command:
    show service
  4. Return to the AWS console to create an inbound rule on the default security group to test NAT rules.
    1. In the navigation pane, click Instances.
    2. Select the vRouter in the list of instances.
    3. In the Description tab area, next to Security groups, click default.
    4. On the security group page, click the Inbound tab.
    5. Click Edit.
    6. Click Add Rule.
    7. In the Type drop-down list, select Custom TCP Rule.
    8. In the Port Range field, type 8443.
    9. In the Source field, type 0.0.0.0/0.
  5. In your browser, type the IP address of the ExtraHop system:
    https://<elastic_public_ip:8443>/admin
  6. On the Licensing page, read the ExtraHop general terms and conditions, select I Agree, and then click Submit.
  7. On the login screen, type setup for the user name and the instance ID for the password. You can find the Instance ID on the Instances page. Type the characters that follow i- (but not i- itself), and then click Log In.
  8. On the Sensor Administration page, in the Appliance Settings section, click License.
  9. Click Manage License and then click Register.
  10. Type the product key obtained from ExtraHop in the Product Key field and then click Register.
    Note:If license registration fails, ensure the AWS security rules allow outbound HTTP and HTTPS traffic.
  11. Click Done.
  12. Return to the Admin page.
  13. In the Network Settings section, click Connectivity.
  14. In the Interfaces section verify that Interface 1 is set to Management + RPCAP/ERSPAN/VXLAN/GENEVE Target.

(Optional) Create a new volume for packet capture storage

Create a new volume for the EDA 1000v to store trigger-enabled packet capture data.

  1. In the navigation pane in AWS, click Volumes.
  2. Click Create Volume. In the Create Volume dialog box, make sure that the Availability Zone selected is the same zone as the Discover instance and then click Create.
  3. Select the new volume in the Volumes list and then select Attach Volume from the Actions drop-down menu. In the Instance field, select your Discover instance and then click Attach.
  4. In the navigation pane, click Instances.
  5. Select the Discover instance in the list and then click Actions > Instance State > Reboot.
  6. When the Discover instance returns to a running state, log in to the Administration settings on the ExtraHop system through https://<extrahop-hostname-or-IP-address>/admin.
  7. In the Appliance Settings section, click Disks and verify that the new packet capture disk appears in the list of direct connected disks.
  8. Click Enable on the Packet Capture disk to enable.

Summary

In this section, you configured the ExtraHop system to receive network packets and traffic from the ERSPAN interface. Optionally, an additional disk was configured to allow trigger-enabled packet captures.

Configure ERSPAN and portmonitoring on the Brocade vRouter

In this section you will configure the ERSPAN and portmonitoring features on the Brocade vRouter to send ERSPAN traffic to the ExtraHop sensor.

  1. From a remote machine, SSH to the vRouter.
    ssh -i <vrouter_private_key.pm> vyatta@<elastic_IP>
  2. Configure the ERSPAN interface by running the following commands:
    1. Enter configuration mode:
      configure
    2. Set the local IP address for the ERSPAN interface:
      set interfaces erspan erspan1 local-ip 10.4.1.10
    3. Set the remote IP address for the ERSPAN interface:
      set interfaces erspan erspan1 remote-ip 10.4.1.15
    4. Set the following additional configuration:
      set interfaces erspan erspan1 ip tos inherit
      
      set interfaces erspan erspan1 ip ttl 255
      
      set interfaces erspan erspan1 mtu 1500
    5. Display the configuration changes:
      show interfaces
    6. Type commit and then press ENTER.
    7. Type save and then press ENTER to save the changes.
  3. Configure the Port Monitor and ERSPAN source by running the following commands:
    Note:In this example, the source of the monitor is the internal interface of the Brocade vRouter. Additionally, the session and identifier numbers are arbitrary, but should not overlap other session IDs.
    1. Set the portmonitor session type:
      set service portmonitor session 25 type erspan-source
    2. Set the source interface for portmonitoring:
      set service portmonitor session 25 source dp0s1
    3. Set the destination interface for portmonitoring:
      set service portmonitor session 25 destination erspan1
    4. Set the session identifier:
      set service portmonitor session 25 erspan identifier 200
    5. Set the ERSPAN header type:
      set service portmonitor session 25 erspan header type-II
    6. Set the ERSPAN direction:
      set service portmonitor session 25 source dp0s1 direction both
    7. Type commit and then press ENTER.
    8. Type save and then press ENTER to save the changes.
      Port monitoring for the session is immediately enabled if the type, source, destination, ERSPAN identifier, and ERSPAN header type parameters are configured correctly.
    9. Type exit to leave configuration mode.
    10. Type show configuration to display the new configuration.
      Output similar to the following appears (truncated for clarity):
      erspan erspan1 {
                      ip {
                              tos inherit
                              ttl 255
                      }
                      local-ip 10.4.1.10
                      mtu 1500
                      remote-ip 10.4.1.15
              }
      .
      .
      portmonitor {
                      session 25 {
                              destination erspan1
                              erspan {
                                      header type-II
                                      identifier 200
                              }
                              source dp0s1 {
                                      direction both
                              }
                              type erspan-source
                      }
              }
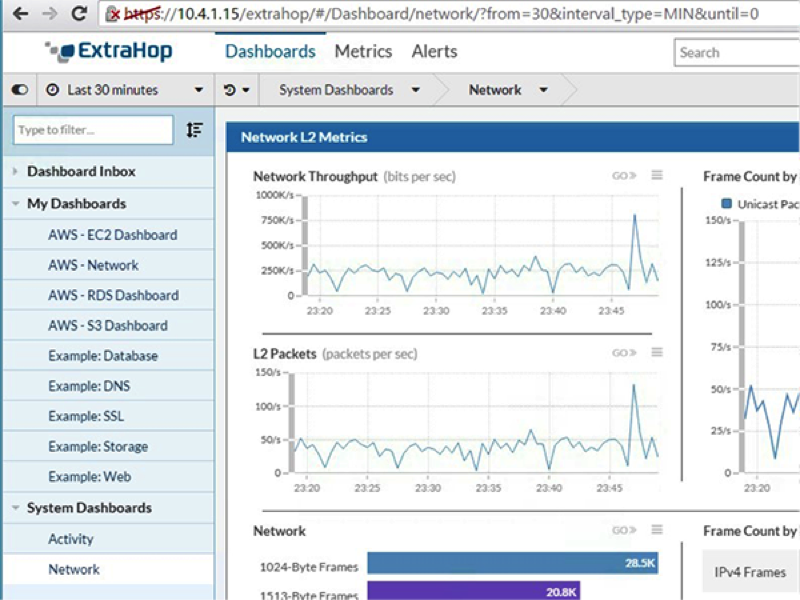
  4. Log in to the ExtraHop system through https://<elastic_public_ip:8443>/extrahop and verify that the ExtraHop is receiving ERSPAN traffic from the vRouter from the Dashboards interface.

Summary

In this section you have configured the Brocade vRouter to send ERSPAN traffic to the ExtraHop system allowing analysis of traffic within the Amazon Web Services virtual private cloud without installing any RPCAPD clients.

Sample Brocade vRouter configuration

vyatta@vyatta:~$ show configuration
interfaces {
        dataplane dp0s0 {
                address dhcp
                ip {
                        gratuitous-arp-count 1
                        rpf-check disable
                }
                ipv6 {
                        dup-addr-detect-transmits 1
                }
                mtu 1500
                vlan-protocol 0x8100
        }
        dataplane dp0s1 {
                address 10.4.1.10/24
                ip {
                        gratuitous-arp-count 1
                        rpf-check disable
                }
                ipv6 {
                        dup-addr-detect-transmits 1
                }
                mtu 1500
                vlan-protocol 0x8100
        }
        erspan erspan1 {
                ip {
                        tos inherit
                        ttl 255
                }
                local-ip 10.4.1.10
                mtu 1500
                remote-ip 10.4.1.15
        }
        loopback lo
}
protocols {
        ecmp {
                mode hrw
        }
        pim {
                register-suppression-timer 60
        }
        pim6 {
                register-suppression-timer 60
        }
}
security {
        firewall {
                all-ping enable
                broadcast-ping disable
                config-trap disable
                syn-cookies enable
        }
}
service {
        nat {
                destination {
                        rule 10 {
                                destination {
                                        port 445
                                }
                                inbound-interface dp0s0
                                protocol tcp
                                translation {
                                        address 10.4.1.50
                                        port 22
                                }
                        }
                        rule 20 {
                                destination {
                                        port 8443
                                }
                                inbound-interface dp0s0
                                protocol tcp
                                translation {
                                        address 10.4.1.15
                                        port 443
                                }
                        }
                }
                source {
                        rule 100 {
                                outbound-interface dp0s0
                                translation {
                                        address masquerade
                                }
                        }
                }
        }
        portmonitor {
                session 25 {
                        destination erspan1
                        erspan {
                                header type-II
                                identifier 200
                        }
                        source dp0s1 {
                                direction both
                        }
                        type erspan-source
                }
        }
        ssh {
                authentication-retries 3
                disable-password-authentication
                port 22
                timeout 120
        }
}
system {
        acm {
                create-default deny
                delete-default deny
                enable
                exec-default allow
                operational-ruleset {
                        rule 9977 {
                                action allow
                                command /show/tech-support/save
                                group vyattaop
                        }
                        rule 9978 {
                                action deny
                                command "/show/tech-support/save/*"
                                group vyattaop
                        }
                        rule 9979 {
                                action allow
                                command /show/tech-support/save-uncompressed
                                group vyattaop
                        }
                        rule 9980 {
                                action deny
                                command "/show/tech-support/save-uncompressed/*"
                                group vyattaop
                        }
                        rule 9981 {
                                action allow
                                command /show/tech-support/brief/save
                                group vyattaop
                        }
                        rule 9982 {
                                action deny
                                command "/show/tech-support/brief/save/*"
                                group vyattaop
                        }
                        rule 9983 {
                                action allow
                                command /show/tech-support/brief/save-uncompressed
                                group vyattaop
                        }
                        rule 9984 {
                                action deny
                                command "/show/tech-support/brief/save-uncompressed/*"
                                group vyattaop
                        }
                        rule 9985 {
                                action allow
                                command /show/tech-support/brief/
                                group vyattaop
                        }
                        rule 9986 {
                                action deny
                                command /show/tech-support/brief
                                group vyattaop
                        }
                        rule 9987 {
                                action deny
                                command /show/tech-support
                                group vyattaop
                        }
                        rule 9988 {
                                action deny
                                command /show/configuration
                                group vyattaop
                        }
                        rule 9989 {
                                action allow
                                command "/clear/*"
                                group vyattaop
                        }
                        rule 9990 {
                                action allow
                                command "/show/*"
                                group vyattaop
                        }
                        rule 9991 {
                                action allow
                                command "/monitor/*"
                                group vyattaop
                        }
                        rule 9992 {
                                action allow
                                command "/ping/*"
                                group vyattaop
                        }
                        rule 9993 {
                                action allow
                                command "/reset/*"
                                group vyattaop
                        }
                        rule 9994 {
                                action allow
                                command "/release/*"
                                group vyattaop
                        }
                        rule 9995 {
                                action allow
                                command "/renew/*"
                                group vyattaop
                        }
                        rule 9996 {
                                action allow
                                command "/telnet/*"
                                group vyattaop
                        }
                        rule 9997 {
                                action allow
                                command "/traceroute/*"
                                group vyattaop
                        }
                        rule 9998 {
                                action allow
                                command "/update/*"
                                group vyattaop
                        }
                        rule 9999 {
                                action deny
                                command "*"
                                group vyattaop
                        }
                }
                read-default allow
                ruleset {
                        rule 9999 {
                                action allow
                                group vyattacfg
                                operation "*"
                                path "*"
                        }
                }
                update-default deny
        }
        config-management {
                commit-revisions 20
        }
        console {
                device ttyS0 {
                        speed 9600
                }
        }
        host-name vyatta
        login {
                session-timeout 0
                user vyatta {
                        authentication {
                                encrypted-password "********"
                                public-keys TestBrocade {
                                        key xxx
                                        type ssh-rsa
                                }
                        }
                        level admin
                }
        }
        syslog {
                global {
                        archive {
                                files 5
                                size 250
                        }
                        facility all {
                                level warning
                        }
                }
        }
        time-zone GMT
}
Last modified 2024-02-16