Module Migration
The ExtraHop system now offers separate modules with features segmented and optimized for security and performance use cases.
The Network Detection and Response (NDR) module provides security and investigation workflows, and the Network Performance Management (NPM) module provides operations and performance workflows. Additional modules are available for Packet Forensics and Intrusion Detection Systems. Learn more about modules.
This guide provides information about global system changes and administrative tasks. Learn more about which features are available for each module.
Global system changes
The ExtraHop system automatically updates certain features as part of the module migration.
Default Login Page
For users with NPM access, the default dashboard page that displays after login can be specified by an administrator.
For NPM users, the default dashboard page that displays after login can be specified globally by an administrator or be personally set by a user. If no dashboard is specified, the Active Directory dashboard appears.
Users can navigate to their preferred default dashboard, click on the command menu in the upper right corner of the page, and select Set as Default Dashboard.
Tuning Rules
The system will remove the All Detection Types option from the Detection Type criteria for tuning rules.
Tuning rules are displayed based on the module access options specified by user privileges.
Existing tuning rules that contain the All Detection Types criteria are automatically split into two rules that are specific to either security or performance categories. The existing rule is modified to specify All Security Detection Types, and a new rule is created forAll Performance Detection Types. During migration, hidden detections might be associated with a new tuning rule that matches the detection criteria.
When you create or edit a tuning rule, you can specify Detection Type criteria depending on your module access privileges. The Detection Type dropdown can include options for All Security Detection Types or All Performance Detection Types.
Notification Rules
Detection notification rules no longer support criteria that apply to both security and performance detections. Notification rules are displayed based on your module access privileges.
Detection notification rules that specify the Detection event type are automatically split into two rules that are specific to either security or performance categories. The existing rule is modified to specify the new Security Detection event type and includes only the security criteria from the original rule. A new rule is created for the new Performance Detection event type and includes only the performance criteria from the original rule.
When a notification rule is split during migration, detection types that are associated with both security and performance are only included in the security version of the rule to avoid duplicate notifications.
Disabled notification rules that contain both security and performance criteria are not split. The rule converts to a security only rule and remains disabled.
Actions specified by notification rules, such as email distribution lists and webhooks, are included in the modified NDR rule and the new NPM rule. Review these actions to ensure security and performance notifications are sent to the correct audience.
When you create a notification rule, you can specify either Security Detection or Performance Detection event types, depending on the module access options specified in your user privileges. After you have selected an event type, you are only able to add detection type and category criteria associated with the selected event type.
Administrative Tasks
Migrated systems grant all users access to both Network Performance Monitoring (NPM) and Network Detection and Response (NDR) modules.
Administrators must grant role-based access for all users who log in through remote authentication (LDAP, RADIUS, SAML, and TACACS+) as well as local users.
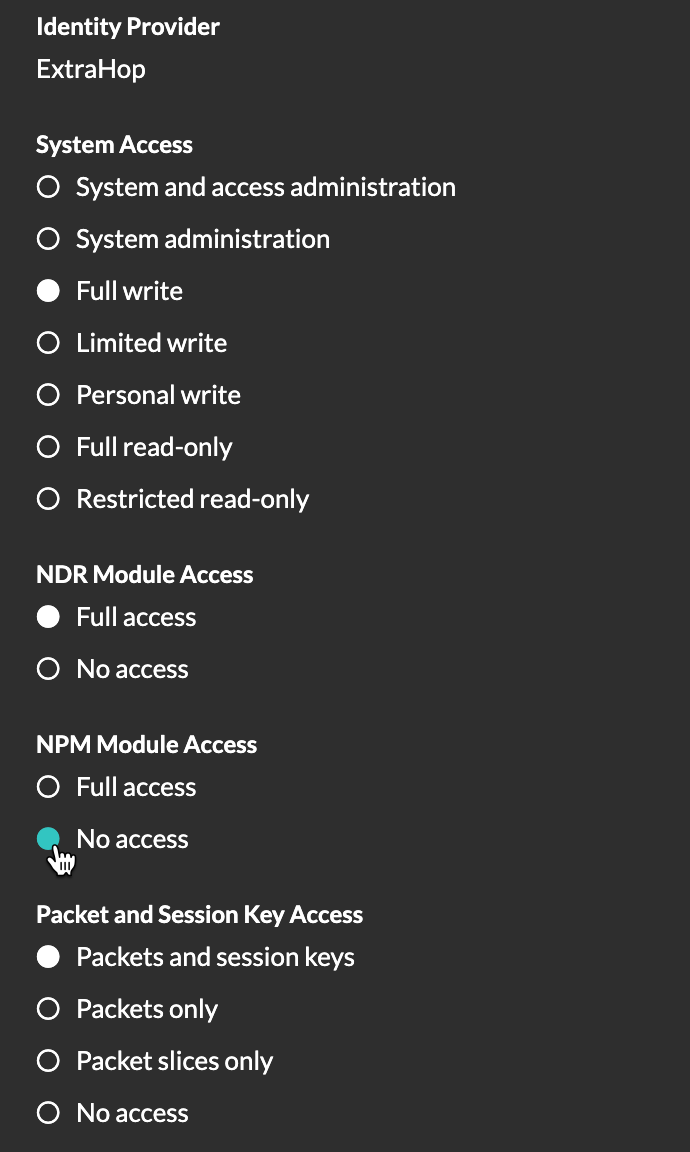
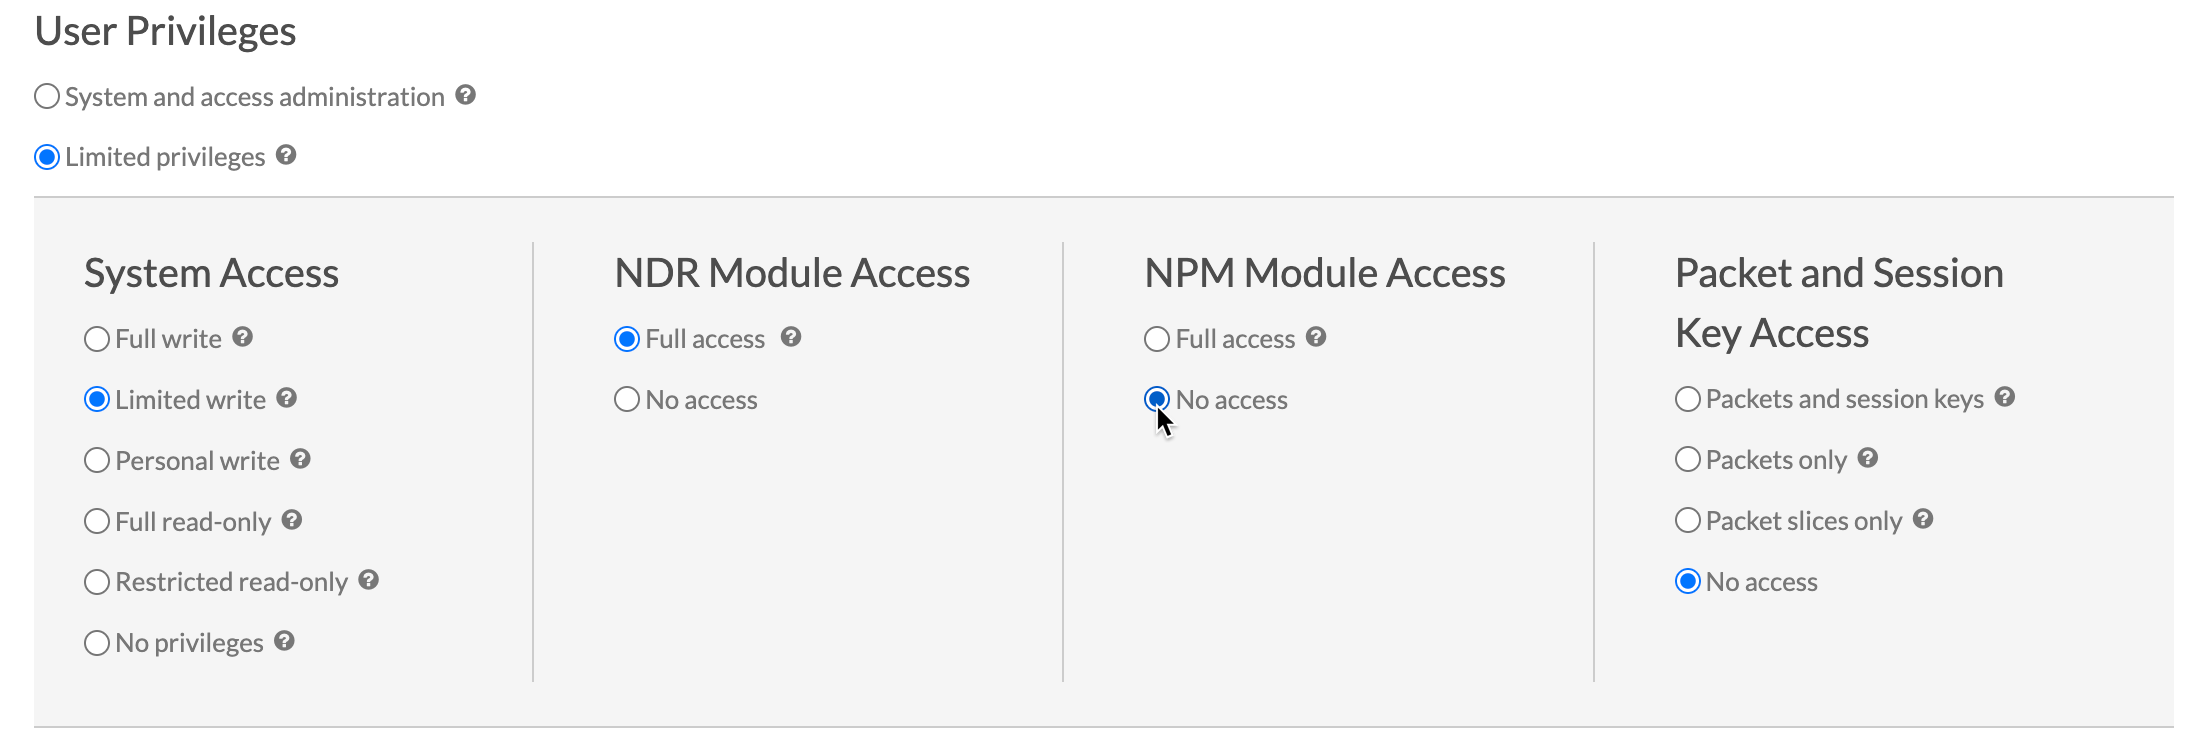
- Module Access
- These user privileges determine which features a user can access. For example, a user must be granted full access to the NDR module to see attack detections. See features specific to each module.
- System Access
- These user privilege levels determine the level of functionality users have with module features. For example, full write users can create and edit all system objects.
Updating remote authentication settings
Administrators must review remote authentication settings for the NDR and NPM modules and update if necessary.
- Network Detection and Response (NDR) module access
- Remote authentication settings for NDR module access must be configured on
Reveal(x)
Enterprise systems where the now deprecated Detections Access
global privilege policy was not previously enabled.
User access to the NDR module is inherited directly from the Detections Access global privilege policy setting. For example, if only specific users were granted detections access with full write system access before migration, those same users now have NDR module access with full write system privileges after migration.
- Network Performance and Monitoring (NPM) module access
- Remote authentication settings for NPM module access must be configured on both Reveal(x) 360 and Reveal(x) Enterprise systems.
Update the custom IdP configuration in Reveal(x) 360
Update your custom Identity Provider (IdP) configuration in Reveal(x) 360 to grant user privileges for NDR and NPM module access.
Remote authentication for NDR module access
NDR module access is automatically configured with the previous settings for Detections Access Control.
Remote authentication for NPM module access
You must update your custom Identity Provider (IdP) configuration to grant users access to the NPM module in Reveal(x) 360.
Add NPM privileges to the ExtraHop application in your identity provider
If your IdP does not include a group attribute for the ExtraHop application, you must add a user attribute and name to match what you will configure in Reveal(x) 360.
- Log in to your identity provider.
- Add an attribute name and value.
- Save the configuration.
Add NPM privileges to your identity provider settings in Reveal(x) 360
-
Click the System Settings icon
 and then click User
Access.
An Action Required panel will guide you through the remaining configuration steps. If the Action Required panel does not appear, you do not need to update your IdP settings.
and then click User
Access.
An Action Required panel will guide you through the remaining configuration steps. If the Action Required panel does not appear, you do not need to update your IdP settings.
Update the custom IdP configuration in Reveal(x) Enterprise
Update your custom Identity Provider (IdP) configuration in Reveal(x) Enterprise to grant user privileges for NDR and NPM module access.
Remote authentication for NPM module access
You must update your custom Identity Provider (IdP) configuration to grant users access to the NPM module in Reveal(x) Enterprise.
-
Click the System Settings icon and then click All
Administration.
Remote authentication for NDR module access
If your Reveal(x) Enterprise system had Detection Access Control enabled as a global policy prior to migration, NDR module access is automatically configured with the previous settings for Detections Access Control.
-
Click the System Settings icon and then click All
Administration.
Updating local user settings
Administrators must review local user access privileges for the NDR and NPM modules and update if necessary.
Thank you for your feedback. Can we contact you to ask follow up questions?