Add storage capacity to an ExtraHop packetstore
Adding additional storage capacity to your ExtraHop packetstore enables you to store more packets and extend the amount of lookback available when running packet queries. You can safely add ExtraHop Extended Storage Units (ESUs) to a packetstore and retain all packets currently stored on the packetstore.
Compatibility
The ExtraHop Extended Storage Unit (ESU) is available in multiple configurations.
You can attach up to four ESUs to an ExtraHop packetstore.
| Packetstore | ESU Size | ESU Product ID | ||
|---|---|---|---|---|
| ETA 6150 | 72 TB ESU 96 TB ESU
|
MD1400 | ||
| ETA 8250 | 96 TB ESU | MD1400 | ||
| ETA 9350 | 240 TB ESU | MD2412 |
Installation prerequisites
Before connecting your extended storage unit (ESU), make sure you have the following items available:
- ExtraHop packetstore with firmware 7.2 or later. Firmware 7.4 is required to encrypt the ESU. If you have not deployed the packetstore, follow the instructions in the deployment guide for your packetstore.
- ExtraHop license for the extended packetstore feature
- ExtraHop extended storage unit
- 2U of rack space
- Electrical connections for 2 x 600 W (ETA 6150/ETA 8250) or 2 x 800 (ETA 9350) power supply units (PSUs)
- Power cables
- SAS cables shipped with the ESU
- Rail kit
Shut down the packetstore
- Log in to the Administration settings on the ExtraHop system through https://<extrahop-hostname-or-IP-address>/admin.
- In the Appliance Settings section, click Shutdown or Restart.
- In the Actions column, click Shutdown.
- On the confirmation page, click Shut down.
Connect the extended storage unit
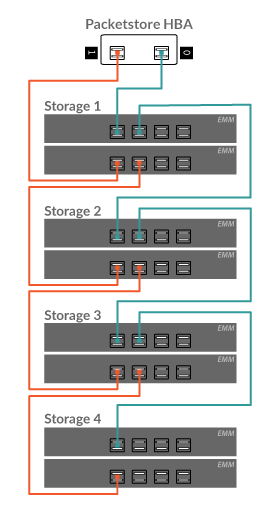
The extended storage unit (ESU) connects to the ExtraHop packetstore through both of the two enclosure management modules (EMMs). Each EMM has either two or four ports for connecting the SAS cables, but you should use only two of these ports.
ESU connection guidelines
These guidelines help with connecting additional extended storage units (ESUs) to a packetstore.
-
Connectors on both ends of the SAS cable are universally keyed. You can connect either end of the cable to the enclosure management module (EMM) or the host bus adapter (HBA) on the packetstore.
-
Insert the SAS4 cable to the EMM until it is fully secured. The pull tab might be blue or white. Ensure that the SAS connector is oriented correctly, with the tab facing up.
- Insert the SAS cable into the HBA on the packetstore until it is fully secured. Ensure that the SAS connector is oriented correctly, with the tab facing down.
-
To remove the SAS4 cable, gasp the connector by the pull tab and pull to release the cable from the connector on the EMM and the packetstore.
In a redundant configuration, the storage units are linked together in a series, with one of the extended storage units connected to both HBA ports on the packetstore.
Example of SAS4 redundant-path cabling

Attach the extended storage unit
Next steps
If the packetstore is locked, you must unlock it from the Packetstore Encryption Settings page before the ESU can be encrypted and new packets can be stored.


Thank you for your feedback. Can we contact you to ask follow up questions?