Reveal(x) 360 Setup and Administration Guide
After you receive your initial email from ExtraHop Networks, there are a few procedures you must complete before you can start analyzing your traffic. This guide provides procedures for basic setup and administration of the Reveal(x) 360 system.
Activate your administrator account
The System and Access Administration privilege is granted to the email address that you provided during sign up.
- Open your Welcome to ExtraHop Reveal(x) 360 email.
- Click the URL link to your Reveal(x) 360 environment.
- At the login page, enter your email address and temporary password included in the email.
- Click Sign In.
- On the Change Password screen, enter a new password in both password fields and then click Send.
- From the Multi-Factor Authentication Setup page, scan the QR code or manually enter the code that appears into your authenticator app.
- Enter the code provided by your authentication app into the Code field and then click Complete Setup.
- On the Success page, click Continue.
Configure your firewall rules
If your ExtraHop system is deployed in an environment with a firewall, you must open access to ExtraHop Cloud Services. For Reveal(x) 360 systems that are connected to self-managed sensors, you must also open access to the ExtraHop Cloud Recordstore.
Open access to Cloud Services
For access to ExtraHop Cloud Services, your sensors must be able to resolve DNS queries for *.extrahop.com and access TCP 443 (HTTPS) from the IP address that corresponds to your sensor license:
- 35.161.154.247 (Portland, U.S.A.)
- 54.66.242.25 (Sydney, Australia)
- 52.59.110.168 (Frankfurt, Germany)
Open access to Cloud Recordstore
For access to the ExtraHop Cloud Recordstore, your sensors must be able to access outbound TCP 443 (HTTPS) to these fully-qualified domain names:
- bigquery.googleapis.com
- bigquerystorage.googleapis.com
- oauth2.googleapis.com
- www.googleapis.com
- www.mtls.googleapis.com
- iamcredentials.googleapis.com
You can also review the public guidance from Google about computing possible IP address ranges for googleapis.com.
In addition to configuring access to these domains, you must also configure the global proxy server settings.
Add and manage users
-
From the Reveal(x) 360 Overview page, click System
Settings
 and then click
All Administration.
and then click
All Administration.
Change user settings
Change user privileges
- In the Users section, click the name of the user you want to modify.
- In the left pane, select the new privilege level for the user and then click Save.
Reset multi-factor authentication
Delete a user
- In the Users section, click the name of the user you want to modify.
- Click Delete.
-
Select one of the following options:
- Transfer dashboards, collections, and activity maps owned by <username> to the following user: and then select a new user from the drop-down list.
- Delete all dashboards, collections, and activity maps owned by <username>
- Click Delete.
Manage global privilege policy
Control whether all users with limited write privileges can create and edit device groups. When this policy is selected, all limited write users can create device groups and add other limited write users as editors to their device groups.
- From the Overview page, click System Settings, and then click User Access.
- From the Global Privilege Policy section, click the Limited write users can create or edit device groups checkbox.
- Click Save Changes.
Configure an allow list
Configure a list of IPv4 addresses and CIDR blocks that are allowed to access Reveal(x) 360.
- From the Overview page, click System Settings and then click User Access.
- In the Allow List section click, Enable Allow List.
- Type a comma-separated list of the IPv4 addresses or CIDR blocks that are allowed to access the system. IPv6 addresses are not supported.
- Click Save. It can take several minutes for the allow list to become active.
Connect sensors
Add sensors to Reveal(x) 360 to monitor your network traffic.
ExtraHop-managed Reveal(x) sensors for AWS can be selected and deployed from within the Reveal(x) 360 console.
Self-managed sensors and packetstores can also be connected from within the Reveal(x) 360 console. Note that if you have an existing console, you must disconnect the console before connecting your self-managed sensors to Reveal(x) 360.
Multi-factor authentication
Multi-factor Authentication (MFA) is a security enhancement that requires you to provide two forms of credentials when you log in to your account. In addition to your ExtraHop credentials, you must supply credentials from a 3rd-party authenticator app.
Select and download an authentication application to your device and generate secure, six-digit codes when you log in to your Reveal(x) 360 system.
There are many authenticator apps to select from. The following steps are a general guideline, but you should also review the help documentation for the app you select.
- Choose a device, such as a computer or mobile device (phone or tablet), on which you can install apps.
-
Download and install an authentication app on the device. Here are some popular
options:
- Android and iOS: Google Authenticator, Authy
- Windows and macOS: 1Password, OTP Manager
- Chrome extensions: Authenticator
- Open a new browser and sign in to your ExtraHop Reveal(x) 360 system.
- Follow the instructions to scan or enter the code that appears on the ExtraHop Multi-Factor Authentication setup screen, and then enter the credentials provided by your authenticator app.
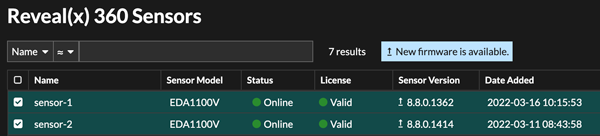
Upgrade connected sensors in Reveal(x) 360
Administrators can upgrade sensors that are connected to Reveal(x) 360.
Before you begin
- Your user account must have privileges on Reveal(x) 360 for System and Access Administration or System Administration.
- Sensors must be connected to ExtraHop Cloud Services
- Notifications appear when a new firmware version is available
- You can upgrade multiple sensors at the same time
-
Click the System Settings icon and then click
Sensors.
Sensors that are eligible for upgrade display an up arrow in the Sensor Version field.
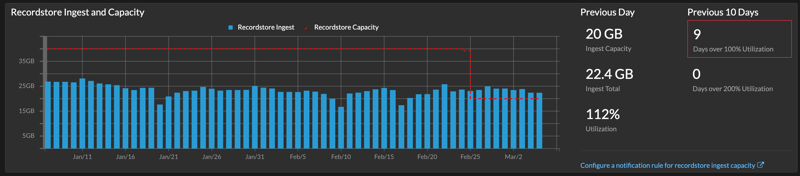
Record ingest and capacity
The Record Ingest and Capacity chart on the main Administration page enables you to monitor the record ingest and capacity levels and confirm that the capacity limit is optimal for your environment.
The dashed red line on the chart represents the record capacity of your subscription, and the blue bars represent the amount of ingest each day up to the last 60 days.
You can create a system notification rule to warn you if recordstore ingest is near (exceeds 80%) or over (exceeds 100%) your daily record ingest capacity.
If you find that you are consistently over your allotted capacity, contact your ExtraHop sales representative.
Thank you for your feedback. Can we contact you to ask follow up questions?