Deploy an ExtraHop sensor on Google Cloud Platform
The following procedures explain how to deploy a virtual ExtraHop sensor in a Google Cloud environment. You must have experience deploying virtual machines in Google Cloud within your virtual network infrastructure.
To ensure that the deployment is successful, make sure you have access and ability to create the required resources. You might need to work with other experts in your organization to ensure that the necessary resources are available.
System requirements
Your environment must meet the following requirements to deploy a virtual ExtraHop sensor in GCP:
- You must have a Google Cloud Platform (GCP) account
- You must have the ExtraHop deployment file, which is available on the ExtraHop Customer Portal.
- You must have an ExtraHop product key.
- You must have packet mirroring enabled in GCP to forward network traffic to the
ExtraHop system. Packet mirroring must be configured to send traffic to nic1
(not nic0) of the ExtraHop instance. See https://cloud.google.com/vpc/docs/using-packet-mirroring.
Important: If your deployment includes a console, the following workflow ensures the best performance for initial device synchronization. First, connect all sensors to the console, then configure network traffic forwarding to the sensors. - You must have firewall rules configured to allow DNS, HTTP, HTTPS, and SSH traffic for ExtraHop administration. See https://cloud.google.com/vpc/docs/using-firewalls.
- You must provision a GCP instance type that most closely matches the virtual
sensor size, as follows:
Sensor Recommended Instance Type Reveal(x) EDA 1100v n1-standard-4 (4 vCPU, 15 GB memory)
Upload the ExtraHop deployment file
- Sign in to your Google Cloud Platform account.
- From the navigation menu, click .
- Click the name of the storage bucket where you want to upload the ExtraHop deployment file. If you do not have a preconfigured storage bucket, create one now.
- Click Upload files.
- Browse to the extrahop-eda-gcp-<version>.tar.gz file you previously downloaded and click Open. Wait for the file to upload, and then continue to the next procedure.
Create the image
- From the navigation menu, click .
-
Click Create Image and complete the following
steps:
- In the Name field, type a name to identify the ExtraHop sensor.
- From the Source drop-down list, select Cloud Storage file.
- In the Cloud Storage file section, click Browse, locate the extrahop-eda-gcp-<version>.tar.gz file in your storage bucket and then click Select.
- Configure any additional fields that are required for your environment.
- Click Create.
Create the datastore disk
- From the navigation menu, click .
-
Click Create Disk and complete the following
steps:
- In the Name field, type a name to identify the ExtraHop disk.
- From the Type drop-down menu, select Standard persistent disk.
- In the Source type section, click Image.
- From the Source image drop-down list, select the image you created in the previous procedure.
- In the Size field, type 61.
- Configure any additional fields that are required for your environment.
- Click Create.
Create the VM instance
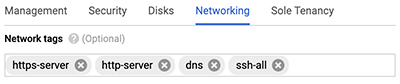
-
In the Network tags field, type the following tag names:
Important: Network tags are required to apply firewall rules to the ExtraHop instance. If you do not have existing firewall rules that allow this traffic, you must create the rules. See https://cloud.google.com/vpc/docs/using-firewalls. - https-server
- http-server
- dns
- ssh-all
-
In the Network interfaces section, click the edit icon
 to edit the management interface.
- From the Network drop-down list, select your management network.
- From the Subnetwork drop-down list, select your management network subnet.
- Configure any additional fields that are required for your environment.
- Click Done.
Register the sensor
Open a web browser and navigate to the ExtraHop system
through the configured management IP address. Accept the license agreement and then
log in. The default login name is setup and the password is the VM
instance ID. Type the product key to license the system.
Configure L3 device discovery
You must configure the ExtraHop system to discover and
track local and remote devices by their IP address (L3 Discovery). To learn how
device discovery works in the ExtraHop system, see Device discovery.
- Log in to the Administration settings on the ExtraHop system through https://<extrahop-hostname-or-IP-address>/admin.
- In the System Configuration section, click Capture.
- Click Device Discovery.
- In the Local Device Discovery section, select the Enable local device discovery checkbox to enable L3 Discovery.
- In the Remote Device Discovery section, type the IP address in the IP address ranges field. You can specify one IP address or a CIDR notation, such as 192.168.0.0/24 for an IPv4 network or 2001:db8::/32 for an IPv6 network.
- Click Save.
Next steps
- After the sensor is licensed and you have verified that traffic is detected, complete the recommended procedures in the post-deployment checklist.
Thank you for your feedback. Can we contact you to ask follow up questions?