Identify Kerberos brute force attacks with the Active Directory bundle

In a brute force attack, an attacker gains access to your system simply by repeatedly logging in with a variety of passwords until they guess the correct one. The ExtraHop Active Directory bundle can help you discover when these attacks are happening and where they are coming from.

In this walkthrough, you will learn how to download, install, and configure the Active Directory bundle, and then identify potential Kerberos brute force attacks with the Active Directory dashboard.

Prerequisites

  • Familiarize yourself with the concepts in this walkthrough by reading the Bundles topic.
  • You must have access to an ExtraHop system with a user account that has full write privileges.
  • You must be familiar with modifying triggers. For more information, see the Triggers topic.

Retrieve the ExtraHop Active Directory Bundle

Before you can upload the Active Directory Bundle to your ExtraHop system, you must retrieve the bundle from the ExtraHop Solution Bundle Index.

  1. Go to the Active Directory bundle page.
  2. If you have not already logged in to the ExtraHop website, click Login in the right pane and then specify a valid username and password.
  3. In the How to Obtain this Bundle section, click the link to create a service request to retrieve the bundle.

Upload and apply the Active Directory Bundle to your ExtraHop system

After you have downloaded the Active Directory Bundle, you can upload and install the bundle on your console or packet sensor.

  1. Log in to the ExtraHop system through https://<extrahop-hostname-or-IP-address>.
  2. Click the System Settings icon in the upper right corner.
  3. Click Bundles.
  4. On the Bundles page, click Upload.
  5. In the Load Bundle dialog box, click the Choose File button, and then select the Active Directory Bundle file you retrieved in the previous task.
  6. Click Upload.
  7. Select the Apply 9 included assignments checkbox.
  8. From the Existing objects drop-down menu, select Overwrite.
    Selecting this option will overwrite any objects that have the same name as objects in the bundle.
  9. Click Apply.
  10. In the Bundle Import Status dialog box, click OK.
  11. In the View Bundle window, click OK.

Configure the Active Directory triggers

In the following steps, you will enable and configure a trigger to mirror the lockout and privileged account settings in your Active Directory environment.

  1. Click the System Settings icon .
  2. Click Triggers.
  3. Enable each trigger in the Active Directory v4 bundle by completing the following steps.
    1. In the table, click a trigger name beginning with AD.
    2. Clear the Disable Trigger checkbox to enable the trigger.
    3. Click Save and Close.
  4. Modify specific fields in the Kerberos trigger to match your Active Directory accounts by completing the following steps.
    1. In the table, click AD: Kerberos and then click the Editor tab.
    2. Set the failedLoginDisableInterval constant to the match the value of the Reset account lockout counter after policy setting in your Active Directory environment.
    3. Set the accountLockoutDuration constant to the value of the Account lockout duration policy setting in your Active Directory environment.
    4. Add the complete names of any privileged accounts in your environment to the priv_names list and any partial matches to the priv_regex list. Examples of privileged accounts include:
      var priv_names = {'admin', 'administrator', 'root', 'ss', 'sys',
              'sysadmin, 'informix'}
    5. Click Save and Close.

Configure Active Directory alerts

The Active Directory Bundle includes alerts that you can configure to email you when high processing and response times are detected. You can also be alerted when a privileged account accesses resources for the first time, or if someone attempts to log in with a privileged account too many times with an invalid password.

  1. Click the System Settings icon .
  2. Click Alerts.
  3. Enable each alert and configure the alert to send notifications to your email address.
    Repeat these steps for each of the five active directory alerts.
    1. Click Active Directory <alert>.
    2. In the Status section, click Disabled.
    3. In the Notifications section, type your email address.
    4. Click Done.

Identify Kerberos brute force attack

This example shows how you can detect Kerberos brute force attacks with the Active Directory bundle.

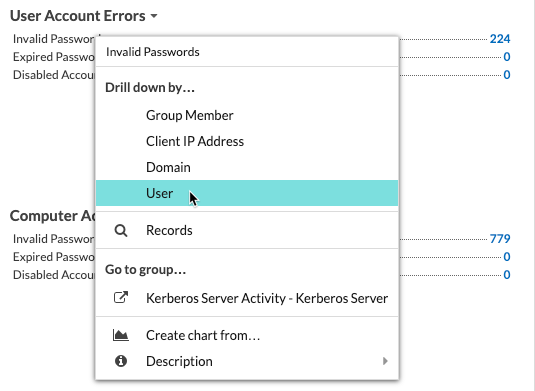
The Active Directory Overview dashboard shows you how many times a user has attempted to log in to a Kerberos system with an invalid password. In the example below, the bundle detected 252 unsuccessful log in attempts.

Drilling down on the Invalid Passwords metric by user then shows you which user accounts people are attempting to log in to.
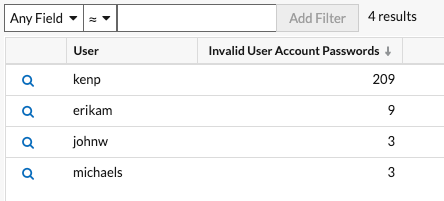

In the example above, someone attempted to log in with the kenp account 241 times. It is highly unlikely that the legitimate owner of the kenp account attempted to log in over 200 times without contacting an administrator. High levels of invalid logins such as these are usually the result of a brute-force attack. The attacker is trying every possible password in an attempt to discover the correct one.

If your ExtraHop system has a recordstore, you can gain even more insight into the attack. From the top navigation, click Records. Clicking Kerberos Response AD in the left pane limits the results to Kerberos transactions only, and filtering the search by User = kenp limits the results to interactions with the kenp user.
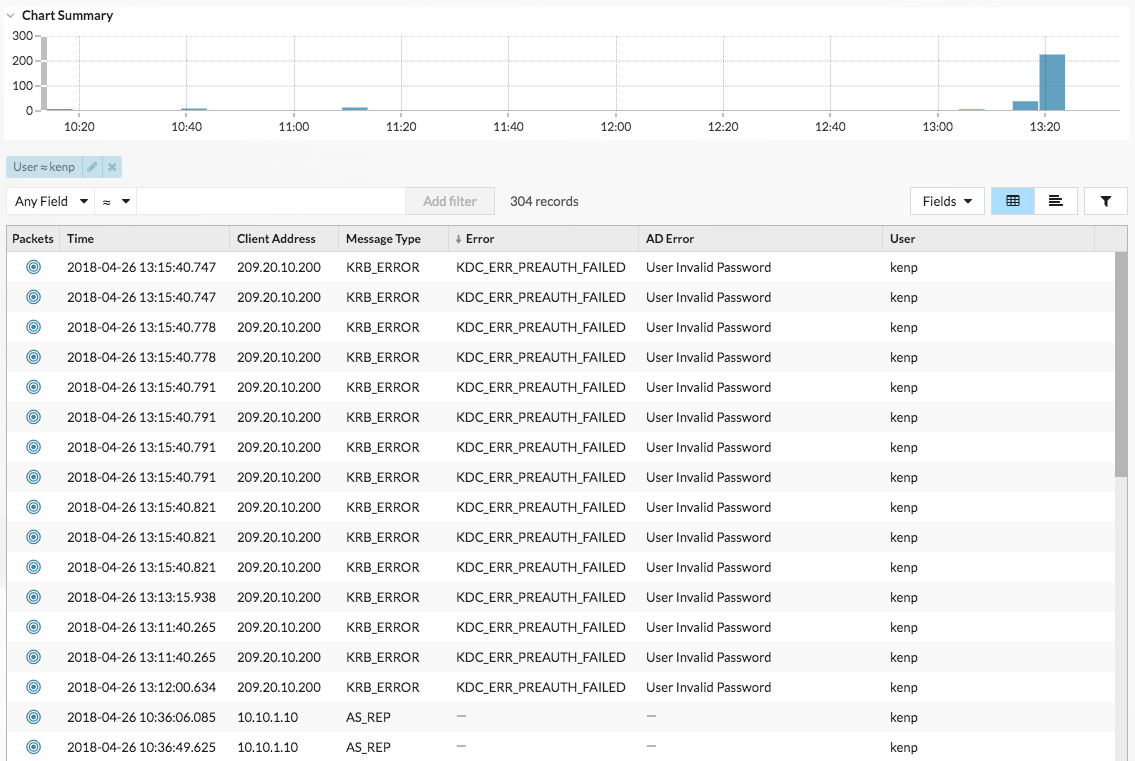
The table shows that although the invalid password attempts all came from 209.20.10.200, there are a number of successful requests coming from 10.10.1.10. These results suggest that 10.10.1.10 belongs to the actual user, and 209.20.10.200 belongs to the attacker. We can now block logins from 209.20.10.200 and contact the owners of both machines to confirm.

Next steps

Now that the Active Directory bundle is up and running, you can check out the other charts in the Active Directory Overview and Active Directory Details dashboards to monitor potential access and authentication issues.

Last modified 2023-11-07