Deploy the ExtraHop Discover 1200 Appliance

This guide explains how to install the EDA 1200 ExtraHop Discover appliance.

System requirements

Your environment must meet the following requirements to deploy the EDA 1200:

Power supply: 100-240v power source

Network access: Two 10/100/1000 BASE-T network ports. One configured as the management port and the other configured as the monitoring port.

Front panel

  • Power button
  • Two USB 3.0 ports

Rear panel ports

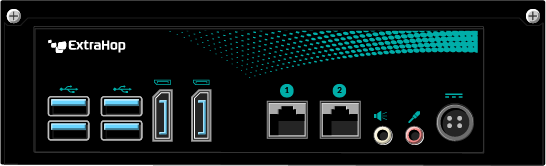
  • Four USB 3.0 ports to connect a keyboard.
  • Two DisplayPorts to connect an external display.
  • Two 10/100/1000 BASE-T network ports. Port 1 is the primary management port and port 2 is the primary monitor port.
  • One audio input and output port. The audio ports are disabled.
  • One power port to connect the EDA 1200 to an AC power source.

Set up the appliance

  1. Attach the four self-adhesive bumpers included in the package to the bottom of the appliance.
  2. Place the appliance on a flat surface near a suitable power source. To prevent overheating, leave at least 2 inches (5 cm) of clearance around the sides and top of the appliance.
  3. Connect an Ethernet cable from network port 1 on the back of the appliance to your management network.
  4. Connect an Ethernet cable from network port 2 on the back of the appliance to the mirror port on your switch.
    Important:If your deployment includes a Command appliance or Reveal(x) 360, the following workflow ensures the best performance for initial device synchronization. First, connect all sensors to the Command appliance or Reveal(x) 360, then configure network traffic forwarding to the sensors.
  5. Connect the power cord to the power port on the back of the EDA 1200, and then plug the cord into a power outlet. The appliance powers on automatically.

Configure the management IP address

DHCP is enabled by default on the EDA 1200. When you power on the appliance, interface 1 attempts to acquire an IP address through DHCP. Log in to your network switch to see the assigned IP address. Alternatively, connect a monitor to one of the DisplayPorts to view the IP address on the display.

If your network does not support DHCP, you can configure a static IP address through the command-line interface (CLI).

(Optional) Configure a static IP address through the CLI

You can access the CLI by connecting a USB keyboard and SVGA monitor to the appliance.

  1. Connect a USB keyboard to any USB port on the front or back of the appliance.
  2. Connect an SVGA monitor to one of the DisplayPorts on the back of the appliance. A DisplayPort to VGA adapter is included with the appliance if your monitor does not have a DisplayPort connector.
  3. At the login prompt, type shell and then press ENTER.
  4. At the password prompt, type the serial number, which is located on the bottom of the appliance.
  5. Enable privileged commands by running the following command:
    enable
  6. At the password prompt, type the serial number, and then press ENTER.
  7. Enter configuration mode by running the following command:
    configure
  8. Enter the interface configuration mode by running the following command:
    interface
  9. Run the ip command and specify the IP address and DNS settings in the following format: ip ipaddr <ip_address> <netmask> <gateway> <dns_server>
    For example:
    ip ipaddr 10.10.2.14 255.255.0.0 10.10.1.253
    10.10.1.254
  10. Leave the interface configuration section:
    exit
  11. Save the running config file:
    running_config save
  12. Type y and then press ENTER.

Configure the Discover appliance

After you configure an IP address for the Discover appliance, open a web browser and navigate to the ExtraHop system through the configured IP address. Accept the license agreement and then log in with the setup user account. The password is the serial number that appears on the label on the bottom of the appliance. Follow the prompts to enter the product key, change the default setup and shell user account passwords, connect to ExtraHop Cloud Services, and connect to Reveal(x) 360 or a Command appliance.

After the appliance is licensed, and you have verified that traffic is detected, complete the recommended procedures in the post-deployment checklist.

Last modified 2023-11-07