Manage threat collections
Before you begin
- Learn about threat intelligence.
- You must have System and Access Administration privileges on each console and sensor to manage threat collections.
- If your ExtraHop deployment includes a console, we recommend that you transfer management of all connected sensors to the console to enable or disable built-in threat collections across your entire system.
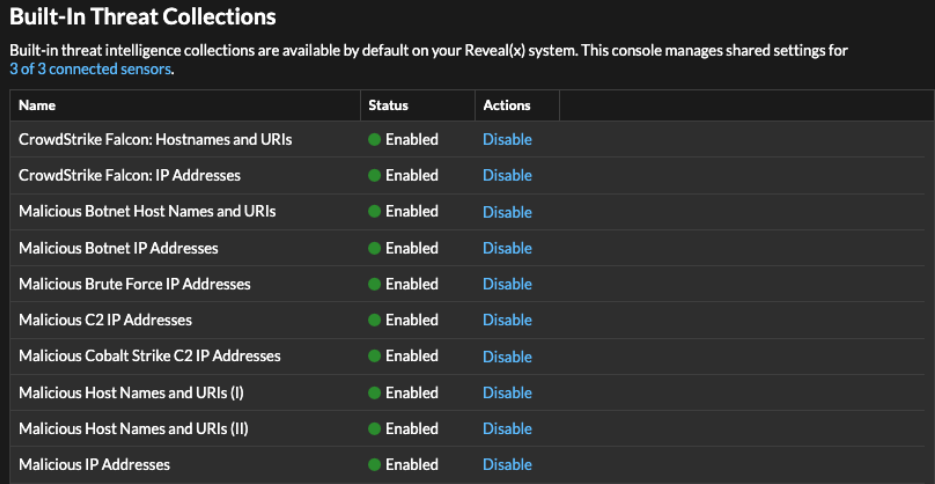
Enable or Disable built-in threat collections
Built-in threat collections from ExtraHop and CrowdStrike identify indicators of compromise throughout the system.
-
Click the System Settings icon
 and then click Threat
Intelligence.
and then click Threat
Intelligence.
-
In the Built-In Threat Collections table, click Enable
or Disable in the Actions column.
The system automatically checks for updates to ExtraHop and CrowdStrike threat collections every 6 hours.
Upload a threat collection
Upload threat collections from free and commercial sources to identify indicators of compromise throughout the ExtraHop system. Because threat intelligence data is updated frequently (sometimes daily), you might need to update a threat collection with the latest data. When you update a threat collection with new data, the collection is deleted and replaced, and not appended to an existing collection.
Here are some considerations about uploading threat collections.
- Custom threat collections must be formatted in Structured Threat Information eXpression (STIX) as compressed TAR files, such as .TGZ or TAR.GZ. Reveal(x) currently supports STIX version 1.0 - 1.2.
- You can directly upload threat collections to Reveal(x) 360 for self-managed sensors. Contact ExtraHop Support to upload a threat collection to ExtraHop-managed sensors.
- The maximum number of observables that a threat collection can contain depends on your sensor memory and license. To ensure successful uploads within the limits of your sensors and license, we recommend breaking collections into files of less than 3,000 observables, with a total collection size of less than 1 million observables. Contact your ExtraHop representative for more information about license and platform limits for uploading threat collections.
- You can upload STIX files through the REST API.
- Log in to the ExtraHop system through https://<extrahop-hostname-or-IP-address>.
-
Click the System Settings icon and then click Threat
Intelligence.
- Click Manage custom collections.
- Click Upload New Collection.
- In the Collection ID field, type a unique collection ID. The ID can only contain alphanumeric characters and spaces are not allowed.
- Click Choose file and select a .tgz file that contains a STIX file.
- Type a display name in the Display Name field.
- Click Upload Collection.
- Repeat these steps on all consoles and each connected sensor.
Add a TAXII feed
Threat collections can be delivered to your environment over the Trusted Automated Exchange of Intelligence Information (TAXII) protocol.
TAXII feeds can vary in quality or relevance to your environment. To maintain accuracy and reduce noise, we recommend that you only add feeds from reliable sources that provide high-quality threat intelligence data.
Before you begin
- TAXII feed indicators are processed by ExtraHop Cloud Services. The ExtraHop system must be connected to ExtraHop Cloud Services to add a TAXII feed.
- Users must be granted NDR module access and have administrator privileges to complete the tasks in this guide.
-
Click the System Settings icon and then click Threat
Intelligence.
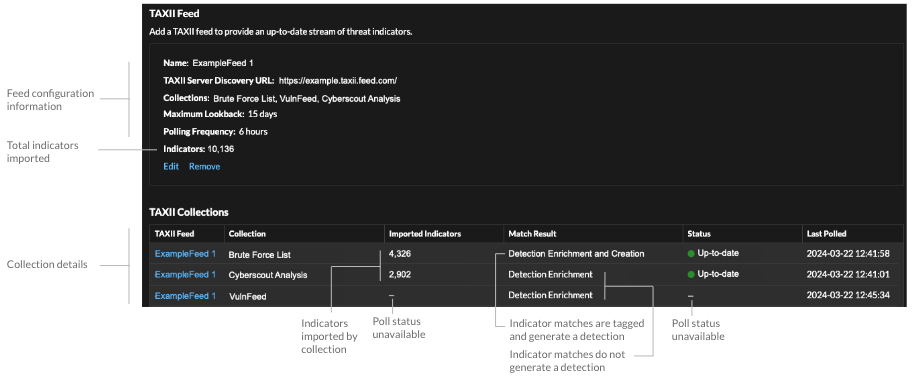
TAXII feed configuration information displays in the TAXII Feed section of the Threat
Intelligence page, including the specified lookback period, polling frequency, and
total number of indicators contained in the feed. The TAXII Collections table
contains details about the individual collections in the feed.
- The time required to poll the TAXII feed and process indicators is based on the number of indicators in the feed. For reference, polling a feed with 500,000 indicators in the specified lookback period could take an hour or more.
- Indicator types that are not recognized by the ExtraHop system, benign endpoint indicators, and indicators marked as revoked will be removed from the feed during polling.
- In the TAXII collections table, the collection status will display a dash (-) until the collection is up-to-date. If this status does not resolve to up-to-date, test your connection to the TAXII server, then check your TAXII feed provider to make sure that the collection still exists in the feed, that your credentials grant access to the collection, and that you have not exceeded polling limits set by the provider.
Thank you for your feedback. Can we contact you to ask follow up questions?