Display a dashboard in a NOC or SOC
Some Network Operation Center (NOC) or Security Operation Center (SOC) applications require a URL to display or embed third-party content on large-screen monitors. However, before you can access your ExtraHop dashboard with a URL, you must first authenticate to the ExtraHop system.
Instead of logging into the ExtraHop system with a username and password, you can configure access for a user account through an API key. You can then add the API key to your dashboard URL and then share the URL with any person or application you want.
We recommend that you create a dedicated user account with restricted access to minimize security risks.
To enable access to a dashboard with a URL, you will complete the following steps:
- Enable API key authentication.
- Create a read-only user with shared access to the dashboard you want to display.
- Generate an API key for the user.
- Modify the dashboard URL to add the API key.
Prerequisites
- You must have access to an ExtraHop system with system and access administration privileges.
- Your ExtraHop system must be enabled for REST API access.
Enable login access through the API
Before you can access a dashboard with a URL, you must enable authentication with an API key by modifying the running configuration file.
-
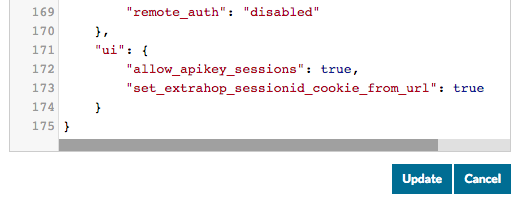
Add an entry to the running configuration file by completing the following
steps:
Your entry should look similar to the following image, though the contents of your running configuration file might vary:
Create a restricted read-only user account
- Log in to the Administration settings on the ExtraHop system through https://<extrahop-hostname-or-IP-address>/admin.
- In the Access Settings section, click Users.
- Click Add User.
- In the Personal Information section, complete the information about your new user.
- In the User Privileges section, click Restricted read-only privileges.
- Click Save.
Share your dashboard with the restricted read-only user
- Log in to the ExtraHop system through https://<extrahop-hostname-or-IP-address>.
- Click Dashboards at the top of the page.
- In the left pane, select the dashboard that you want to share.
- Click the command menu (icon) in the upper-right corner of the dashboard page, and then select Share.
- Select Only specified users or groups can view or edit.
- In the Specify users and groups field, type the name of your new user, and then select the user name from the drop-down list.
- From the drop-down list, select Can view.
- Click Add User.
- Click Save.
Modify your dashboard URL
Dashboard URLs are composed of a series of parameters, such as your appliance hostname, a dashboard ID, and the time interval for the current view. Before your dashboard can be accessed with a URL, you must add an API key. For large-screen displays, we also recommend setting a parameter for slideshow mode.
| Warning: | It is important to remember that by sharing a dashboard with a URL and API key, you are granting access to your ExtraHop system. Be sure to restrict access per your security guidelines. |
For this topic, we will start with the following example URL, where the dashboard ID is KXK9C and the time interval is set for 30 minutes:
https://hostname.example.com/extrahop/#/Dashboard/KXK9C/?from=30&interval_type=MIN&until=0
| Tip: | You can quickly modify the time interval for your dashboard directly in
the URL. The string at the end of the URL determines the time displayed. For example, in the following URL, the time interval is set for 30 minutes: https://hostname.example.com/extrahop/#/Dashboard/KXK9C/?from=30&interval_type=MIN&until=0 |
You can modify that time to two months by changing the number to 2 and the interval_type to MON:
https://hostname.example.com/extrahop/#/Dashboard/KXK9C/?from=2&interval_type=MON&until=0
Similarly, to change to a weekly or daily interval, change the interval_type to WK or DAY.
Thank you for your feedback. Can we contact you to ask follow up questions?