Build a trigger
Triggers provide expanded functionality of your ExtraHop system. With triggers, you can create custom metrics, generate and store records, or send data to a third-party system. Because you write the trigger script, you control the actions taken by the trigger upon specified system events.
Before you begin
Log in to the ExtraHop system with a user account that has the full write privileges required to create triggers.If you are new to triggers, familiarize yourself with the trigger planning process, which will help you narrow the focus of your trigger, or determine whether you need a build a trigger at all. Then, run through the process of building a trigger by completing the Triggers Walkthrough.
Configure trigger settings
The first step to building a trigger is to provide a trigger name, determine whether debugging is enabled, and most importantly, identify which system events the trigger will run on.
-
Click the System Settings icon
 and then click Triggers.
Write a trigger script
The trigger script specifies the instructions the trigger will carry out when a system event configured for the trigger occurs.
Before you begin
We recommend that you open the ExtraHop Trigger API Reference, which contains the events, methods, and properties you need for your trigger. A link is also available from the trigger editor window in the ExtraHop system.-
Click the System Settings icon , and then click Triggers.
-
In the right pane, type the trigger script in JavaScript-like syntax with
events, methods, and properties from the ExtraHop Trigger API Reference.
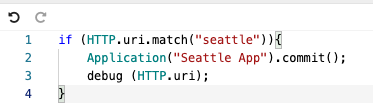
The following figure shows a sample script entered on the Editor tab:
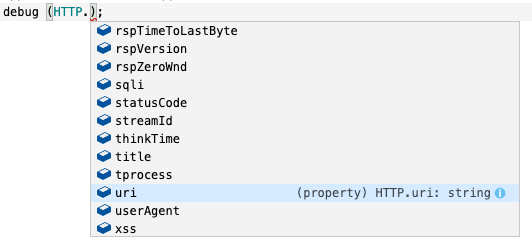
The editor provides an autocomplete feature that displays a list of properties and methods based on the selected class object. For example, type a class name and then type a dot (.) to display a list of available properties and methods as shown in the following figure:
-
Click Save.
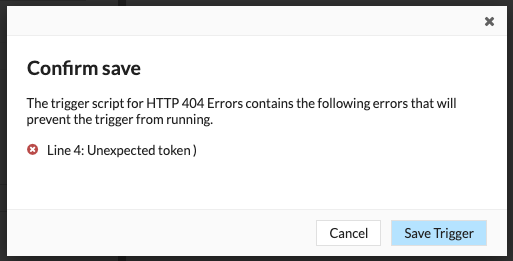
The editor provides syntax validation of your script. When you save the trigger, the validator calls out any invalid actions, syntax errors, or deprecated elements in the script. If available, the validator displays replacements for deprecated elements.
Warning: To avoid poor trigger performance, incorrect results, or a trigger that does not function, we strongly recommended that you fix the code or replace the deprecated element. The following figure shows a sample error message generated by the syntax validator:
Advanced trigger options
You must configure triggers to run on at least one event. Depending on the selected event, the Create Trigger pane displays advanced configuration options. For example, selecting the HTTP_RESPONSE event enables you to set the number of payload bytes to buffer each time that event occurs on the system.
| Option | Description | Supported events | ||
|---|---|---|---|---|
| Bytes Per Packet to Capture | Specifies the number of bytes to capture per packet. The capture
starts with the first byte in the packet. Specify this option only
if the trigger script performs packet capture. A value of 0 specifies that the capture should collect all bytes in each packet. |
All events are supported except the following list:
|
||
| L7 Payload Bytes to Buffer | Specifies the maximum number of payload bytes to buffer.
|
|
||
| Clipboard Bytes | Specifies the number of bytes to buffer on a Citrix clipboard transfer. |
|
||
| Metric cycle | Specifies the length of the metric cycle, expressed in seconds.
The following values are valid:
|
|
||
| Metric types | Specifies the metric type by the raw metric name, such as extrahop.device.http_server. Specify multiple metric types in a comma-delimited list. |
|
||
| Run trigger on each flow turn | Enables packet capture on each flow
turn. Per-turn analysis continuously analyzes communication between two endpoints to extract a single payload data point from the flow. If this option is enabled, any values specified for the Client matching string and Server matching string options are ignored. |
|
||
| Client Port Range | Specifies the client port range. Valid values are 0 to 65535. |
|
||
| Client Bytes to Buffer | Specifies the number of client bytes to buffer. The value of this option cannot be set to 0 if the value of the Server bytes to buffer option is also set to 0. |
|
||
| Client Buffer Search String | Specifies the format string that indicates when to begin
buffering client data. Returns the entire packet upon a string
match. You can specify the string as text or hexidecimal numbers. For example, both ExtraHop and \x45\x78\x74\x72\x61\x48\x6F\x70 are equivalent. Hexidecimal numbers are not case sensitive. Any value specified for this option is ignored if the Per Turn or Run trigger on all UDP packets option is enabled. |
|
||
| Server Port Range | Specifies the server port range. Valid values are 0 to 65535. |
|
||
| Server Bytes to Buffer | Specifies the number of server bytes to buffer. The value of this option cannot be set to 0 if the value of the Client bytes to buffer option is also set to 0. |
|
||
| Server Buffer Search String | Specifies the format string that indicates when to begin
buffering server data. You can specify the string as text or hexidecimal numbers. For example, both ExtraHop and \x45\x78\x74\x72\x61\x48\x6F\x70 are equivalent. Hexidecimal numbers are not case sensitive. Any value specified for this option is ignored if the Per Turn or Run trigger on all UDP option is enabled. |
|
||
| Run trigger on all UDP packets | Enables capture of all UDP datagrams. |
|
||
| Run FLOW_CLASSIFY on expiring, unclassified flows | Enables running the event upon expiration to accumulate metrics for flows that were not classified before expiring. |
|
||
| External types | Specifies the types of external data the trigger processes. The trigger only runs if the payload contains a type field with one of the specified values. Specify multiple types in a comma-separated list. |
|
Thank you for your feedback. Can we contact you to ask follow up questions?