Enable detection tracking
Detection tracking enables you to assign a detection to a user, set the status, and add notes. You can track detections directly in the ExtraHop system, with a third-party external ticketing system, or with both methods.
| Note: | You must enable ticket tracking on all connected sensors. |
Before you begin
- You must have access to an ExtraHop system with a user account that has Administration privileges.
- After you enable external ticket tracking, you must configure third-party ticket tracking by writing a trigger to create and update tickets on your ticketing system, then enable ticket updates on your ExtraHop system through the REST API.
- If you disable external ticket tracking, previously stored status and assignee ticket information is converted to ExtraHop detection tracking. If detection tracking from within the ExtraHop system is enabled, you will be able to view tickets that already existed when you disabled external ticket tracking, but changes to that external ticket will not appear in the ExtraHop system.
-
From the Overview page, click System Settings
 and then click
All Administration.
and then click
All Administration.
- (Optional):
After you select the option to enable external integrations, specify the URL
template for your ticketing system and add the $ticket_id
variable at the appropriate location. For example, type a complete URL
such as https://jira.example.com/browse/$ticket_id. The
$ticket_id variable is replaced with the ticket ID
associated with the detection.
After the URL template is configured, you can click the ticket ID in a detection to open the ticket in a new browser tab.
Next steps
If you enabled external ticket tracking integrations, you must continue on to the following task:Configure third-party ticket tracking for detections
Ticket tracking enables you to connect tickets, alarms, or cases in your work-tracking system to ExtraHop detections. Any third-party ticketing system that can accept Open Data Stream (ODS) requests, such as Jira or Salesforce, can be linked to ExtraHop detections.
Before you begin
- You must have selected the third-party detection tracking option in Administration settings.
- You must have access to an ExtraHop system with a user account that has System and Access Administration privileges.
- You must be familiar with writing ExtraHop Triggers. See Triggers and the procedures in Build a trigger.
- You must create an ODS target for your ticket tracking server. See the following topics about configuring ODS targets: HTTP, Kafka, MongoDB, syslog, or raw data.
- You must be familiar with writing REST API scripts and have a valid API key to complete the procedures below. See Generate an API key.
Write a trigger to create and update tickets about detections on your ticketing system
This example shows you how to create a trigger that performs the following actions:
- Create a new ticket in the ticketing system every time a new detection appears on the ExtraHop system.
- Assign new tickets to a user named escalations_team in the ticketing system.
- Run every time a detection is updated on the ExtraHop system.
- Send detection updates over an HTTP Open Data Stream (ODS) to the ticketing system.
The complete example script is available at the end of this topic.
-
Click the System Settings icon and then click
Triggers.
const summary = "ExtraHop Detection: " + Detection.id + ": " + Detection.title;
const description = "ExtraHop has detected the following event on your network: " + Detection.description
const payload = {
    "fields": {
        "summary": summary,
        "assignee": {
            "name": "escalations_team"
        },
        "reporter": {
            "name": "ExtraHop"
        },
        "priority": {
            "id": Detection.riskScore
        },
        "labels": Detection.categories,
        "mitreCategories": Detection.mitreCategories,
        "description": description
    }
};
const req = {
    'path': '/rest/api/issue',
    'headers': {
        'Content-Type': 'application/json'
    },
    'payload': JSON.stringify(payload)
};
Remote.HTTP('ticket-server').post(req);Send ticket information to detections through the REST API
After you have configured a trigger to create tickets for detections in your ticket tracking system, you can update ticket information on your ExtraHop system through the REST API.
Ticket information appears in detections on the Detections page in the ExtraHop system. For more information, see the Detections topic.
The following example Python script takes ticket information from a Python array and updates the associated detections on the ExtraHop system.
#!/usr/bin/python3

import json
import requests
import csv

API_KEY = '123456789abcdefghijklmnop'
HOST = 'https://extrahop.example.com/'

# Method that updates detections on an ExtraHop system
def updateDetection(detection):
    url = HOST + 'api/v1/detections/' + detection['detection_id']
    del detection['detection_id']
    data = json.dumps(detection)
    headers = {'Content-Type': 'application/json',
               'Accept': 'application/json',
               'Authorization': 'ExtraHop apikey=%s' % API_KEY}
    r = requests.patch(url, data=data, headers=headers)
    print(r.status_code)
    print(r.text)

# Array of detection information
detections = [
                 {
                     "detection_id": "1",
                     "ticket_id": "TK-16982",
                     "status": "new",
                     "assignee": "sally",
                     "resolution": None,
                 },
                 {
                     "detection_id": "2",
                     "ticket_id": "TK-2078",
                     "status": None,
                     "assignee": "jim",
                     "resolution": None,
                 },
                 {
                     "detection_id": "3",
                     "ticket_id": "TK-3452",
                     "status": None,
                     "assignee": "alex",
                     "resolution": None,
                 }
             ]

for detection in detections:
    updateDetection(detection)
| Note: | If the script returns an error message that the SSL
certificate verification failed, make sure that a trusted certificate has
been added to your sensor or console. Alternatively, you can add the
verify=False option to bypass certificate verification. However, this
method is not secure and not recommended. The following code sends an HTTP GET request
without certificate
verification:requests.get(url, headers=headers, verify=False) |
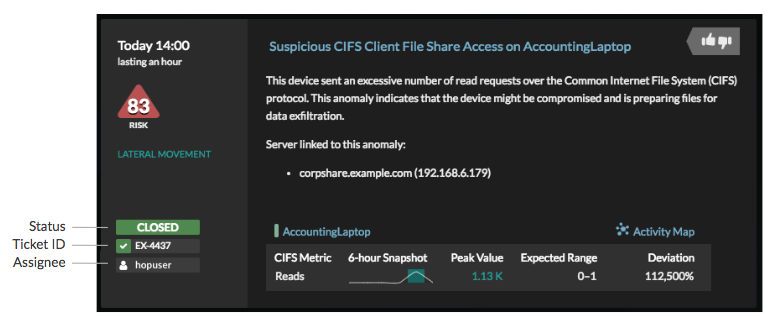
- Status
- The status of the ticket associated with the detection. Ticket tracking
supports the following statuses:
- New
- In Progress
- Closed
- Closed with Action Taken
- Closed with No Action Taken
- Ticket ID
- The ID of the ticket in your work-tracking system that is associated with the detection. If you have configured a template URL, you can click the ticket ID to open the ticket in your work-tracking system.
- Assignee
- The username assigned to the ticket associated with the detection. Usernames in gray indicate a non-ExtraHop account.
Thank you for your feedback. Can we contact you to ask follow up questions?