Deploy an ExtraHop recordstore on Linux KVM
In this guide, you will learn how to deploy an ExtraHop virtual recordstore on a Linux kernel-based virtual machine (KVM) and to join multiple recordstore to create a cluster. You should be familiar with basic KVM administration before proceeding.
| Important: | If you want to deploy more than one ExtraHop virtual sensor, create the new instance with the original deployment package or clone an existing instance that has never been started. |
System requirements
Your environment must meet the following requirements to deploy a virtual recordstore:
| Important: | ExtraHop tests virtual clusters on local storage for optimal performance. ExtraHop strongly recommends deploying virtual clusters on continuously available, low latency storage, such as a local disk, direct-attached storage (DAS), network-attached storage (NAS), or storage area network (SAN). |
- A KVM hypervisor environment capable of hosting the virtual recordstore. The virtual
recordstore is available in the following configurations:
Recordstore Manager-Only Node 5100v Extra-Small 5100v Small 5100v Medium 5100v Large 4 CPUs 4 CPUs 8 CPUs 16 CPUs 32 CPUs 8 GB RAM 8 GB RAM 16 GB RAM 32 GB RAM 64 GB RAM 4 GB boot disk 4 GB boot disk 4 GB boot disk 4 GB boot disk 4 GB boot disk 12 GB 250 GB or smaller datastore disk 500 GB or smaller datastore disk 1 TB or smaller datastore disk 2 TB or smaller datastore disk The hypervisor CPU should provide Streaming SIMD Extensions 4.2 (SSE4.2) and POPCNT instruction support.
Note: The recordstore manager-only node is preconfigured with a 12 GB datastore disk. You must manually configure a second virtual disk to the other recordstore configurations to store record data. Consult with your ExtraHop sales representative or Technical Support to determine the datastore disk size that is best for your needs.
Note: For KVM deployments, virtio-scsi interface is recommended for the boot and datastore disks. - A virtual recordstore license key.
- The following TCP ports must be open:
- TCP port 443: Enables browser access to Administration settings. Requests sent to port 80 are automatically redirected to HTTPS port 443.
- TCP port 9443: Enables recordstore nodes to communicate with other nodes in the same cluster.
Package contents
The installation package for KVM systems is a tar.gz file that contains the following items:
- EXA-5100v-<x>.xml
- The domain XML configuration file
- EXA-5100v-<x>.xml.md5
- The domain XML checksum file
- extrahop-boot.qcow2
- The boot disk
- extrahop-boot.qcow2.md5
- The boot disk checksum file
Deploy the virtual recordstore
To deploy the virtual recordstore, complete the following procedures:
Determine the best bridge configuration
Identify the bridge through which you will access the management interface of your recordstore.
- Make sure the management bridge is accessible to the virtual recordstore and to all users who must access the management interface.
- If you need to access the management interface from an external computer, configure a physical interface on the management bridge.
Edit the domain XML configuration file
After you identify the management bridge, edit the configuration file, and create the virtual recordstore.
- Contact ExtraHop Support to obtain and download the Explore KVM package.
- Extract the tar.gz file that contains the installation package.
- Copy the extrahop-boot.qcow2 file to your KVM system.
-
Open the domain XML configuration file in a text editor and edit the following
values:
- Save the XML file.
Create the datastore disk
Create the datastore disk so that the allotted space is large enough to store the type of records you want to store for the amount of lookback desired.
qemu-img create -f qcow2 <path to storage location> <size>
Where <size> is the size of the disk in gigabytes. This example creates a qcow2 image with a maximum size of 2 TB:
qemu-img create -f qcow2 /home/extrahop/extrahop-data.qcow2 2000G
Create the recordstore
virsh define <EXA-5100v-<x>.xml>
(Optional) Configure a static IP address
By default, the ExtraHop system is configured with DHCP enabled. If your network does not support DHCP, you must configure a static address manually.
Configure the recordstore
After you obtain the IP address for the ExtraHop recordstore, log in through https://<explore_ip_address>/admin and complete the following recommended procedures.
| Note: | The default login username is setup and the password is default. |
- Register your ExtraHop system
- Connect the console and sensors to ExtraHop recordstores
- Send record data to the ExtraHop recordstore
- Review the ExtraHop recordstore Post-deployment Checklist and configure additional recordstore settings.
Create a recordstore cluster
For the best performance, data redundancy, and stability, you must configure at least three ExtraHop recordstores in a cluster.
| Important: | If you are creating a recordstore cluster with six to nine nodes, you must configure the cluster with at least three manager-only nodes. For more information, see Deploying manager-only nodes. |
In this example, the recordstores have the following IP addresses:
- Node 1: 10.20.227.177
- Node 2: 10.20.227.178
- Node 3: 10.20.227.179
You will join nodes 2 and 3 to node 1 to create the recordstore cluster. All three nodes are data-only nodes. You cannot join a data-only node to a manager-only node or join a manager-only node to a data-only node to create a cluster.
| Important: | Each node that you join must have the same configuration (physical or virtual) and the same ExtraHop firmware version. |
Before you begin
You must have already installed or provisioned the recordstores in your environment before proceeding.-
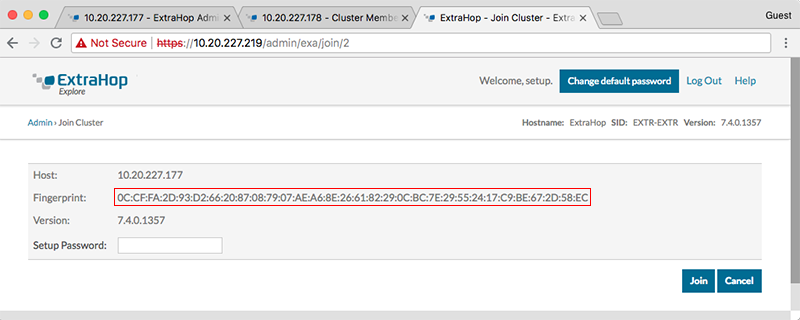
Confirm that the fingerprint on this page matches the fingerprint you noted in
step 3.
-
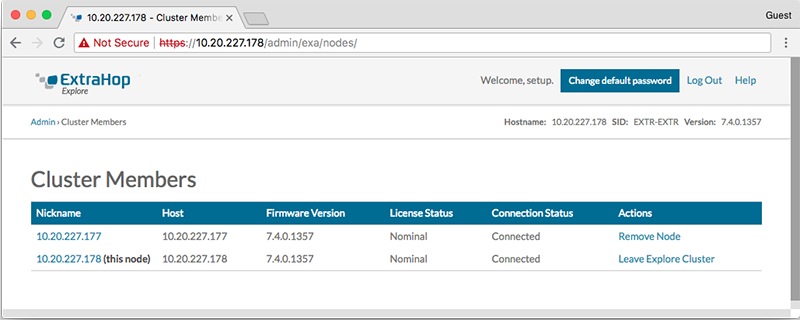
Click Cluster Members.
You should see node 1 and node 2 in the list.
-
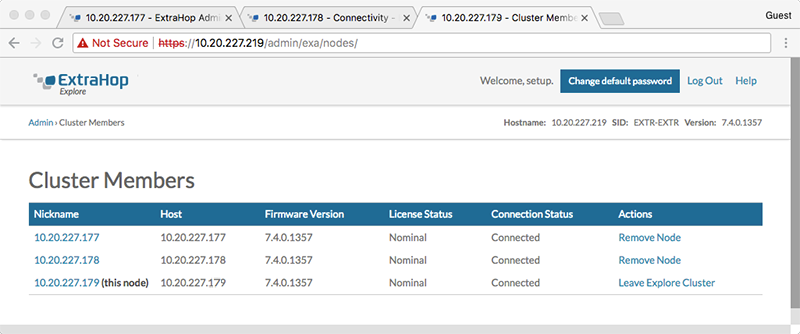
When you have added all of your recordstores to the cluster, click
Cluster Members in the Explore Cluster
Settings section.
You should see all of the joined nodes in the list, similar to the following figure.
Connect the recordstore to a console and all sensors
After you deploy the recordstore, you must establish a connection from the ExtraHop console and all sensors before you can query records.
| Important: | Connect the sensor to each recordstore node so that the sensor can distribute the workload across the entire recordstore cluster. |
| Note: | If you manage all of your sensors from a console, you only need to perform this procedure from the console. |
- Log in to the Administration settings on the ExtraHop system through https://<extrahop-hostname-or-IP-address>/admin.
- In the ExtraHop Recordstore Settings section, click Connect Recordstore.
- Click Add New.
- In the Node 1 section, type the hostname or IP address of any recordstore in the cluster.
- For each additional node in the cluster, click Add New and enter the individual hostname or IP address for the node.
- Click Save.
- Confirm that the fingerprint on this page matches the fingerprint of node 1 of the recordstore cluster.
- In the Explore Setup Password field, type the password for the node 1 setup user account and then click Connect.
- When the recordstore cluster settings are saved, click Done.
Send record data to the recordstore
After your recordstore is connected to your console and sensors, you must configure the type of records you want to store.
Thank you for your feedback. Can we contact you to ask follow up questions?