Packet Forwarding with RPCAP
The ExtraHop system generates metrics about your network and applications through a wire data feed, which is typically mirrored from a switch. However, you might not always have access to a switch or you might want to monitor a specific device that is outside of your wire data network. Additionally, in a cloud environment, such as Microsoft Azure or Amazon Web Services (AWS), you cannot directly access switch hardware. For these types of environments, you can forward packets to an ExtraHop sensor through a packet forwarder such as Remote Packet Capture (RPCAP).
Before you begin
- You must have experience with network administration and installing utilities on servers to complete the procedures in this guide.
- WARNING: Be aware of the data charges that are incurred with AWS and Azure. For example, multiple AWS VPC peers within a region can incur additional costs. For information about pricing, see the AWS Data Transfer page and the Azure Bandwidth pricing page.
- For best results, begin with a deployment of a few RPCAP senders and evaluate the impact to your environment. As you add senders to the deployment, monitor the CPU usage on your RPCAP-monitored systems, as CPU and memory overhead is correlated to the number of senders that are sending packets to the same sensor.
- Limit the number of RPCAP senders that are sending packets to the ExtraHop system. Specifically, we recommend that you configure fewer than 400 RPCAP senders per sensor. If RPCAP is sending packets to both a sensor and a packetstore, we recommend that you configure 200 senders or fewer. These recommendations are based on our internal lab results. Your experience might vary based on the complexity of your configuration or environment.
- If your ExtraHop system includes packetstore, you can configure a second feed of packets from your remote environment to the packetstore.
Deployment overview
The following steps outline the key procedures that are required to implement RPCAP with an ExtraHop sensor.
- First, configure the sensor to accept RPCAP traffic and add packet-forwarding rules.
- Next, download the rpcapd software for your operating system from the ExtraHop Downloads and Resources web page.
- If your environment has a firewall, open ports on your firewall for the requisite RPCAP traffic.
- Finally, install the rpcapd software on every Linux and Windows device that you want to forward traffic from. You must modify the configuration file (rpcapd.ini) to specify device interfaces or to direct traffic to the sensor.
- If you have an ExtraHop packetstore, you must configure it to accept RPCAP traffic, add packet-forwarding rules, and update your rpcapd.ini files to direct traffic to both sensors and packetstores.
Implementing RPCAP with the ExtraHop system
RPCAP is implemented through a small binary file that runs as a daemon (rpcapd) on each device that you want to monitor traffic for.
The RPCAP installation package for Windows or Linux can be downloaded from the ExtraHop Downloads and Resources web page. The following figure shows a simple RPCAP implementation with a single sensor behind a firewall. Your network configuration might vary.
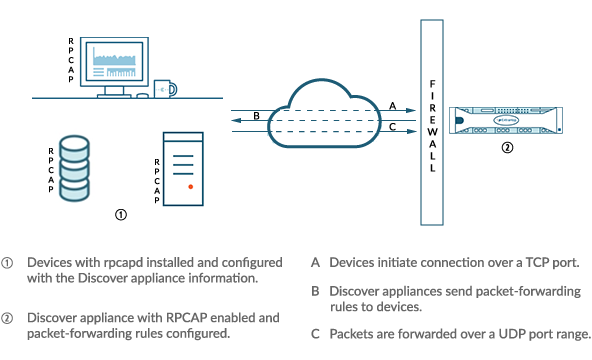
The ExtraHop implementation of RPCAP operates in active mode, which means that devices installed with rpcapd software initiate a TCP connection to the ExtraHop system over defined ports. After the TCP connection is established, the ExtraHop system responds with packet-forwarding rules that identify the allowed traffic. When the allowed traffic is detected on the monitored rpcapd device, packets are forwarded to the ExtraHop system over a designated UDP port range.
Each rpcap-installed device contains a configuration file (rpcapd.ini) with the IP addresses of the sensors where traffic should be sent, and the TCP port over which the connection should be initiated.
Each ExtraHop system must have an interface configured to monitor RPCAP traffic. In addition, your ExtraHop system must be configured with packet-forwarding rules that determine which packets are forwarded by the remote devices.
| Important: | Each interface that monitors RPCAP traffic can process a maximum of 1 Gbps. |
Configure RPCAP on the ExtraHop system
We recommend that you configure a second interface only for RPCAP, rather than configuring both RPCAP and management on the the same interface. Configuring a dedicated RPCAP interface improves the likelihood that all packets will be successfully forwarded to the ExtraHop system.
Configure packet-forwarding rules on the ExtraHop system
After you configure the interface as an RPCAP target, you must configure packet-forwarding rules. Packet forwarding rules limit what traffic is allowed to be sent to the ExtraHop system through RPCAP.
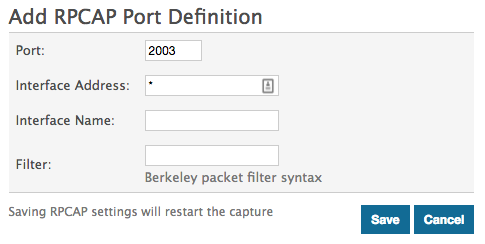
By default, an entry is configured for port 2003 that accepts traffic from all interface addresses. You can modify the default entry for your environment, delete the default entry, and add additional entries. Make sure that you specify port numbers greater than 1023 to avoid conflicts with reserved ports. It is a good practice to set these rules first, so that when you configure rpcapd on your remote devices, the ExtraHop system is ready to receive the forwarded packets.
You can configure up to 16 rules for packet forwarding in the ExtraHop system; each rule must have a single TCP port over which the ExtraHop system communicates the packet-forwarding rules to rpcapd devices.
| Important: | The information in the rpcapd configuration file on the devices that are forwarding packets must not contradict the rules set in the ExtraHop system. |
- Log in to the Administration settings on the ExtraHop system through https://<extrahop-hostname-or-IP-address>/admin.
- In the Network Settings section, click Connectivity.
-
In the RPCAP Settings section, complete one of the
following actions:
- Click on 2003 to open the default entry.
- Click Add to add a new entry.
Important: Port numbers must be 1024 or greater.
-
In the Add RPCAP Port Definition section, complete the
following information:
- Click Save, which saves the settings and restarts the capture.
- Repeat these steps to configure additional rules. You can add up to 16 rules.
Save the running configuration file
After you configure the interface and configure packet forwarding rules, you must save the changes to the running configuration file.
- Log in to the Administration settings on the ExtraHop system through https://<extrahop-hostname-or-IP-address>/admin.
- In the Network Settings section, click Connectivity.
- Click View and Save Changes.
- Review the changes in the Current running config (not yet saved) pane.
- Click Save.
- Click Done.
Installing rpcapd on your remote devices
You can customize the rpcapd installation by specifying the following configuration options.
| Important: | These options should not be modified without an understanding of how the change might affect your workflow. |
When you run the installation command, rpcapd automatically starts and initiates communication to the IP address and destination port specified in the command. For example, on a Linux device, where 172.18.10.25 is the IP address of the sensor and the TCP port is 2003, the installation command is sudo ./install.sh -k 172.18.10.25 2003.
Running the install command creates a configuration file (rpcapd.ini) with an ActiveClient entry that defines the IP address and destination port of the sensor, such as ActiveClient = 10.0.0.100,2003. The entry can also specify the name of the interface to forward traffic from; if not specified, the entry forwards traffic from eth0. We recommend that you do not forward traffic from an interface that is also capturing network traffic to avoid performance degradation. For example, if the interface between the RPCAP peer and the sensor is 1Gbps, and the RPCAP peer is both capturing and forwarding traffic from that interface, RPCAP will only be able to forward 500 Mbps, since the other 500 Mbps is consumed by capturing incoming network traffic.
If you want to forward traffic from multiple interfaces, you must specify multiple ActiveClient values in the rpcapd.ini file. We recommend that you specify the interface names explicitly. For example, the following configuration forwards traffic from both eth0 and eth1:
ActiveClient=172.25.26.5, 2003, ifname=eth0
ActiveClient=172.25.26.5, 2003, ifname=eth1
Standard Script
- -v
- Runs rpcap in active mode only instead of both active and passive modes.
- -d
- Runs rpcap as a daemon (in Linux) or as a service (in Windows).
- -L
- Sends log messages to a syslog server.
Script Filters
Modify the start up script to refine the traffic that is sent to the sensor.
- -F
- Specify a local filter in BPF syntax that is combined with any RPCAP filters set on your sensor through the AND operator. While standard BPF standard expressions are supported, RPCAP additionally supports the following qualifiers.
- hatype <num>
- Filter by the hardware type. For example, set this value to 1 for Ethernet or to 772 for loopback. For a complete list of hardware types, see the ARPHRD_* constants in the Linux if_arp.h header file.
- -i <interface>
- Specify an interface for the RPCAP traffic.
- -i any-eth
- Captures any Ethernet interface and preserves the required Ethernet framing. (Linux only).
- ifidx <num>
- Filter by the interface index. (Linux only).
- ifn <name>
- Filter by the interface name. For example, not ifn eth0 excludes any packets on eth0 from being captured.
Debian-Ubuntu Linux distributions
Before you begin
The server must be running one of the following Linux distributions:- Ubuntu 18.04
- Ubuntu 20.04
- Ubuntu 22.04
The following packages must be installed on the server:
- debconf
- libc6
- libcap-ng
- libcrypt1
Note: The libcrypt1 package is only required for Ubuntu 20.04 and later.
sudo dpkg-reconfigure rpcapd
RPM-based Linux distributions
Before you begin
The server must be running one of the following Linux distributions:- CentOS 6
- CentOS 7
- CentOS 8
- CentOS 9
- RHEL 6
- RHEL 7
- RHEL 8
- RHEL 9
- Amazon Linux 2
The following packages must be installed on the server:
- chkconfig
- initscripts
- glibc
- libcap-ng
- libxcrypt
Note: The libxcrypt package is only required for CentOS 8, CentOS 9, RHEL 8, RHEL 9, and Amazon Linux 2.
Configure rpcapd on a Linux device with multiple interfaces
For devices with multiple interfaces, rpcapd can be configured to forward packets by interface.
To edit the configuration file, complete the following steps.
Example Linux configurations
The following example shows an interface in CIDR format.
ActiveClient = 10.10.6.45, 2003, ifaddr=10.10.1.0/24
NullAuthPermit = YES
UserName = rpcapd
The following example shows a configuration that forwards packets by interface name:
ActiveClient = 10.10.6.45, 2003, ifname=eth0
NullAuthPermit = YES
UserName = rpcapd
Uninstall the software
- Log in to the Linux server.
-
Open a terminal application and choose one of the following options to remove
the software.
- For RPM-based servers, run the following
command:
sudo rpm --erase rpcapd
- For Debian and Ubuntu servers, run the following
command:
sudo apt-get --purge remove rpcapd
- For RPM-based servers, run the following
command:
- Type Y at the prompt to confirm the software removal and then press ENTER.
Install rpcapd on a Windows server with the installation wizard
Before you begin
- The server must be running Windows Server 2016 or later.
- The Microsoft C and C++ (MSVC) runtime libraries must be installed on the
server. You can install the libraries by downloading the Visual C++
Redistributable package from the Microsoft documentation website.
Important: Download the package for Visual Studio 2015, 2017, 2019, and 2022 with x64 architecture.
Configure rpcapd on a Windows device with multiple interfaces
For network devices with multiple interfaces, rpcapd can be configured to forward packets from multiple interfaces.
To edit the configuration file, complete the following steps.
Example Windows configurations
The following example shows two interfaces in CIDR format.
ActiveClient = 10.10.6.45, 2003, ifaddr=10.10.1.0/24
ActiveClient = 10.10.6.45, 2003, ifaddr=10.10.2.0/24
NullAuthPermit = YES
UserName = rpcapd
The following example shows a configuration that forwards packets by interface name.
ActiveClient = 10.10.6.45, 2003,ifname=\Device\NPF_{2C2FC212-701D-42E6-9EAE-BEE969FEFB3F}
ActiveClient = 10.10.6.45, 2003,ifname=\Device\NPF_{3C2FC212-701D-42E6-9EAE-BEE969FEFB3F}
NullAuthPermit = YES
UserName = rpcapd
Uninstall the software
Complete the following steps to uninstall RPCAP software through the Windows Programs control panel.
- Log in to the Windows computer where the RPCAP software is installed.
- Open the Control Panel and click Uninstall a program.
- Select RPCAP Service For Windows in the list and then click Uninstall/Change.
- Click Remove.
- After the software is removed, click Close.
Verify your RPCAP traffic
After your configuration is complete, you can view RPCAP packets and throughput metrics on the System Health page to verify that the correct traffic is being forwarded to the ExtraHop system.
Learn more about System Health dashboard.
Forwarded by Peer
A list chart that displays the following information regarding packets and frames that are forwarded by an RPCAP peer:
- Forwarded Packets
- The number of packets that an RPCAP peer attempted to forward to an ExtraHop system.
- Forwarder Interface Packets
- The total number of packets that were viewed by the forwarder. Forwarders on RPCAP devices will coordinate with each other to keep multiple devices from sending the same packet. This is the number of packets that were viewed before any frames were removed to reduce forwarded traffic, and before frames were removed by user-defined filters.
- Forwarder Kernel Frame Drops
- The number of frames that were dropped because the kernel of the RPCAP peer was overloaded with the stream of unfiltered frames. Unfiltered frames have not been filtered by the kernel to remove duplicate packets or packets that should not be forwarded because of user-defined rules.
- Forwarder Interface Drops
- The number of packets that were dropped because the RPCAP forwarder was overloaded with the stream of unfiltered frames. Unfiltered frames have not been filtered to remove duplicate packets or packets that should not be forwarded because of user-defined rules.
Received by the ExtraHop system
A list chart that displays the following information regarding packets and frames that are received by an ExtraHop system from a Remote Packet Capture (RPCAP) peer:
- Encapsulated Bytes
- The total size of all packets related to the UDP flow from the RPCAP device to the ExtraHop system, in bytes. This information shows you how much traffic the RPCAP forwarder is adding to your network.
- Encapsulated Packets
- The number of packets related to the UDP flow from the RPCAP device to the ExtraHop system.
- Tunnel Bytes
- The total size of packets, not including encapsulation headers, that the ExtraHop system received from an RPCAP device, in bytes.
- Tunnel Packets
- The number of packets that the ExtraHop system received from an RPCAP peer. This number should be very close to the Forwarded Packets number in the Sent by Remote Device chart. If there is a big gap between these two numbers, then packets are dropping between the RPCAP device and the ExtraHop system.
How this information can help you
Tracking the encapsulated packets and bytes is a good way to make sure that RPCAP forwarders are not placing an unnecessary load on your network. You can monitor tunnel packets and bytes to make sure that the ExtraHop system is receiving everything that the RPCAP device is sending.
Troubleshooting
If the number of Forwarded Packets do not equal the number of Forwarder Interface Packets, packets are being dropped at some point in the RPCAP process. This is usually due to one of the following issues:
- An internal process on the RPCAP peer is overloaded.
- If there are Forwarder Kernel Frame Drops, the kernel of the RPCAP peer is overloaded.
- If there are Forwarder Interface Drops, the libpcap process of the RPCAP peer is attempting to send too many packets per second, and the process is probably consuming close to 100% CPU usage on a single core.
- If the dropped packets metrics do not account for the difference between the Forwarded Packets and the Forwarder Interface Packets, this might indicate that the thread on the RPCAP peer that is sending the packets is overloaded.
- The network connection between the peer and the sensor is too slow.
- If the Encapsulated Bytes is equal or nearly equal to the speed of the network connection between the sensor and the peer, the connection is probably not fast enough.
Sample RPCAP configuration
The following sample configurations illustrate how traffic rules apply to packet forwarding.
In all scenarios below, the sensor interface has a network configuration of 172.25.26.5, 172.25.26.0/24 and is configured for RPCAP, as displayed in the following figure.
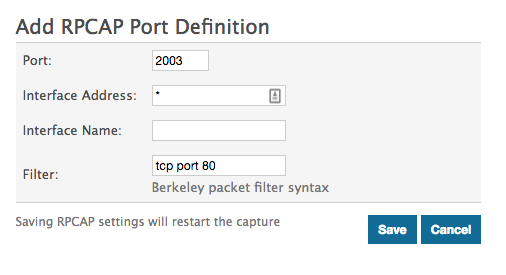
Scenario 1: The sensor is configured to accept all interface traffic, as displayed in the following figure.
| Client Network Configuration | RPCAP Configuration (rpcapd.ini) | Traffic Forwarded |
|---|---|---|
| eth0 = 10.10.1.20, 10.10.1.0/24 | ActiveClient=172.25.26.5, 2003 | All traffic on eth0. |
|
eth0 = 10.10.1.21 10.10.1.0/24 eth1 = 192.168.4.21, 192.168.4.0/24 |
ActiveClient=172.25.26.5, 2003 | All traffic on eth0. No traffic from eth1. |
|
eth0 = 10.10.1.21, 10.10.1.0/24 eth1 = 192.168.4.21, 192.168.4.0/24 |
ActiveClient=172.25.26.5, 2003, ifname=eth1 | All traffic on eth1. No traffic from eth0. |
|
eth0 = 10.10.1.21, 10.10.1.0/24 eth1 = 192.168.4.21, 192.168.4.0/24 |
ActiveClient=172.25.26.5, 2003, ifname= eth0 ActiveClient=172.25.26.5, 2003, ifname = eth1 |
All traffic on both eth0 and eth1. |
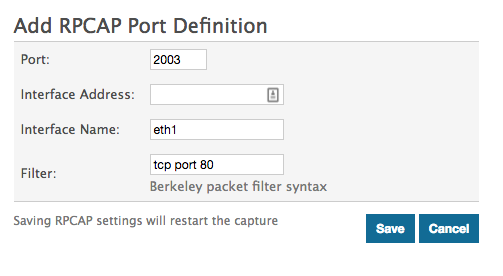
Scenario 2: The sensor is configured to accept traffic from only the device eth1 interface, as displayed in the following figure.

| Client Network Configuration | RPCAP Configuration (rpcapd.ini) | Traffic Forwarded |
|---|---|---|
| eth0 = 10.10.1.20, 10.10.1.0/24 | ActiveClient=172.25.26.5, 2003 | No traffic is forwarded. |
|
eth0 = 10.10.1.21, 10.10.1.0/24 eth1 = 192.168.4.21, 192.168.4.0/24 |
ActiveClient=172.25.26.5, 2003 | All traffic on eth1. No traffic from eth0. |
|
eth0 = 10.10.1.21, 10.10.1.0/24 eth1 = 192.168.4.21, 192.168.4.0/24 |
ActiveClient=172.25.26.5, 2003, ifname=eth1 | All traffic on eth1. No traffic from eth0. |
|
eth0 = 10.10.1.21, 10.10.1.0/24 eth1 = 192.168.4.21, 192.168.4.0/24 |
ActiveClient=172.25.26.5, 2003, ifname= eth0 ActiveClient=172.25.26.5, 2003, ifname = eth1 |
All traffic on eth1. No traffic from eth0. |
Scenario 3: The sensor is configured to accept all interface traffic for TCP port 80, as displayed in the following figure.
| Client Network Configuration | RPCAP Configuration (rpcapd.ini) | Traffic Forwarded |
|---|---|---|
| eth0 = 10.10.1.20, 10.10.1.0/24 | ActiveClient=172.25.26.5, 2003 | Only port 80 traffic on eth0. |
|
eth0 = 10.10.1.21, 10.10.1.0/24 eth1 = 192.168.4.21, 192.168.4.0/24 |
ActiveClient=172.25.26.5, 2003 | Only port 80 traffic on eth0. No traffic from eth1. |
|
eth0 = 10.10.1.21, 10.10.1.0/24 eth1 = 192.168.4.21, 192.168.4.0/24 |
ActiveClient=172.25.26.5, 2003, ifname=eth1 |
Only port 80 traffic on eth1. No traffic from eth0. |
|
eth0 = 10.10.1.21, 10.10.1.0/24 |
ActiveClient=172.25.26.5, 2003, ifname=eth0 |
Only port 80 traffic on eth0. |
Scenario 4: The sensor is configured to only accept TCP port 80 traffic from the eth1 interface, as displayed in the following figure.
| Client Network Configuration | RPCAP Configuration (rpcapd.ini) | Traffic Forwarded |
|---|---|---|
| eth0 = 10.10.1.20, 10.10.1.0/24 | ActiveClient=172.25.26.5, 2003 | No traffic is forwarded. |
|
eth0 = 10.10.1.21, 10.10.1.0/24 eth1 = 192.168.4.21, 192.168.4.0/24 |
ActiveClient=172.25.26.5, 2003 | Port 80 traffic on eth1. No traffic from eth0. |
|
eth0 = 10.10.1.21, 10.10.1.0/24 eth1 = 192.168.4.21, 192.168.4.0/24 |
ActiveClient=172.25.26.5, 2003, ifname=eth1 |
Port 80 traffic on eth1. No traffic from eth0. |
|
eth0 = 10.10.1.21, 10.10.1.0/24 eth1 = 192.168.4.21, 192.168.4.0/24 |
ActiveClient=172.25.26.5, 2003, ifname=eth0 ActiveClient=172.25.26.5, 2003, ifname=eth1 |
Port 80 traffic on eth1. No traffic from eth0. |
Opening ports on your firewall
RPCAP forwards packets over a range of UDP ports that are determined by the TCP ports configured in the sensor and packetstore and the model of your appliance.
| Important: | Opening four ports might be sufficient for most environments. However, we recommend that you open a full 32 ports to avoid losing traffic from your RPCAP-installed devices. If opening 32 ports on your firewall is a concern, you can follow the guidelines in the table below. If you are not receiving all expected traffic, contact ExtraHop Support. |
- For the lower end of the UDP port range, take the lowest TCP port listed in the set of rules on the sensor or packetstore.
- For the higher end of the UDP range, take the lowest number and add the number associated with your ExtraHop appliance model, as listed in the following table.
| ExtraHop Appliance | Number of Ports | Example Range |
|---|---|---|
| ETA 1150v | 1 | 2003 |
| EDA 6100v, ETA 6150, ETA 6150v | 8 | 2003-2010 |
| EDA 10200 | 72 | 2003-2074 |
For advanced users, you can also manually modify the lowest port of the UDP range through the rpcap:udp_port_start running configuration file setting.
Thank you for your feedback. Can we contact you to ask follow up questions?