Integrate ExtraHop with AWS CloudFormation

This guide explains how to install and configure rpcap daemons on EC2 instances of ExtraHop sensors when they are deployed through Amazon Web Services (AWS) CloudFormation.

This guide assumes you have completed the procedures to deploy an ExtraHop sensor in AWS. You must have launched an ExtraHop AMI in the same region with the proper security groups configured to deploy a stack or monitor Auto Scaling groups.

Deploying a stack

To deploy a stack in CloudFormation, complete the following steps.

  1. Sign into your AWS management console.
  2. Download a sample template from the AWS CloudFormation Templates page to your workstation. If you already have a template from a previous deployment, edit that template with the changes below.
  3. Open the template file in a text editor.
  4. Define the ExtraHop system IP address and port by pasting the code at the end of the "Parameters" section as shown in the following example:
    "EXTRAHOPIP" : {
        "DEFAULT" : "10.10.0.0",
        "DESCRIPTION" : "IP ADDRESS OF EXTRAHOP SENSOR",
        "TYPE" : "STRING"
    },
    "EXTRAHOPPORT" : {
        "DEFAULT" : "2003",
        "DESCRIPTION" : "PORT FOR EXTRAHOP FORWARDERS",
        "TYPE" : "STRING"
    }
    Note:Some PDF viewers might add extra newlines when copying and pasting commands. Make sure the text is correct before running the command.
  5. (Single stack) If you are deploying a single stack, format the user data script for CloudFormation by pasting the following code after "#!/bin/bash", "\n", in the "User Data" section:
    "curl --connect-timeout 10 --fail -k 'https://", { "Ref" : "ExtraHopIP" }, "/tools/install-rpcapd.sh' > install-rpcapd.sh" ,"\n",
    "sh install-rpcapd.sh ", { "Ref" : "ExtraHopIP" }, " ", { "Ref" : "ExtraHopPort" },"\n"

    If your template does not contain a "User Data" or "#!/bin/bash", "\n", section, you must create the sections to run the command, formatted as in the following example:

    "UserData" : {
        "Fn::Base64" : { "Fn::Join" : [ "", [
            "#!/bin/bash", "\n",
            "curl --connect-timeout 10 --fail -k 'https://", { "Ref" : "ExtraHopIP" }, "/tools/install-rpcapd.sh' > install-rpcapd.sh" ,"\n",
            "sh install-rpcapd.sh ", { "Ref" : "ExtraHopIP" }, " ", { "Ref" :
        "ExtraHopPort" },"\n"] ]
        }
    }

    Refer to the following example of the "Resources" attribute:

        "Resources" : {
            "Ec2Instance" : {
                "Type" : "AWS::EC2::Instance",
                "Properties" : {
                "SecurityGroups" : [ "security-group" ],
                "KeyName" : "key-name",
                "ImageId" : { "Ref" : "AMI" },
                "UserData" : {
                "Fn::Base64" : { "Fn::Join" : [ "", [
                "#!/bin/bash -v", "\n",
                "curl --connect-timeout 10 --fail -k 'https://", { "Ref" : "ExtraHopIP" }, "/tools/install-rpcapd.sh' > install-rpcapd.sh" ,"\n",
                "sh install-rpcapd.sh ", { "Ref" : "ExtraHopIP" }, " ", { "Ref" : "ExtraHopPort" },"\n"] ]
                }
            }   
        }
    }
    }

    (Auto Scaling groups) If you are monitoring Auto Scaling groups, format the user data script for CloudFormation by pasting the following code after "#!/bin/bash", "\n", in the "User Data" section:

    "curl --connect-timeout 10 --fail -k 'https://", { "Ref" : "ExtraHopIP" }, "/tools/install-rpcapd.sh' > install-rpcapd.sh" ,"\n",
    "sh install-rpcapd.sh ", { "Ref" : "ExtraHopIP" }, " ", { "Ref" : "ExtraHopPort" },"\n"
    If your template does not contain a "User Data" or "#!/bin/bash", "\n", section, you must create the sections to run this command, formatted as in the following example:
    "UserData" : {
        "Fn::Base64" : { "Fn::Join" : [ "", [
            "#!/bin/bash", "\n", "curl --connect-timeout 10 --fail -k 'https://", { "Ref" : "ExtraHopIP" }, "/tools/install-rpcapd.sh' > install-rpcapd.sh" ,"\n",
            "sh install-rpcapd.sh ", { "Ref" : "ExtraHopIP" }, " ", { "Ref" : "ExtraHopPort" },"\n"] ]
        }
    }

    Refer to the following example of the "LaunchConfig" attribute:

    "LaunchConfig": {
    "Type" : "AWS::AutoScaling::LaunchConfiguration",
    "Metadata" : {
    ...
    },
    "Properties": {
    ... "UserData" : { "Fn::Base64" : { "Fn::Join" : ["", [
    "#!/bin/bash -v\n",
    "curl --connect-timeout 10 -k 'https://[ExtraHopIP]/tools/install-rpcapd.sh' > install-rpcapd.sh","\n",
    "sh install-rpcapd.sh [ExtraHopIP] [Port]"]]
    }
    }
    }
    }
    Note:Updating user data parameters will not change the packet forwarder settings on instances that have already been created. The user data field is processed only on instance initialization.
  6. Save the template file.
  7. Click on the following link to access the CloudFormation Management Console: https://console.aws.amazon.com/cloudformation.
  8. Click Create New Stack.
  9. On the Create Stack page, complete the following actions:

    Stack Name: Type a name.

    Upload a Template File: Select this radio button.

    Choose File: Select the template file that you saved earlier.

  10. Click Continue.
  11. On the Specify Parameters page, enter the following parameters defined in the template:

    ExtraHopIP: Type your ExtraHop system IP address.

    ExtraHopPort: Type the port number, which is 2003 by default.

  12. Click Continue.
  13. From the Add Tags page, complete the Key and Value fields, and then click Continue.
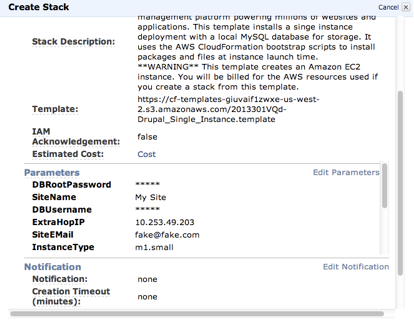
  14. Review the stack information and click Continue.
    The following figure shows configured stack information.

  15. Click Close.
    After the browser is redirected to the CloudFormation Management Console, view the status, which should be CREATE_IN_PROGRESS. When the stack is built, the status changes to CREATE_COMPLETE.
  16. Browse to the EC2 management console.
  17. Click the stack you just created and find the private IP address.
  18. Log in to the ExtraHop system to analyze packet-forwarding traffic.

Analyze packet forwarding traffic in the ExtraHop Web UI

To find out how much forwarded traffic the ExtraHop system is receiving, complete the following steps.

  1. Log in to the ExtraHop system through https://<extrahop-hostname-or-IP-address>.
  2. Click the System Settings icon and then click System Health to get more information about the packet forwarding traffic.

    The RPCAP Packets and Throughput graphs contain four metrics:

    Encapsulation

    The total number of RPCAP encapsulation packets received by the ExtraHop system.

    Tunnel Eligible
    Total number of packets eligible to be forwarded to the ExtraHop system.
    Tunnel Sent
    Total number of RPCAP-tunneled packets forwarded to the ExtraHop system.
    Tunnel Received
    Total number of RPCAP-tunneled packets received by the ExtraHop system. The Tunnel Eligible, Tunnel Sent, and Tunnel Received values are equal if the ExtraHop system is receiving and processing all the packets sent by the server.

    If the Tunnel Eligible, Tunnel Sent, and Tunnel Received values do not equal the Tunnel Received values, refer to the following troubleshooting scenarios:

    • If Tunnel Sent is less than Tunnel Eligible, the server is not able to forward out all the traffic. This condition might indicate that packet forwarding requires more processing or outbound bandwidth resources on the instance. Consider separating the forwarding process onto a separate CPU or allocating a dedicated interface for forwarding traffic.
    • If Tunnel Received is less than Tunnel Sent, the ExtraHop system is not receiving all the traffic forwarded by the instance. This condition might be due to network congestion or insufficient resources on the ExtraHop system. If you suspect it is the latter, contact ExtraHop Support.
Last modified 2023-11-07