Deploy the ExtraHop sensor on VMware
The following procedures explain how to deploy a virtual ExtraHop sensor on a VMware ESXi/ESX platform. You must have experience deploying virtual machines in vSphere within your virtual network infrastructure.
An ExtraHop virtual sensor can help you to monitor the performance of your applications across internal networks, the public internet, or a virtual desktop interface (VDI), including database and storage tiers. The ExtraHop system can monitor application performance across geographically distributed environments, such as branch offices or virtualized environments through inter-VM traffic.
This installation enables you to run network performance monitoring, network detection and response, and intrusion detection on a single sensor.
| Important: | Before you can enable the IDS module on this sensor, you must upgrade the sensor firmware to version 9.6 or later. When the upgrade completes, you can apply the new license to the sensor. |
System requirements
Your environment must meet the following requirements to deploy a virtual ExtraHop sensor in VMware vSphere:
- You must have familiarity with administering VMware vSphere.
Note: The images in this guide are examples only, and some of the menu selections might have changed. - You must have the ExtraHop deployment file, which is available on the ExtraHop Customer Portal
- You must have an ExtraHop sensor product key.
- You should upgrade to the latest patch for the vSphere environment to avoid any known issues.
Virtual machine requirements
You must provision a VMware vSphere virtual machine that most closely matches the virtual ExtraHop sensor size and meets module requirements.
| Sensor | Modules | CPU | RAM | Disk |
|---|---|---|---|---|
| EDA 1100v | EDA | 4 processing cores with hyper-threading support, VT-x or AMD-V technology, and 64-bit architecture. Streaming SIMD Extensions 4.2 (SSE4.2) and POPCNT instruction support. | 8 GB | 46 GB or larger disk for data storage (thick-provisioned) 250 GB or smaller disk for packet captures (thick-provisioned) |
| EDA 6100v | EDA | 18 processing cores with hyper-threading support, VT-x or AMD-V technology, and 64-bit architecture. Streaming SIMD Extensions 4.2 (SSE4.2) and POPCNT instruction support. | 64 GB | 1 TB or larger disk for data storage (thick-provisioned) 500 GB or smaller disk for packet captures (thick-provisioned) |
| EDA 6320v | EDA + IDS | 32 processing cores with hyper-threading support, VT-x or AMD-V technology, and 64-bit architecture. Streaming SIMD Extensions 4.2 (SSE4.2) and POPCNT instruction support. | 96 GB | 1.4 TB or larger disk for data storage (thick-provisioned) 500 GB or smaller disk for packet captures (thick-provisioned) |
| EDA 8320v | EDA + IDS | 64 processing cores with hyper-threading support, VT-x or AMD-V technology, and 64-bit architecture. Streaming SIMD Extensions 4.2 (SSE4.2) and POPCNT instruction support. | 192 GB |
2 TB or larger disk for data storage (thick-provisioned) 500 GB or smaller disk for packet captures (thick-provisioned) |
Hypervisor specifications
Your hypervisor must be able to support the following specifications for the virtual sensor.
- VMware ESX/ESXi server version 6.5 or later
- VMware vSphere client to deploy the OVF file and to manage the virtual machine
- (Optional) If you want to enable packet captures, configure an additional storage disk during deployment
Additional guidelines
To ensure proper functionality of the virtual sensor:
- Make sure that the VMware ESX/ESXi server is configured with the correct date and time.
- Always choose thick provisioning. The ExtraHop datastore requires low-level access to the complete drive and is not able to grow dynamically with thin provisioning. Thin provisioning can cause metric loss, VM lockups, and capture issues.
- Do not change the default disk size on initial installation. The default disk size ensures correct lookback for ExtraHop metrics and proper system functionality. If your configuration requires a different disk size, contact your ExtraHop representative before you make any changes.
- Do not migrate the VM. Although it is possible to migrate when the datastore is on a remote SAN, ExtraHop does not recommend this configuration. If you must migrate the VM to a different host, shut down the virtual sensor first and then migrate with a tool such as VMware VMotion. Live migration is not supported.
| Important: | If you want to deploy more than one ExtraHop virtual sensor, create the new instance with the original deployment package or clone an existing instance that has never been started. |
Network requirements
| Sensor | Management | Monitor |
|---|---|---|
| EDA 6100v | One 1 GbE network port is required (for management). The management interface must be accessible on port 443. The management interface can be configured as an additional ERSPAN/RPCAP target. | A 10 GbE network port is recommended for the physical port mirror. The physical port mirror interface must be connected to the port mirror destination on the switch. |
| EDA+IDS 6320v | One 1 GbE network port is required (for management). The management interface must be accessible on port 443. The management interface can be configured as an additional ERSPAN/RPCAP target. | A 10 GbE network port is recommended for the physical port mirror. The physical port mirror interface must be connected to the port mirror destination on the switch. |
| EDA+IDS 8320v | One 1 GbE network port is required (for management). The management interface must be accessible on port 443. The management interface can be configured as an additional ERSPAN/RPCAP target. |
A 10 GbE network port is recommended for the physical port mirror. The physical port mirror interface must be connected to the port mirror destination on the switch. |
| Important: | To ensure the best performance for initial device synchronization, connect all sensors to the console and then configure network traffic forwarding to the sensors. |
| Note: | For registration purposes, the virtual sensor requires outbound DNS connectivity on UDP port 53 unless managed by an ExtraHop console. |
Deploy the OVA file through the VMware vSphere web client
ExtraHop distributes the virtual sensor package in the open virtual appliance (OVA) format.
Before you begin
If you have not already done so, download the ExtraHop virtual sensor OVA file for VMware from the ExtraHop Customer Portal.-
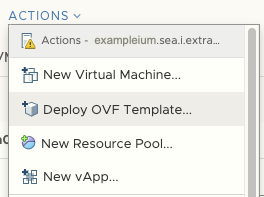
Select Deploy OVF Template… from the
Actions menu.
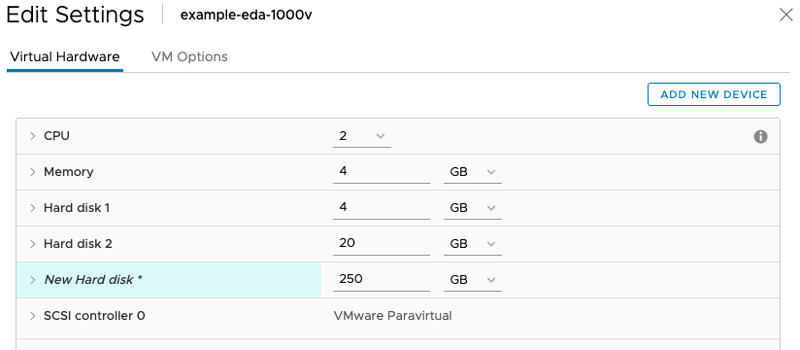
Add a packet capture disk in VMware vSphere
-
In the New Hard disk field, type a disk size, based on the sensor
you are deploying:
- 250 GB for the EDA 1100v
- 500 GB for the EDA 6100v
- 500 GB for the EDA+IDS 6320v
- 500 GB for the EDA+IDS 8320v
Configure a static IP address through the CLI
The ExtraHop system is configured by default with DHCP enabled. If your network does not support DHCP, no IP address is acquired, and you must configure a static address manually.
| Important: | We strongly recommend configuring a unique hostname. If the system IP address changes, the ExtraHop console can re-establish connection easily to the system by hostname. |
- Access the CLI through an SSH connection, by connecting a USB keyboard and SVGA monitor to the physical ExtraHop appliance, or through an RS-232 serial (null modem) cable and a terminal emulator program. Set the terminal emulator to 115200 baud with 8 data bits, no parity, 1 stop bit (8N1), and hardware flow control disabled.
- At the login prompt, type shell and then press ENTER.
- At the password prompt, type default, and then press ENTER.
-
To configure the static IP address, run the following commands:
Configure the sensor
Next steps
After the system is licensed, and you have verified that traffic is detected, complete the recommended procedures in the post-deployment checklist.Configure the IDS sensor
Next steps
Complete the recommended procedures in the post-deployment checklist.
Thank you for your feedback. Can we contact you to ask follow up questions?